
User's Manual


5
EN
2. Initiate Smart Cloud Camera
Smart Cloud Camera has built-in a Wi-Fi network and
can connect to the internet directly. Therefore, for the
first time use the Smart Cloud Camera, you need to set
up the Wi-Fi network and assign an available network
which can link to the internet for the camera from the AP
(Access Point) Mode.
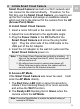
Install Smart Cloud Camera
1. Insert a micro SD card in the micro SD card slot.
2. Adjust the Lens Bracket to the applicable angle.
3. Plug the Power Cable in the DC In Port of the
Smart Cloud Camera and screw the plug holder
tight. Plug the other side of the USB cable to the
USB port of the AC Adaptor.
4. Insert the AC Adaptor to the wall AC outlet and the
Smart Cloud Camera power on.
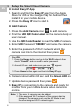
Access AP Mode
If the Smart Cloud Camera was never be used. It will
enter the AP Mode directly.
1. The Red Status LED light on about 8 seconds to
initiate it then blanking slowly 20 or more seconds
and active the Wi-Fi function.
2. The Ready LED blanking fast in Green when the
camera enters the AP Mode.
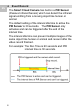
Note: 1. The Smart Cloud Camera has not built-in a battery. If
take out the camera from the AC outlet, the camera will
off-line and turn off.
2. All settings have saved in camera even power off.
When the power supply restore, the camera will turn
on and connect to the internet automatic.
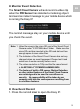
Note: Press the Reset Button to restore the default setting of
camera in AP Mode.