
User Manual


Valve/Rocker Arm Gap Adjustment
The valve clearance has been correctly set at the Saito
factory. Usually you will not have to make adjustments
until after several hours of normal operation. If you
experience a loss of power, of if the engine has been
disassembled due to a crash or repairs, the valve clear-
ances should be checked and readjusted as necessary.
We would also suggest that after approximately one hour
of break-in operation, you check the valve clearance
(distance between rocker arm (SAI50-41) and valve
stem (SAI91S-46)(FA56-46 for 100Ti)
When you check the valves, lubricate the moveable parts.
Also make sure the screw (see Figure 2 below) is in
tight before making adjustments to valves. The valves
should be adjusted when the engine is cold to prevent
errors due to thermal expansion.
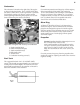
1. Remove the rocker arm cover by unscrewing the two
Allen screws from the rocker arm cover on top of the
cylinder head.
2. Turn the propeller over until compression is felt, then
turn it one-quarter turn more and stop. Both of the
valves should be closed at this time.
3. The correct valve clearance is between .03mm and
.10mm (.002"-.004"). Use the "feeler" gauge supplied
in the tool kit and measure between the valve stem and
rocker arm.
4. The feeler gauge should pass through the gap. To
adjust the gap, carefully loosen the locknut on the
rocker arm screw with the 5mm wrench supplied and
turn the adjusting screw with the 1.5mm Allen screw
provided and open or close the gap as required, then
retighten the adjusting screw.
5. Recheck the gap and readjust as necessary.
Carburetor Maintenance
Should you experience difficulty with the carburetor of
your engine, please refer to the following suggestions.
1. We suggest you use a filter when filling the tank,
and use a fuel filter between the tank and carburetor.
If you have been using a fuel filter, check it
periodically to remove trapped impurities.
2. Remove the high-speed needle valve (SAI200Ti-85)
and flush out the spray bar with clean fuel.
Replace the high-speed needle valve and follow
the instructions in the"Adjusting the Carburetor"section.
3. Periodically clean any material that may have
adhered to the carburetor body and remote needle
valve assembly.
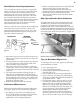
High-Speed Needle Valve Extension
The high-speed needle valve is designed to allow the
installation of an extension for those situations where
the engine is enclosed and it would be difficult to
reach the needle valve to make adjustments. Locate the
L-shaped rod included in the hardware and tool package.
Use the small Allen key provided to loosen the setscrew
in the high-speed needle valve. Insert the L-shaped rod
and retighten the setscrew.
Needle valve extension installed in HS Needle valve
Tips for Extended Engine Life
To add longer life to your Saito engine, the following
recommendations are made:
1. Use a high-quality fuel.
2. Use recommended glow plugs.
3. Use the proper propeller size and balance the
propeller prior to use.
4. Use a tachometer for precise engine adjustments
5. Use an "after-run" oil when you're finished flying
for the day. Evolution Blue Block Rust inhibitor is
recommended.(EVO×1000)
6. For long-term storage, make sure there is no fuel
left in the tank and the engine. Remove the glow
plug(s) and apply several drops of high-quality
light oil (e.g., a good quality light machine oil or
Marvel Air Tool Oil) to the top of the engine, into
the glow plug hole(s), down the push rod tubes,
and through the crankcase breather nipple
(SAI65-19). Rotate the crankshaft several times.
Store the engine in the box or on the airplane with
the nose down in order to keep oil in the bearings.
9
Tappet Adjustment
Screw
Figure 2
Adjust between
0.03-0.10mm(.002"-.004")
Gauge
(0.1mm Max.)
Needle valve extension