
Installation Instructions

COMPLETE PORCH & PATIO SCREENING SYSTEM
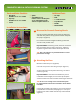
Splining the Screen
Measure each opening and cut each piece of screen
2 inches wider and longer than the opening. (Figure F)
Starting at one corner, hold the screen over the spline
channel and begin to roll spline in (Figure G). Roll spline
into inside channel of the opening your are screening in. If
the base does not divide two sections, you will only spline
into the one channel.
TIP: Beginners may find it easier to start at the top,
followed by each side and ending with the bottom.
Cut the spline when you reach the end of each side/corner
and begin with the next side (Figure H). Do not try to
wrap spline around corners or lay spline over the channels.
Spline must be cut at each corner so top caps can snap
into place.
Continue to spline in all 4 sides and be sure to pull the
screen tight to keep it wrinkle free.
Trim the excess screen o on all 4 sides using the knife
end of the tool. (Figure I)
Important Note: Complete all screen installation before
installing caps.
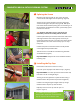
Installing the Top Caps
Re-measure each beam to ensure accuracy.
Cut each cap to the proper size with tin snips. ( Figure J)
Important Note: Since the caps will be visible in the end,
take extra care to cut straight edges.
Starting at one end, push the cap into the base using a
rubber mallet or the pressure of your hand. (Figure K)
Continue securing along the length of the cap using a
rubber mallet to tap the cap into the base.
Repeat process on each cap until all caps are
in plac
e. (Figure L)
3
4
Visit www.insectscreening.com for
more product information and to view our
step-by-step how-to installation video.
s
F
G
H
I
J
L
K