ARCHER S7 SPOT 380W LED Order code: SG ARCHER S7 MANUALE UTENTE USER MANUAL
Rev. 01-04/19 INDICE: 1. INTRODUZIONE p. 3 2. ISTRUZIONI DI SICUREZZA p. 4 3. APERTURA CONFEZIONE E CONTROLLO p. 6 4. INSTALLAZIONE ED ACCENSIONE p. 7 5. ISTRUZIONI PER L'USO p. 9 6. MANUTENZIONE p. 15 7. SPECIFICHE TECNICHE p. 15 INDEX: 1. INTRODUCTION p. 16 2. SAFETY INSTRUCTIONS p. 17 3. OPENING AND CONTROL p. 19 4. INSTALLATION AND SWITCH ON p. 20 5. SETUP p. 22 6. MAINTENANCE p. 28 7. TECHNICAL SPECIFICATIONS p.
1. INTRODUZIONE Grazie per avere scelto un nostro prodotto! Vi preghiamo di fare riferimento alle istruzioni e alle avvertenze contenute nel presente manuale per l’utilizzo del dispositivo e di conservarlo per future consultazioni. Il presente manuale contiene informazioni riguardanti l’installazione e l’utilizzo del dispositivo. Le informazioni contenute in questo documento sono state attentamente redatte e controllate. Tuttavia non è assunta alcuna responsabilità per eventuali inesattezze.
2. ISTRUZIONI DI SICUREZZA Attenzione! Questo prodotto non è adatto ad un uso domestico. Leggere il presente manuale prima di installare e dare corrente all’apparecchiatura, seguire le precauzioni di sicurezza elencate di seguito ed osservare tutti gli avvertimenti indicati nel presente manuale e stampati sull’apparecchiatura. Si prega di contattare un distributore PROEL per ricevere assistenza riguardo qualsiasi dubbio su come attivare l’apparecchiatura in modo sicuro.
CLASSE DI PROTEZIONE IP20 Il dispositivo è protetto contro la penetrazione di corpi solidi di dimensioni superiori a 12 mm (0.47”) di diametro (prima cifra 2), ma non contro la caduta di gocce d’acqua, pioggia, schizzi o getti d’acqua (seconda cifra 0). Usare solo in ambienti asciutti. Usare solo all’interno. Non esporre l’apparecchiatura a pioggia o ad umidità. PROTEZIONE CONTRO LE SCOSSE ELETTRICHE Il dispositivo deve essere collegato ad un sistema di alimentazione dotato di un’efficiente messa a terra.
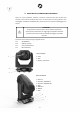
3. APERTURA DELLA CONFEZIONE E CONTROLLO Aprire con cura la confezione, verificare il contenuto e assicurarsi che tutte le parti siano presenti e siano in buone condizioni. Nel caso in cui alcune parti non siano presenti o siano danneggiate, contattare immediatamente il proprio fornitore e conservare l’imballaggio per la verifica.
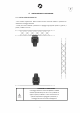
4. - INSTALLAZIONE ED ACCENSIONE 4.1 - INSTALLAZIONE PRODOTTO - Non scuotere l'apparecchio. Evitare l'utilizzo di forza eccessiva durante le operazioni di installazione o fissaggio dell'unità. - L'unità può essere installata a pavimento in appoggio sugli appositi piedini in gomma, a parete, a soffitto o su truss. ATTENZIONE! E' OBBLIGATORIO il montaggio della fune di sicurezza (PLH232 – PLH248 vendute separatamente) nel caso in cui il prodotto sia appeso a parete, a soffitto o su truss.
4.2 - COLLEGAMENTO ALLA LINEA DI ALIMENTAZIONE Il dispositivo deve essere collegato ad un sistema di alimentazione dotato di un’efficiente messa a terra. Inoltre, si consiglia di proteggere le linee di alimentazione dei prodotti dai contatti indiretti e/o da cortocircuiti verso massa utilizzando interruttori differenziali opportunamente dimensionati. Il collegamento alla rete elettrica deve essere effettuato da un installatore elettrotecnico qualificato.
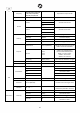
5. – ISTRUZIONI PER L’USO 5.1 – MAPPA DEL MENU’ DMX Address User Mode SET Network Wireless Status Fixture ID Function A001 – AXXX Assegnazione DMX 24 Channels Modalità 24 canali 34 Channels Modalità 34 canali 29 Channels Modalità 29 canali Net Protocol ArtNet/sACH Protocollo rete W-DMX OFF/ON On-Off wireless Operating Mode Receiver/Trasmitter Transmitting Mode G3/G4S Link Link/Unlink Receive Reset YES/NO No DMX Mode Black/Hold/Auto P. Reverse ON/OFF Inversione Pan T.
Frequency Power Mode 900/1000/1100/1200/1300 /1400/1500/2500/4000/ 5000/10K/15K/20K/25K Impostazione frequenza LED Normal/Theatre Impostazione modalità potenza Auto Head fan High Velocità ventola testa Low Fan Set 50% Base Fan 75% Velocità ventola base 90% LCD. Set Backlight 02-60m Timeout spegnimento schermo Flip Display OFF/ON Inversione display Key Lock OFF/ON Blocco display DispFlash OFF/ON Lampeggio display Channel Value Pan (000-255) Pan Fine (000-255) … Disp.
Clear Last Temp Info ON/OFF Cancellazione ultime conteggio ore Xxx °C Temperatura proiettore Fan Speed Informazione velocità ventole Error Info Pan, Tilt…. Errori del proiettore Model Info ARCHER S7 Info del modello Software V. Versione software 5.
9 11 12 11 13 15 16 17 155 – 169 170 – 189 190 – 221 222 – 223 224 – 255 Gobo 6 shake, da lento a veloce Gobo 7 shake, da lento a veloce Rotazione ruota Gobo in senso antiorario da veloce a lento No rotazione Rotazione ruota Gobo in senso orario da lento a veloce 000 – 127 128 – 189 190 – 193 194 – 255 Rotazione Gobo 1 Rotazione Gobo indicizzata Rotazione Gobo in senso antiorario da veloce a lento No rotazione Rotazione Gobo in senso orario da lento a veloce 000 – 004 005 – 017 018 – 030 031 – 0
12 14 18 13 15 19 14 16 20 15 17 21 16 17 18 19 20 21 18 19 20 22 23 24 000 – 127 128 – 189 190 – 193 194 – 255 Ruota animazione Nessuna funzione Rotazione oraria da veloce a lento Nessuna funzione Rotazione antioraria da lento a veloce 000 – 031 032 – 255 Prisma lineare Nessuna funzione Prisma lineare inserito 000 – 127 128 – 189 190 – 193 194 – 255 Rotazione prisma lineare Indicizzazione prisma Rotazione antioraria da veloce a lento Nessuna rotazione Rotazione oraria da lento
22 23 24 192 – 223 224 - 255 Strobo con effetto random da lento a veloce Shutter aperto 26 31 000 – 255 Dimmer Intensità da 0 % a 100% 27 32 000 – 255 Dimmer Fine Intensità dimmer Fine 28 29 33 34 000 – 020 021 – 040 041 – 060 061 – 080 081 – 100 101 – 255 Modalità dimmer Standard Stage TV Architetturale Teatrale Impostata su proiettore 000 – 079 080 – 084 085 – 087 088 – 090 091 – 093 094 – 096 097 – 099 100 – 255 Reset Nessuna funzione Reset di tutti i motori Reset motori PAN/TILT Rese
6. - MANUTENZIONE Per garantire ottime prestazioni, l’apparecchio deve essere pulito frequentemente. Scollegare l’apparecchio della corrente e lasciarlo raffreddare per almeno 35 minuti onde evitare il rischio di bruciature. Utilizzare un’aspirapolvere o compressore e una spazzola morbida o un panno per lenti per rimuovere la polvere depositata. Le lenti, come qualsiasi altra parte eventualmente danneggiata, devono essere sostituite con ricambi originali. 7.
1. - INTRODUCTION Thank You for choosing one of Our products! Please refer to the instructions and warnings contained in this user manual, please retain it for future reference. This manual contains information about the installation and use of the device. The information contained in this publication has been carefully prepared and checked. However it is not assumed any responsibility for any inaccuracies.
2. - SAFETY INSTRUCTIONS Caution! This product is not suitable for household illumination. Please read this manual before installing and applying power to the equipment, follow the safety precautions listed below and observe all warnings in this manual and printed on. Please contact a PROEL distributor for assistance with any questions about how to activate the equipment safely. Contact a qualified technician for any maintenance work not described in this manual.
IP20 PROTECTION RATING The device is protected against the penetration of solid bodies larger than 12 mm (0,47 ") in diameter (first digit 2), but not against dripping water, rain, splashes or jets of water (second digit 0). Use only in dry areas. Inside use only. Do not expose the equipment to rain or moisture. PROTECTION AGAIN ELECTRIC SHOCK The device must be connected to a power supply system with efficient earthing.
3. - OPENING AND CONTROL Carefully open the package, check the content and make sure that all the parts are present and are in good condition. In cases where some parts are not present or are damaged, immediately contact Your supplier and retain the packaging for verification. WARNING! If the product has been exposed to drastic temperature changes, let the unit turned off until it reaches room temperature because the presence of condensation can damage the product if it is turned on.
4. - INSTALLATION AND SWITCH ON 4.1 - PRODUCT INSTALLATION - Do not shake the device. Avoid the use of too much force during installation or unit fixing. - The unit can be installed on the floor resting on the rubber feet, on the wall, ceiling or on a truss. WARNING! IT'S REQUIRED the mounting of the safety rope (PLH232 – PLH248) sold separately) in the case where the product is hung on a wall, ceiling or on a truss. Except when the device is placed in the floor, the safety cable is always required.
4.2 - CONNECTION TO THE MAINS The device must be connected to a power supply system with a proper earth system. Moreover, it is recommended to protect power supply lines of the products from indirect contact and / or shorting to earth by using appropriately sized anti electrical shock switch. The electrical connection must be carried out by a qualified electrician. Ensure that the mains frequency and voltage correspond to those for which the device is designed, as shown in the electrical data label. 4.
5. - SETUP 5.1 – MENU DMX Address User Mode SET Network Wireless Status Fixture ID Function A001 – AXXX DMX address 24 Channels 24 channels mode 34 Channels 34 channels mode 24 Channels 24 channels mode Net Protocol ArtNet / sACH W-DMX OFF/ON On-Off wireless Operating Mode Receiver/ Trasmitter Wireless mode Transmitting Mode G3/G4S Link Link/Unlink Receive Reset YES/NO No DMX Mode Black/Hold/Auto P. Reverse ON/OFF Pan reverse T.
Frequency Power Mode 900/1000/1100/1200/1300 /1400/1500/2500/4000/50 00/10K/15K/20K/25K Frequency setting Normal/Theatre Power mode setting Auto Head fan High Head Fans setting Low Fan Set 50% Base Fan 75% Base Fan setting 90% LCD.
Temp Info Xxx °C Temperature Fan Speed Fans speed information Error Info Pan, Tilt…. Projector errors Model Info ARCHER S7 Model info Software V. Software version 5.
9 10 11 11 12 13 15 16 17 190 – 221 222 – 223 224 – 255 Gobo wheel rotation counter clockwise from fast to slow No rotation Gobo wheel rotation clockwise from slow to fast 000 – 127 128 – 189 190 – 193 194 – 255 Gobo 1 rotation Gobo rotation index Gobo rotation counter-clockwise from fast to slow No rotation Gobo rotation clockwise from slow to fast 000 – 004 005 – 017 018 – 130 031 – 043 044 – 056 057 – 069 070 – 082 083 – 095 096 – 108 109 – 121 122 – 134 135 – 147 148 – 160 161 – 173 174 – 1
12 14 18 13 15 19 14 16 20 15 17 21 16 17 18 19 20 21 18 19 20 22 23 24 000 – 127 128 – 189 190 – 193 194 – 255 Animation wheel No function Clockwise rotation from fast to slow No function Counter-clockwise rotation from slow to fast 000 – 031 032 – 255 Linear Prism No function Linear prism inserted 000 – 127 128 – 189 190 – 193 194 – 255 Linear prism rotation Prism indexing Counter-clockwise rotation from fast to slow No rotation Clockwise rotation from slow to fast 000 – 031
22 23 24 192 – 223 224 - 255 Strobe with random effects from slow to fast Shutter open 26 31 000 – 255 Dimmer Intensity from 0 % to 100% 27 32 000 – 255 Dimmer Fine Intensity dimmer Fine 28 29 33 34 000 – 020 021 – 040 041 – 060 061 – 080 081 – 100 101 – 255 Dim Modes Standard Stage TV Architectural Theater Default to Unit Setting 000 – 079 080 – 084 085 – 087 088 – 090 091 – 093 094 – 096 097 – 099 100 – 255 Reset No function Reset of all motors PAN / TILT motors reset Color motors rese
6. - MAINTENANCE To ensure optimal performance, the unit must be frequently cleaned. Unplug the device from the mains and let it cool for at least 35 minutes to avoid the risk of burns. Use a vacuum cleaner or an air compressor and a soft brush or a lens cloth to remove the dust deposited. The lenses, like any other damaged part, must be replaced with original spare parts. 7.