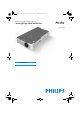
PPX4350_UM_EN_253xxxxxx.book Page 1 Mardi, 16. septembre 2014 12:52 12 Register your product and get support at www.philips.
PPX4350_UM_EN_253xxxxxx.book Page 2 Mardi, 16. septembre 2014 12:52 12 Table of contents Dear Customer ....................................................................3 About this User Manual 3 What's in the Box 3 Product Highlights 3 WiFiDisplay (Miracast) ........................................................3 General Safety Information .....................4 Setting up the Device ..........................................................4 Power Supply .............................................
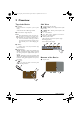
PPX4350_UM_EN_253xxxxxx.book Page 3 Mardi, 16. septembre 2014 12:52 12 Dear Customer What's in the Box Thank you for purchasing our Pocket Projector. We hope you enjoy your device and its many functions! 1 – PicoPix Projector 2 – Quick Start Guide About this User Manual With the installation guide on the following pages, you can start using your device quickly and easily. Detailed descriptions can be found in the following sections of this user manual. Read the entire user manual carefully.
PPX4350_UM_EN_253xxxxxx.book Page 4 Mardi, 16. septembre 2014 12:52 12 1 General Safety Information Do not make any changes or settings that are not described in this user manual. Physical injury or damage to the device or loss of data can result from improper handling. Take note of all warning and safety notes indicated. Setting up the Device The unit is for indoor use only. The device should be placed securely on a stable, flat surface.
PPX4350_UM_EN_253xxxxxx.book Page 5 Mardi, 16. septembre 2014 12:52 12 Repairs Do not repair the device yourself. Improper maintenance can result in injuries or damage to the device. Your device must be repaired by an authorised service centre. Find details of authorised service centres on the warranty card. Do not remove the type label from your device; this would void the warranty.
PPX4350_UM_EN_253xxxxxx.book Page 6 Mardi, 16.
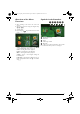
PPX4350_UM_EN_253xxxxxx.book Page 7 Mardi, 16. septembre 2014 12:52 12 Overview of the Menu Functions Symbols in the Statusbar 12 3 45 6 1 After switching on the device the main menu appears. 2 Select the desired menu using the navigation keys / , À/Á. 3 Confirm with à. 4 By pressing the key you will return to the main menu.
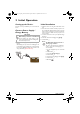
PPX4350_UM_EN_253xxxxxx.book Page 8 Mardi, 16. septembre 2014 12:52 12 3 Initial Operation Setting up the Device Initial Installation A tripod accessory is available if you can to elevate the device. 1 Switch the device on using the on/off switch on the side. 2 Turn the device towards a suitable projection surface or wall. Note that the distance to the projection surface must be a minimum of 0.3 meters and a maximum of 2.1 meters. Make sure the projector is in a secure position.
PPX4350_UM_EN_253xxxxxx.book Page 9 Mardi, 16. septembre 2014 12:52 12 4 + functions Functions are available for you to use your projector as a pocket flashlight, emitting a flash or a SOS bright. CAUTION! These functions use a lot of energy, make sure your battery is charged before using them. The SOS light can not be seen as an emergency beacon. Flashlight Allows to use the Pocket Projector as a flashlight. Warning light Your Pocket Projector can emit a flash of red or orange.
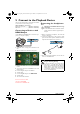
PPX4350_UM_EN_253xxxxxx.book Page 10 Mardi, 16. septembre 2014 12:52 12 5 Connect to the Playback Device Only use the supplied cable or cables that are available as accessories to connect the projector. Cables available as accessories Mini Display port cable ............. (PPA1270 / 253xxxxxx) MHL cable .................................... (PPA1240 / 253520048) Connecting to Devices with HDMI Output Use the HDMI to mini HDMI cable to connect the projector to a computer or laptop.
PPX4350_UM_EN_253xxxxxx.book Page 11 Mardi, 16. septembre 2014 12:52 12 6 Memory Inserting a Memory Card 1 Insert a memory card with the contacts facing downwards into the slot at the side of the device. Your device supports the following memory cards: Micro SD/SDHC/SDXC. 2 Insert the memory card into the slot until it snaps into position. DANGER! Connecting USB Storage Medium 1 Connect the USB storage medium to the USB cable of the device. describe here how to connect iOS and Android devices.
PPX4350_UM_EN_253xxxxxx.book Page 12 Mardi, 16.
PPX4350_UM_EN_253xxxxxx.book Page 13 Mardi, 16. septembre 2014 12:52 12 8 Bluetooth Activating the Bluetooth connection 1 Switch the device on using the on/off switch on the side. 2 After the initial screen the main menu appears. 9 Modify the desired settings. Menu Description Select device The list shows all paired devices. Paired device To unconnect or unpair the paired device. to finish settings and possibilities with bluetooth.
PPX4350_UM_EN_253xxxxxx.book Page 14 Mardi, 16. septembre 2014 12:52 12 9 Media Playback File Format Notice Best Settings for Optimal Use Read the informations on the best settings in the chapter settings (see also Settings, page 17) for optimal use of your device. Video playback Video Playback (USB / MICRO SD / Internal Memory) 1 2 3 4 5 Switch the device on using the on/off on the side. After the initial screen the main menu appears. Use the navigation keys to select Videos. Confirm with à.
PPX4350_UM_EN_253xxxxxx.book Page 15 Mardi, 16. septembre 2014 12:52 12 Modify settings during playback 1 Press the or key. 2 Use the / keys to choose from the following settings: Volume: Adjust volume level Smart Settings: Select predefined settings for brightness / contrast / colour saturation Saturation: Adjust colour saturation Contrast: Adjust contrast Brightness: Adjust brightness 3 Modify the setting using À/Á. The device saves the modified settings automatically.
PPX4350_UM_EN_253xxxxxx.book Page 16 Mardi, 16. septembre 2014 12:52 12 Managing Files Notice Error If errors occur during the copying process, make sure that enough free space is available on the medium. Removing Storage Medium Only remove the storage medium after the copy process is complete. Copy Files You can copy files back and forth from the internal memory to the connected USB storage medium or memory card. 1 Switch the device on using the on/off switch on the side.
PPX4350_UM_EN_253xxxxxx.book Page 17 Mardi, 16. septembre 2014 12:52 12 10 Settings 1 Switch the device on using the on/off switch on the side. 2 After the initial screen the main menu appears. 3 Use the navigation keys to select Settings. 4 Confirm with à. 5 Use / to select from the following settings. 6 Confirm with à. 7 Modify the settings using à, / , 8 Confirm with à. The key takes you one step back in the menu.
PPX4350_UM_EN_253xxxxxx.book Page 18 Mardi, 16. septembre 2014 12:52 12 11 Service Care Instructions for the Battery The capacity of the battery diminishes with time. You can prolong the life of the battery if you observe the following points: • Without a power supply, the device operates from the built-in battery. When the battery does not have sufficient capacity, the device turns off. Connect the device to the power supply.
PPX4350_UM_EN_253xxxxxx.book Page 19 Mardi, 16. septembre 2014 12:52 12 Cleaning DANGER! Instructions for Cleaning! Use a soft, lint-free cloth. Never use liquid or easily flammable cleansers (sprays, abrasives, polishes, alcohol, etc.). Do not allow any moisture to reach the interior of the device. Do not spray the device with any cleaning fluids. Wipe over the surfaces gently. Be careful that you do not scratch the surfaces.
PPX4350_UM_EN_253xxxxxx.book Page 20 Mardi, 16. septembre 2014 12:52 12 Troubleshooting 1 Switch the device off using the on/off switch on the side. 2 Wait at least ten seconds. 3 Switch the device on using the on/off switch on the side. 4 If the problem repeats, please contact our technical customer service or your retailer. Power Cycling If a problem occurs that cannot be corrected with the instructions in this user manual (see also the help below), follow the steps given here.
PPX4350_UM_EN_253xxxxxx.book Page 21 Mardi, 16. septembre 2014 12:52 12 Problems Solutions Devices changes from maximum level of brightness to • minimum level of brightness when the device is connected over USB to play videos. • Bad image or color quality when connecting with HDMI • Service When the environment temperature is too high, the devices turns automatically from maximum level of brightness to minimum level of brightness in order to protect the high power LED.
PPX4350_UM_EN_253xxxxxx.book Page 22 Mardi, 16. septembre 2014 12:52 12 12 Appendix Technical Data Accessories Dimensions (L¦×¦H¦×¦W)........................ 97 x 17 x 54 ¦mm Weight ............................................................................ 120 g Recommended Ambient........................................5¦–¦35¦ºC Relative Humidity ..................15¦–¦85¦% (non-condensing) File format................... *.mp4, *.avi, *.mov, *.mkv, *.mpg, ..................................*.mpeg, *.
PPX4350_UM_EN_253xxxxxx.book Page 23 Mardi, 16. septembre 2014 12:52 12 The CE marking certifies that the product meets the main requirements of the European Parliament and Council directives 1999/5/CE, 2006/95/CE, 2004/108/ CE and 2009/125/CE on information technology equipment, regarding safety and health of users and regarding electromagnetic interference. The declaration of compliance can be consulted on the site www.picopix.philips.com.
PPX4350_UM_EN_253xxxxxx.book Page 24 Mardi, 16. septembre 2014 12:52 12 PHILIPS and the PHILIPS’ Shield Emblem are registered trademarks of Koninklijke Philips N.V. and are used by Sagemcom Documents SAS under license from Koninklijke Philips N.V. È 2014 Sagemcom Documents SAS All rights reserved Sagemcom Documents SAS Documents Business Unit Headquarters : 250, route de l’Empereur 92848 Rueil-Malmaison Cedex · FRANCE Tel: +33 (0)1 57 61 10 00 · Fax: +33 (0)1 57 61 10 01 www.sagemcom.