Register your product and get support at www.philips.
Table of Contents Overview ................................................... 2 8 Digital TV Playback........................... 27 Dear Customer ................................................................... About this User Manual ..................................................... What's in the Box ............................................................... Product Highlights .............................................................. Connecting the Aerial ...............................
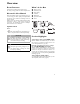
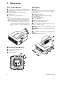
Overview Dear Customer What's in the Box Thank you for purchasing our Pocket Projector. We hope you enjoy your device and its many functions! 1 – Remote Control 2 – PicoPix Projector 3 – Power supply 4 – USB cable 5 – HDMI cable 6 – Quick Start Guide 7 – Pouch About this User Manual With the installation guide on the following pages, you can start using your device quickly and easily. Detailed descriptions can be found in the following sections of this user manual. Read the entire user manual carefully.
1 General Safety Information Do not make any changes or settings that are not described in this user manual. Physical injury or damage to the device or loss of data can result from improper handling. Take note of all warning and safety notes indicated. Setting up the Device The unit is for indoor use only. The device should be placed securely on a stable, flat surface.
Power Supply Wireless Network (WLAN) Use only the enclosed power adapter (see chapter Appendix / Technical Data). Check whether the mains voltage of the power supply matches the mains voltage available at the setup location. This equipment complies with the voltage type specified on the unit. The capacity of the battery diminishes with time. If the device functions only with the power supply, the battery is defective. Contact an authorised service centre to replace the battery.
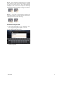
2 Overview Top of the Device Side View 1 – Touchpad for navigation and operation of the mouse pointer (see also Touchpad / Gestures, page 7) 2 – LED status bar Blue: device switched on / device in standby Off: device off 3 – Focus wheel for image sharpness. 1 – Reset hole The Pocket Projector is unresponsive or hung up: insert a slim, pointy object into the reset hole to trigger a hardware reset.
1 ý – USB port for a USB storage medium, DVB-T stick, mouse or keyboard. 2 – Lens Bottom of the Device 1 – Tripod socket a a b Pico Station Front View (not included) The Pico Station docking station has its own battery, with which you can extend the replay time of the device. The inbuilt speakers ensure improved sound quality during playback. The Pico Station has a DVB-T adapter so that you can directly connect a DVB-T adapter.
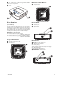
Touchpad / Gestures Input Area The touchpad is a touch-sensitive surface. Touch the touchpad with one or more fingers to move the cursor, navigate in the menu, select menu options or carry out other actions. The input area is limited by the navigation area/scrolling area. You can control the cursor using gestures in the input area. CAUTION! Ballpoint Pens! Do not use a ball-point pen or other objects to operate the touchpad. Hard and sharp objects may damage the touchpad.
Zoom – Place the thumb and forefinger in the middle of the input area and separate them slowly to magnify an image or document. Zoom – Place the thumb and forefinger in the corners of the input area and bring them slowly together to magnify an image or document. Rotate – Touch the touchpad with the thumb and swipe the forefinger in a circular pattern in the direction in which you want to rotate the image.
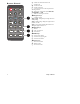
Remote Control B – Switches the device hibernation mode t – Call the menu u – Call the main menu v – Call the search menu ¿ – One menu step back, one directory level back / cancelling a function w – Switch to the external video input HDMI, AV, COMPONENT or VGA x – DVB-T mode: change to favourites 1 Navigation keys à – Confirms selection ¡/¢, À/Á – Navigation keys / navigate the menu / modify settings ¡/¢ – Modify settings / during music playback select previous, next title À/Á – During music playback adjus
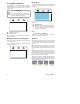
Overview of the Menu Functions Symbols in the Statusbar 123456 1 After switching on the device the main menu appears. 2 Select the desired menu using the navigation keys À/Á. 3 Confirm with à. 4 By pressing the u key you will return to the main menu.
3 Initial Operation Setting up the Device You can position the device so that it lies flat on a table in front of the projection surface; it is not necessary to tilt it towards the projection surface. The device compensates for the distortion from the slanted projection (pincushion distortion). Connect Power Supply / Charge Battery CAUTION! Mains Voltage at the Site of Installation! Check whether the mains voltage of the power supply matches the mains voltage available at the setup location.
2 Insert the new batteries into the battery compartment with the positive and negative poles as shown on the back of the remote control. Make sure the polarities(+ and -) are aligned correctly. Using the Remote Control Point the remote control at the remote sensor on the back of the device. The remote can be used within an angle of 60 degrees and up to 5 meters from the device. When using the remote control, no obstacle should be placed between the remote control and remote sensor.
Initial Installation 1 Push for about 3 seconds the on/off switch on the side to turn the device on. 2 Turn the device towards a suitable projection surface or wall. Note that the distance to the projection surface must be a minimum of 0.5 meters and a maximum of 5 meters. Make sure the projector is in a secure position. 3 Use the focus wheel on the top to adjust the image sharpness. 4 Select the desired menu language using ¡/¢. 5 Confirm with à.
4 Connect to the Playback Device Supplied cables Connecting to an iPhone/ iPad/iPod HDMI cable USB cable Use the iPhone/iPad/iPod-HDMI cable (not supplied) to connect the projector to an iPhone/iPad/iPod. Only use the supplied cable or cables that are available as accessories to connect the projector. Cables available as accessories Component Video Cable YUV / YPbPr .............................................. (PPA1210 / 253447083) Video-(CVBS) cable ...................
Connecting to a Computer (VGA) Notice Many laptops do not activate the external video output automatically when you connect a second display such as a projector. Check your laptop's manual to find out how to activate the external video output. Connecting Using an Audio/ Video (CVBS) Adapter Cable Use the projector's audio/video adapter cable (A/V cable) (not included) to connect camcorders, DVD players or digital cameras.