
Technical information


Proc Sheet 1 10
myC3-2
5HPRYHDQG3ODFHWKHDVVHPEOHGXSKRXVLQJ
1/2
7RROV
-
Cross shaped screwdriver
- Equipment to remove the hinge of PN .
3UHOLPLQDU\RSHUDWLRQ
1. Remove the battery ( Proc sheet 0 01).
2. Remove the back cover ( Proc sheet 1 01).
3. Remove the volume control key ( Proc sheet 1 22 ).
4. Remove the keypad ( Proc sheet 1 04 ).
5. Remove the micro rubber ( Proc sheet 1 05 ).
6. Remove the equipped electronic board ( Proc sheet 1 18 ).
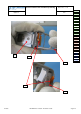
5HPRYDOSURFHGXUH
1. Press the hinge (2) inside the front cover by means of (curved) tweezers ( 5 ) or the equipment to
remove the hinge to release the equipped flip (1)
2. Remove delicately the flex PCB (3) from the front cover
3. Remove the equipped flip (1).
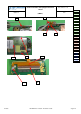
3ODFHPHQWSURFHGXUH
1. Position the equipped flip in its housing by inserting the flex PCB (3) into the front cover ( 4 ),
2. Press firmly the hinge (2) with a flat screwdriver, to fix the equipped flip (1) on the front cover to not
damage the FPC of display ( 3 ).
)XUWKHURSHUDWLRQV
1. Place the equipped electronic board ( Proc sheet 1 18 ).
2. Place the micro rubber ( Proc sheet 1 05 ).
3. Place the keypad ( Proc sheet 1 04 ).
4. Place the volume control key ( Proc sheet 1 22 )
5. Place the back cover ( Proc sheet 1 01).
6. Place the battery pack ( Proc sheet 0 01).
Procedure
Proc 0 01
Proc 1 01
Proc 1 02
Proc 1 03
Proc 1 04
Proc 1 05
Proc 1 08
Proc 1 10
Proc 1 18
Proc 1 20
Proc 1 22
Proc 2 01
Proc 2 03
Proc 3 01
Proc 3 02
Proc 4 01
Symptom
Symp 01
Symp 02
Symp 03
Symp 04
Symp 05
Symp 06
Symp 07
Symp 08
Symp 10
Test
Test 01
Test 02
Test 03
Test 04
Test 05
Test 06
Contents REF MTB DTS 1- Indice D - November 10 2005 Page 5-15