the Smoking Gun™ BSM600/SSM600 EN QUICK GUIDE DE KURZANLEITUNG FR GUIDE RAPIDE NL SNELSTARTGIDS IT GUIDA RAPIDA ES GUÍA RÁPIDA PT MANUAL RÁPIDO
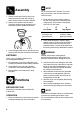
Contents 2 Sage® Recommends Safety First 5 Components 6 Assembly 6 Functions 7 Tips 7 Care & Cleaning 8 Troubleshooting 9 Guarantee SAGE® RECOMMENDS SAFETY FIRST At Sage® we are very safety conscious. We design and manufacture consumer products with the safety of you, our valued customer, foremost in mind. In addition we ask that you exercise a degree of care and adhere to the following precautions.
EN • Cleaning of the appliance should not be carried out by children unless they are aged 8 years or older and supervised. • The appliance should be kept out of the reach of children aged 8 years or younger. • This product is intended for household use only. Do not use this product for anything other than its intended use. Do not use in moving vehicles or boats. • It is recommended to regularly inspect the product.
• Batteries can contain flammable substances. If handled improperly, batteries may leak, heat up, ignite, or exploded, which could damage the device and your health. • Keep batteries away from children. If swallowed, they can be life-threatening. If a battery has been swallowed, seek immediately medical help. • Do not throw batteries into the fire, do not short-circuit them, and do not take them apart. • Do no dismantle, open or shred secondary cells or batteries.
EN Components C B A D G F E A. B. C. D. On / off switch Removable burn chamber Removable mesh filter Die-cast barrel E. Silicone hose F. Robust housing G. Battery operated Rating Information 6V (4x1.
Assembly 1. Place the mesh filter in the top of the burn chamber and press down with a finger to seat it into the bottom of the burn chamber. 2. Place the burn chamber into the barrel. Push down until the spring around the burn chamber provides a small click sensation. NOTE Do not overfill the burn chamber. The wood chips should just cover the mesh filter area with a thin layer. 2. Press down the power switch located on the rear of the main unit, to activate the fan at high speed.
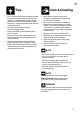
EN Tips • Only 3 minutes under smoke is all that is needed to provide smoke flavour and aroma for meats, fish, fruits, or vegetables after cooking. Simply place the food in a covered casserole, stockpot, Dutch oven, or other covered dish / pan and inject smoke under the lid. • Don’t place hose directly in the food. Place it just slightly above. • Continuous smoking with the Smoking Gun™ is NOT required.
Troubleshooting POSSIBLE PROBLEM Fan not starting. No smoke generated. Not enough smoke. 8 EASY SOLUTION • Check orientation of batteries. • Switch not turned to High or Low speed. • Replace batteries. • Ensure mesh filter is not blocked. • Ensure the hose is not blocked. • When using a container ensure there is an outlet for the air to escape. • Ensure the fan starts when the switch is pressed to High or Low. • Ensure wood chips are dry and small. • Increase fan speed to High.
EN Guarantee 2 YEAR LIMITED GUARANTEE Sage Appliances guarantees this product for domestic use in specified territories for 2 years from the date of purchase against defects caused by faulty workmanship and materials. During this guarantee period Sage Appliances will repair, replace, or refund any defective product (at the sole discretion of Sage Appliances). All legal warranty rights under applicable national legislation will be respected and will not be impaired by our guarantee.
Inhalte 10 Sage® Empfiehlt: Sicherheit Geht Vor 14 Bestandteile 15 Montage 15 Funktionen 16 Tipps 16 Pflege & Reinigung 17 Fehlerbehebung 18 Garantie SAGE® EMPFIEHLT: SICHERHEIT GEHT VOR Wir bei Sage® sind sehr sicherheitsbewusst. Beim Design und bei der Herstellung unserer Geräte denken wir zu allererst an Ihre Sicherheit. Darüber hinaus bitten wir Sie, bei der Verwendung jedes Elektrogeräts angemessene Sorgfalt anzuwenden und sich an die folgenden Vorsichtsmaßnahmen zu halten.
DE • Smoking Gun™ nur nutzen, wenn das Gerät richtig zusammengesetzt ist. Bitte die Anweisungen in dieser Broschüre befolgen. • Produkt während des Betriebs nicht unbeaufsichtigt lassen. • Keine heißen Oberflächen berühren. • Zur Reinigung des Produkts keine scheuernden oder ätzenden Reinigungsmittel verwenden. • Produkt sauber halten. Die Reinigungs- und Pflegeanweisungen in dieser Broschüre befolgen. • Kinder nicht mit dem Gerät spielen lassen.
• Die Röhre und die Brennkammer der Smoking Gun™ werden beim Gebrauch sehr heiß. Gerät vollständig abkühlen lassen, ehe Sie die Röhre oder Brennkammer berühren, reinigen oder lagern. • Smoking Gun™ stets aufrecht lagern. Wenn das Gerät gekippt wird, können aus der Brennkammer heiße Räuchermaterialien herausfallen und Brandgefahr verursachen. • Asche und verbrannte Materialien immer in einen nicht entflammbaren Behälter entleeren.
DE • Batterien von Kindern fern halten. Verschlucken kann lebensgefährlich sein. Bei Verschlucken einer Batterie sofort ärztliche Hilfe in Anspruch nehmen. • Batterien nicht in offenes Feuer werfen, nicht kurzschließen und nicht zerlegen. • Sekundärzellen oder Batterien nicht zerlegen, öffnen oder zerkleinern. • Leere Batterien sofort aus dem Gerät entnehmen, da diese leichter auslaufen können. • Batterie soweit möglich bei Nichtgebrauch aus dem Gerät nehmen.
Bestandteile C B A D G F E A. B. C. D. Ein / Aus Schaltertaste Abnehmbare Räucherkammer Abnehmbares Filtersieb Druckguss-Zylinder E. Silikonschlauch F. Robustes Gehäuse G. Batteriebetrieben Leistungsangaben 6V (4x1.
DE Montage 1. Legen Sie das Filtersieb oben in die Räucherkammer ein und drücken Sie es mit einem Finger nach unten, bis es in den Boden der Räucherkammer eingesetzt ist. 2. Stellen Sie die Räucherkammer in den Zylinder. Drücken Sie dann nach unten, bis Sie ein leichtes Einklicken der Feder um die Räucherkammer wahrnehmen. BETRIEB 1. Legen Sie eine kleine Menge Holzschnitzel (oder gewünschte Rauchmateralien) in die Räucherkammer. HINWEIS Überfüllen Sie die Räucherkammer nicht.
6. Lassen Sie das Gerät ganz abkühlen, wenn Sie mit dem Verbrennen fertig sind. 7. Wenn das Gerät vollständig abgekühlt ist, kann die Räucherkammer abgenommen werden, indem sie aus dem Zylinder gezogen wird. HINWEIS Drehen Sie die Räucherkammer um und klopfen Sie diese auf einer harten Oberfläche aus, um alle verbliebenen Holzschnitzel zu entfernen.Es wird angeraten, die Räucherkammer zu reinigen, bevor Sie sie wieder zusammensetzen.
DE Fehlerbehebung MÖGLICHES PROBLEM Der Ventilator startet nicht. Es wird kein Rauch erzeugt. Nicht genug Rauch. EINFACHE LÖSUNG • Überprüfen Sie, ob die Batterien richtig eingesetzt sind. • Die Schaltertaste ist nicht auf hohe oder niedrige Geschwindigkeit gedrückt. • Tauschen Sie die Batterien. • Stellen Sie sicher, dass das Filtersieb nicht verstopft ist. • Stellen Sie sicher, dass der Schlauch nicht verstopft ist.
Garantie 2 JAHRE BESCHRÄNKTE GARANTIE Sage Appliances gibt auf dieses Produkt für den häuslichen Gebrauch in bestimmten Gebieten eine Garantie über 2 Jahre ab Kaufdatum für Mängel, die durch fehlerhafte Verarbeitung und Materialien verursacht wurden. Während dieser Garantiezeit wird Sage Appliances jedes fehlerhafte Produkt reparieren, ersetzen oder das Geld zurückerstatten (nach eigenem Ermessen von Sage Appliances).
the Smoking Gun™ FR GUIDE RAPIDE
• Une version téléchargeable de ce document est également disponible sur sageappliances.com. • Retirez tous les emballages et 2 Mesures importantes de sécurité les étiquettes promotionnelles 5 Composants avant d'utiliser the Smoking 6 Assemblage Gun™ pour la première fois. 6 Fonctions • Ne placez pas the Smoking 7 Astuces Gun™ au bord d'une table ou d'un 7 Entretien et nettoyage comptoir pendant son utilisation. 8 Dépannage Assurez-vous que la surface est 8 Garantie plane, propre et sèche.
FR • Les enfants ne doivent pas jouer avec l'appareil. • Cet appareil peut être utilisé par des enfants âgés d'au moins 8 ans et des personnes aux capacités mentales, sensorielles ou physiques réduites, ou ayant peu d'expérience et de connaissances uniquement sous supervision ou s'ils ont reçu des instructions sur l'utilisation sécuritaire de l'appareil et qu'ils comprennent les risques impliqués.
• • • • • torche ou un autre dispositif de chauffage, car une chaleur excessive pourrait endommager l'appareil. Ne dirigez pas the Smoking Gun™ vers une personne ou un objet inflammable. Évitez d'utiliser the Smoking Gun™ dans des endroits où la fumée pourrait activer les détecteurs de fumée ou les systèmes anti-incendie.
FR Composants C B A D G F E A. B. C. D. Interrupteur marche/arrêt Chambre de combustion amovible Filtre à mailles amovible Canon moulé E. Tuyau en silicone F. Structure résistante G.
Assemblage 1. Placez le filtre à mailles dans le haut de la chambre de combustion et appuyez avec un doigt pour le faire descendre. 2. Placez la chambre de combustion dans le canon. Poussez vers le bas jusqu'à ce que le ressort autour de la chambre de combustion émette un clic. REMARQUE Ne remplissez pas trop la chambre de combustion. Les copeaux de bois doivent simplement recouvrir d'une fine couche la zone du filtre à mailles. 2.
FR Astuces • 3 minutes sous la fumée suffisent pour que les viandes, poissons, fruits ou légumes prennent une saveur fumée après leur cuisson. Placez simplement les aliments dans une casserole couverte, une marmite, une cocotte ou tout autre plat couvert, et diffusez de la fumée sous le couvercle. • Ne placez pas le tuyau directement dans les aliments. Placez-le juste au-dessus. • Vous n'avez PAS besoin de générer une fumée continue avec the Smoking Gun™.
Dépannage PROBLÈME POSSIBLE Le ventilateur ne démarre pas. Aucune fumée n'est générée. Il n'y a pas assez de fumée. 8 SOLUTION FACILE • Vérifiez le sens des piles. • L'interrupteur n'est pas réglé sur la vitesse élevée ou basse. • Remplacez les piles. • Assurez-vous que le filtre à mailles n'est pas obstrué. • Assurez-vous que le tuyau n'est pas obstrué. • Lorsque vous utilisez un récipient, assurez-vous que l'air peut s'évacuer.
the Smoking Gun™ NL SNELSTARTGIDS
Inhoud 2 Belangrijke veiligheidsmaatregelen 5 Onderdelen 6 Montage 6 Functies 7 Tips 7 Onderhoud en reiniging 8 Problemen oplossen 8 Garantie SAGE® STELT VEILIGHEID VOOROP Bij Sage® gaan we zeer veiligheidsbewust te werk. Bij het ontwerpen en produceren van onze consumentenproducten staat de veiligheid van onze gewaardeerde klanten voorop. Daarnaast vragen wij u voorzichtig te werk te gaan en de volgende voorzorgsmaatregelen in acht te nemen.
NL • • • • • • • mentale capaciteiten of een gebrek aan ervaring en kennis, alleen als zij worden begeleid of instructies hebben gekregen over het veilige gebruik van het apparaat en de gevaren ervan begrijpen. Reiniging van het apparaat mag niet door kinderen worden uitgevoerd, tenzij ze ten minste 8 jaar oud zijn en onder toezicht staan. Het apparaat moet buiten het bereik van kinderen jonger dan 8 jaar worden gehouden. Dit product is alleen voor huishoudelijk gebruik.
• Richt de Smoking Gun™ niet op een persoon of een ontvlambaar voorwerp. • Vermijd het gebruik van de Smoking Gun™ in ruimtes waar brandbestrijdingssystemen of rookmelders door rook kunnen worden geactiveerd. • Gebruik de Smoking Gun™ nooit zonder dat het roestvrijstalen gaasfilter op zijn plaats zit; brandende/gloeiende materialen kunnen het hoofddeel binnendringen waardoor de eenheid beschadigd kan worden, of kunnen via het mondstuk naar buiten komen en brand of brandgevaar opleveren.
NL Onderdelen C B A D G F E A. B. C. D. Aan-uitschakelaar Verwijderbaar brandcompartiment Verwijderbaar gaasfilter Gegoten schacht E. Siliconenslang F. Robuuste behuizing G.
Montage 1. Plaats het gaasfilter in de bovenkant van het brandcompartiment en druk het met een vinger omlaag om het in de bodem van het brandcompartiment te plaatsen. 2. Plaats het brandcompartiment in de schacht. Duw omlaag totdat de veer rond het brandcompartiment een klein klikgevoel geeft. OPMERKING Plaats niet te veel materiaal in het brandcompartiment. Het gaasfilter moet worden bedekt met een dunne laag houtsnippers. 2.
NL Tips • U hoeft slechts drie minuten te roken om vlees, vis, fruit en groenten na het koken een gerookte geur of smaak te geven. Plaats het eten gewoon in een braadpan met deksel, kookpan, sudderpan of andere schotel/pan met deksel, en richt de rook onder het deksel. • Steek de slang niet rechtstreeks in het eten. Houd de slang er net iets boven. • U hoeft NIET continu te roken met de Smoking Gun™.
Problemen oplossen MOGELIJK EENVOUDIGE PROBLEEM OPLOSSING Ventilator start niet. Er wordt geen rook geproduceerd. Onvoldoende rook. 8 • Controleer de richting van de batterijen. • Schakelaar staat niet op Hoge of Lage snelheid. • Vervang de batterijen. • Zorg dat het gaasfilter niet is geblokkeerd. • Zorg dat de slang niet is geblokkeerd. • Zorg er bij gebruik van een container voor dat er een luchtuitlaat is. • Zorg dat de ventilator start wanneer de schakelaar op Hoog of Laag wordt gezet.
NL Opmerkingen 9
Opmerkingen 10
the Smoking Gun™ IT GUIDA RAPIDA
• Prima di usare the Smoking Gun™ per la prima volta, Sommario rimuovere i materiali di imballaggio e le etichette promozionali. 2 Norme di sicurezza importanti • Non posizionare the Smoking 5 Componenti Gun™ vicino al bordo di un 6 Montaggio banco o di un tavolo durante il 6 Funzioni funzionamento. Assicurarsi che 7 Suggerimenti la superficie sia piana, pulita 7 Manutenzione e pulizia e priva di acqua.
IT • • • • • • • sensoriali o mentali o prive di esperienza o conoscenza dell'elettrodomestico stesso, a condizione che queste ultime lo utilizzino sotto la supervisione di qualcuno o secondo specifiche istruzioni ricevute in merito all'uso in sicurezza dell'elettrodomestico e che comprendano i rischi associati. La pulizia dell'elettrodomestico può essere effettuata da bambini di età non inferiore a 8 anni e con la supervisione di un adulto.
• Evitare di utilizzare the Smoking Gun™ in luoghi in cui il fumo potrebbe attivare rilevatori di fumo o sistemi antincendio. • Non utilizzare mai the Smoking Gun™ senza il filtro a maglie in acciaio inossidabile; la brace ardente/ incandescente può introdursi all'interno dell'apparecchio danneggiandolo, o potrebbe essere espulsa attraverso l'ugello, con il conseguente rischio di incendio o ustione.
IT Componenti C B A D G F E A. B. C. D. Interruttore ON / OFF Camera di combustione rimovibile Filtro a maglie rimovibile Tamburo in metallo pressofuso E. Tubo in silicone F. Involucro robusto G.
Montaggio 1. Posizionare il filtro a maglie sulla camera di combustione e spingere verso il basso con un dito per fissarlo sul fondo di quest'ultima. 2. Posizionare la camera di combustione nel tamburo. Spingere verso il basso finché la molla attorno alla camera di combustione non produce un lieve scatto. NOTA Non riempire eccessivamente la camera di combustione. I trucioli di legno dovrebbero formare solo uno strato sottile che copra il filtro a maglie. 2.
IT Suggerimenti • Appena 3 minuti di affumicatura sono sufficienti per conferire il sapore e l'aroma di affumicato a carne, pesce, frutta e ortaggi dopo la cottura. Introdurre gli ingredienti in una casseruola coperta, un pentolone, un recipiente in ghisa o in altro contenitore coperto e iniettare il fumo sotto il coperchio. • Non posizionare il tubo direttamente negli ingredienti da affumicare. Mantenerlo leggermente al di sopra degli ingredienti.
Risoluzione dei problemi POSSIBILE SOLUZIONE SEMPLICE PROBLEMA La ventola non si avvia. Non viene generato fumo. La quantità di fumo è insufficiente. 8 • Controllare l'orientamento delle batterie. • L'interruttore non è impostato sulla velocità alta o bassa. • Sostituire le batterie. • Assicurarsi che il filtro a maglie non sia ostruito. • Assicurarsi che il tubo non sia ostruito. • Quando si utilizza un contenitore, assicurarsi che ci sia uno sbocco per la fuoriuscita dell'aria.
IT Garanzia GARANZIA LIMITATA DI 2 ANNI Sage Appliances offre una garanzia per l’utilizzo domestico di questo prodotto in specifiche aree geografiche, per 2 anni dalla data di acquisto. La garanzia copre eventuali malfunzionamenti causati da difetti di fabbricazione o dei materiali. Durante il periodo coperto dalla garanzia, Sage Appliances sarà tenuta a riparare, sostituire o rimborsare l’importo corrispondente ai prodotti difettosi (a sola discrezione di Sage Appliances).
Note 10
the Smoking Gun™ ES GUÍA RÁPIDA
Índice 2 Sage® recomienda seguridad ante todo 5 Componentes 6 Ensamblaje 6 Funciones 7 Consejos 7 Cuidado y limpieza 8 Resolución de problemas 9 Garantía SAGE® RECOMIENDA SEGURIDAD ANTE TODO En Sage® nos preocupa mucho la seguridad. Para el diseño y la fabricación de nuestros productos de consumo tenemos en cuenta antes que nada la seguridad de nuestros clientes, como tú. También te rogamos que actúes cuidadosamente y que tomes las precauciones siguientes.
ES • No permitas que los niños jueguen con el electrodoméstico. • El electrodoméstico puede ser utilizado por niños mayores de 8 años y personas con discapacidades físicas o mentales, o sin experiencia ni conocimientos de uso, siempre y cuando reciban supervisión o instrucciones para el uso seguro del dispositivo y comprendan los riesgos implicados. • La limpieza del electrodoméstico no debe ser realizada por niños a menos que sean mayores de 8 años y estén supervisados por un adulto.
• No apuntes the Smoking Gun™ a ninguna persona u objeto inflamable. • Evita usar the Smoking Gun™ en áreas donde el humo pueda activar las alarmas de humo o los sistemas de extinción de incendios. • Nunca hagas funcionar the Smoking Gun™ sin el filtro de malla de acero inoxidable en su sitio; las brasas ardiendo pueden entrar en el cuerpo y dañar la unidad o pueden ser expulsadas a través de la boquilla, creando un incendio o peligro de quemaduras.
ES Componentes C B A D G F E A. B. C. D. Interruptor de encendido/apagado Cámara de combustión extraíble Filtro de malla extraíble Cañón de metal moldeado a presión E. Manguera de silicona F. Carcasa robusta G.
Ensamblaje 1. Coloca el filtro de malla en la parte superior de la cámara de combustión y pulsa hacia abajo con un dedo para encajarlo en la parte inferior de la cámara de combustión. 2. Coloca la cámara de combustión en el cañón. Empuja hacia abajo hasta que el resorte alrededor de la cámara de combustión proporcione una pequeña sensación de clic. NOTA No llenes en exceso la cámara de combustión. Las astillas de madera solo deben cubrir el área del filtro de malla con una capa delgada. 2.
ES Consejos • Con solo 3 minutos bajo humo basta para proporcionar sabor y aroma ahumado para carnes, pescados, frutas o verduras después de la cocción. Simplemente coloca la comida en una cacerola, olla, cacerola grande u otro plato u olla cubierta e inyecta humo por debajo de la tapa. • No coloques la manguera directamente en la comida. Colócala ligeramente por encima. • NO se requiere ahumar de forma continua con the Smoking Gun™.
Resolución de problemas POSIBLE SOLUCIÓN FÁCIL PROBLEMA El ventilador no se pone en marcha. • Comprueba la orientación de las pilas. • El interruptor no está girado a alta velocidad o baja velocidad. • Sustituye las pilas. No se genera • Asegúrate de que el filtro humo. de malla no esté bloqueado. • Asegúrate de que la manguera no esté bloqueada. • Cuando uses un recipiente, asegúrate de que haya una salida para que escape el aire.
ES Garantía GARANTÍA LIMITADA DE 2 AÑOS La garantía de Sage Appliances cubre este producto para uso doméstico en territorios específicos durante 2 años a partir de la fecha de compra contra fallos causados por mano de obra y materiales defectuosos. Durante el plazo de la garantía, Sage Appliances reparará o sustituirá productos defectuosos (a criterio de Sage Appliances).
Notas 10
the Smoking Gun™ BSM600/SSM600 PT MANUAL RÁPIDO
Índice 2 5 6 6 7 7 8 9 A Sage® recomenda a segurança como máxima prioridade Componentes Montagem Funções Dicas Cuidados e limpeza Resolução de problemas Garantia A SAGE® RECOMENDA A SEGURANÇA COMO MÁXIMA PRIORIDADE Na Sage®, temos a máxima preocupação com a segurança. Concebemos e produzimos produtos para o consumidor principalmente com a sua segurança, o nosso prezado cliente, em mente. Além disso, pedimos que tenha cuidado e que cumpra as precauções seguintes.
PT • As crianças não devem brincar com o aparelho. • O aparelho pode ser utilizado por crianças com mais de 8 anos de idade e pessoas com capacidades físicas, sensoriais ou mentais reduzidas ou com falta de experiência ou conhecimento, mas apenas se tiverem recebido supervisão ou instruções relativas ao uso seguro do aparelho e compreenderem os perigos envolvidos. • As tarefas de limpeza do aparelho não devem ser executadas por crianças exceto caso tenham mais de 8 anos de idade e tenham supervisão.
• Não aponte o dispositivo de cura com fumo Smoking Gun™ a pessoas ou objetos inflamáveis. • Evite utilizar o dispositivo de cura com fumo Smoking Gun™ em áreas onde o fumo possa ativar detetores de fumo ou sistemas de supressão de incêndios. • Nunca opere o dispositivo de cura com fumo Smoking Gun™ sem o filtro de rede de aço inoxidável instalado; as brasas podem entrar no corpo do aparelho danificando-o ou podem ser expelidas através do bocal, criando um risco de incêndio ou queimadura.
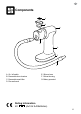
PT Componentes C B A D G F E A. B. C. D. Interruptor On/Off (Ativar/Desativar) Câmara de combustão extraível Filtro de rede extraível Tambor forjado E. Mangueira de silicone F. Invólucro robusto G.
Montagem 1. Coloque o filtro de rede na parte superior da câmara de combustão e empurre-o para baixo com um dedo para ele assentar no fundo da câmara de combustão. 2. Coloque a câmara de combustão no tambor. Empurre para baixo até que a mola em torno da câmara de combustão emita um pequeno clique. Funções ANTES DA PRIMEIRA UTILIZAÇÃO Limpe a câmara de combustão e o filtro de rede com um pano humedecido. FUNCIONAMENTO 1.
PT 4. Quando vir fumo a sair pela extremidade da mangueira, pressione a parte superior do interruptor para manter a ventoinha a funcionar a baixa velocidade (designado por 1 linha –). Permita que as aparas de madeira ardam sem chama e encaminhe o fumo para onde for necessário. 5. Quando fumo suficiente tiver sido gerado ou as aparas de madeira se tiverem apagado, coloque o interruptor na posição central para desligar a ventoinha (designado por um círculo O). 6.
Resolução de problemas POSSÍVEL SOLUÇÃO FÁCIL PROBLEMA A ventoinha não arranca. Não é gerado fumo. Não existe fumo suficiente. 8 • Verifique a orientação das pilhas. • O interruptor não está ativado na posição de Alta ou Baixa velocidade. • Substitua as pilhas. • Certifique-se de que o filtro da rede não está obstruído. • Certifique-se de que a mangueira não está obstruída. • Ao utilizar um recipiente, certifique-se de que existe uma saída para exaustão do ar.
PT Garantia GARANTIA LIMITADA DE 2 ANOS A Sage Appliances fornece uma garantia para este produto para uso doméstico nos territórios especificados de 2 anos a partir da data de compra contra avarias provocadas por defeitos na mão-de-obra e de materiais. Durante este período da garantia, a Sage Appliances irá reparar, substituir ou reembolsar qualquer produto defeituoso (sob o critério exclusivo da Sage Appliances).
Nota 10
PT Nota 11
CHE Switzerland +41 (0)800 009 933 DEU AUT Sage Appliances GmbH Campus Fichtenhain 48, 47807 Krefeld, Deutschland Deutschland: +49 (0)8005053104 Österreich: +43 (0)800 80 2551 BEL Belgium +32 (0)800 54 155 LUX Luxembourg +352 (0)800 880 72 ESP Spain +34 (0)900 838 534 POR Portugal +351 (0)800 180 243 www.sageappliances.com Registered in Germany No. HRB 81309 (AG Düsseldorf). Registered in England & Wales No. 8223512.