the Fast Slow GO™ BPR680/SPR680 EN QUICK GUIDE
Contents 2 9 10 11 12 13 23 25 26 Sage Recommends Safety First Components Control Panel Food Presets Cooking Presets Functions Care & Cleaning Troubleshooting Guarantee SAGE RECOMMENDS SAFETY FIRST At Sage® we are very safety conscious. We design and manufacture consumer products with the safety of you, our valued customer, foremost in mind. In addition, we ask that you exercise a degree of care when using any electrical appliance and adhere to the following precautions.
EN result from inappropriate to more than half of its use of the pressure capacity. cooker. Make sure that the • The heating source cooker is properly closed necessary for cooking is before applying heat. included in the appliance. See “Pressure Cook” • After cooking meat with instructions in this book. a skin (e.g. ox tongue) which may swell under • Never force open the the effect of pressure, pressure cooker.
• Do not tamper with any of the safety systems beyond the maintenance instructions specified in the instructions for use. • Only use Sage® spare parts in accordance with the relevant model. In particular, use a body and a lid from Sage® indicated as being compatible. • Before using for the first time please ensure that your electricity supply is the same as shown on the rating label on the underside of the appliance. If you have any concerns, please contact your local electricity company.
EN • Do not place the appliance near the edge of a bench or table during operation. Ensure that the surface is dry, level, clean and free of any liquid and other substances. • Cooking appliances should be positioned in a stable situation with the handles (if any) properly secured to avoid spillage of the hot liquids. • Always operate the appliance on a stable and heat resistant surface.
• Do not use a damaged removable cooking bowl. Replace before using. • Do not place food or liquid directly into the stainless-steel base. Only the removable cooking bowl is designed to contain food or liquid. • Before use, always check pressure release valve and safety locking pin for clogging and clean if necessary. Check to make sure the safety locking pin moves freely from under the lid. • Do not touch the pressure release valve whilst in use.
EN sensory or mental capabilities, or lack of experience and knowledge, if they have been given supervision or instruction concerning use of the appliance in a safe way and understand the hazards involved. • Children shall not play with the appliance. • Cleaning and user maintenance shall not be made by children unless they are older than 8 and supervised. • Keep the appliance and its cord out of reach of children less than 8 years. • It is recommended to regularly inspect the appliance.
current not exceeding 30mA be installed in the electrical circuit supplying the appliance. See your electrician for professional advice. To protect against electric shock, do not immerse the power cord, power plug or appliance in water or any other liquid. The symbol shown indicates that this appliance should not be disposed of in normal household waste. It should be taken to a local authority waste collection centre designated for this purpose or to a dealer providing this service.
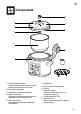
EN Components A B C F D E G H I J K A. Pressure Release Valve Automatically controls the rate at which steam is released from the cooker B. Pressure Safety Valve C. Dishwasher Safe Removable Lid D. Safety Locking Pin Pin pops up once pressure is reached acting as a safety locking device E. Silicone Lid Seal Easy fitting for hassle free assembly and cleaning F. Sealing Nut G. 6L Removable Cooking Bowl H. Lid Arm I. Easy Clean Moat Catches condensation drips for a mess-free clean up. J.
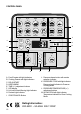
CONTROL PANEL SOUP STOCK MEAT STEW STEAM SAUTÉ | SEAR A B LEGUMES RICE | GRAINS RISOTTO YOGURT REDUCE SOUS VIDE F C DELAY START D KEEP WARM E NATURAL G H PRESSURE COOK HI HI LO LO SLOW COOK AUTO QUICK PULSE J RELEASE K A. Food Presets with light indicators B. Cooking Presets with light indicators C. DELAY START D. KEEP WARM E. TIME (+/-) adjustment buttons F. LED display G. Lid Lock/Unlock Warning Light Indicator H. Preheat Light Indicator I. START/CANCEL Button L M J.
EN FOOD PRESETS SETTING: PRESSURE COOK FOOD MENU DEFAULT PRESET RANGE Stock 80 kPa - approx. 116°C 1 HOUR AUTO QUICK 10 kPA – 80 kPa Up to 2:00 HRS 60 kPa - approx. 112°C 1 HOUR AUTO QUICK 10 kPA – 80 kPa Up to 2:00 HRS 50 kPa - approx. 110°C 10 MINS AUTO PULSE 10 kPA – 80 kPa Up to 2:00 HRS Soup Meat 50 kPa - approx. 110°C 30 MINS AUTO QUICK 10 kPA – 80 kPa Up to 2:00 HRS 80 kPa - approx. 116°C 1 HOUR AUTO QUICK 10 kPA – 80 kPa Up to 2:00 HRS 80 kPa - approx.
YOGHURT Stage 1 Scalding 10 MIN Temp: 83°C KEEP WARM OFF Stage 2 Cooling* Up to 3 hours Temp: from 83°C to 43°C KEEP WARM OFF Stage 3 Incubating 8 hours Temp: 43°C KEEP WARM OFF Time: 8 – 16 HRS Temp: n/a Keep warm: n/a *Cool down time if the lid is open (for 2 litres of milk): It can take up to 1hr 20mins to lower the temperature from 83°C to 43°C Cool down time if the lid is closed (for 2 litres of milk): It can take up to 3 hours to lower the temperature from 83°C to 43°C COOKING PRESETS SETTING T
EN Functions Pressure Release Valve Cover towards rear of cooker BEFORE FIRST USE 1. Remove and safely discard any packaging material, promotional labels and tape from the cooker. 2. Open the lid by turning the lid knob counter clockwise and lifting lid up and off the appliance until it is in the hinged open position. Unscrew and remove the sealing nut from the centre of the lid and pull the lid away to remove from the lid arm. 3.
10. We recommend running a 15-minute cooking cycle with water to get rid of any protective substances in the cooking bowl and on the heating element. WARNING Only use the cooking bowl intended for this appliance; using vessels not provided will result in a non-resettable issue. CONTROL PANEL SETTINGS The Fast Slow GO™ features 6 Cooking Preset Settings; Pressure Cook, Slow Cook, Reduce, Sauté/Sear, Steam and Sous Vide.
EN • Refer to ‘Food Presets’ and ‘Cooking Presets’ section for preset settings recommendations. • If there is no visible light on any of the food preset indicators, then the product is in manual mode. Press a food preset button to return to its default settings. • The steam or pressure release mode programmed into the preset cooking modes are selected for best results. Any changes to the steam release mode may lead to food spillage.
the pressure release valve. The steam release setting can be changed during the steam release cycle by pressing the STEAM RELEASE button. 14. At the end of the steam release cycle, the cooker alert will sound, the display will flash, and if ‘KEEP WARM’ is on, display timer will start counting up. 15. Open the lid by turning the lid knob counter clockwise and carefully lift the lid into the hinged open position. 16. After 5 minutes of inactivity, standby mode will be activated.
EN changes to the steam release mode may lead to food spillage. CAUTION Always keep hands and face clear of the pressure release valve when pressure cooking as hot steam and water may be emitted during operation. MANUAL SLOW COOK MODE The SLOW COOK setting is designed for long cook times at low temperatures. It is also ideal for breaking down tough cuts of meat and developing deep flavours. on the 1. Select the Slow Cook interface. 2.
or SEAR setting and allow the water to come to a simmer before pressure cooking. • Do not overfill the cooking bowl. The total volume of soup should not exceed the ‘MAX’ level marking inside the removable cooking bowl. Stock • The PRESSURE & SLOW COOK STOCK setting is suitable for making all kinds of stock, including chicken, beef and vegetable. • To make a brown stock, use the SAUTÉ/ SEAR setting to brown bones and vegetables prior to pressure or slow cooking.
EN • Measure or weigh dry rice accurately and wash well with cold water until water runs clear. Drain well and place into the removable cooking bowl. • Add corresponding water amount. Refer to the cooking table for rice/grains and legumes on the Sage webpage for more information. • After cooking, allow rice to stand in bowl for 5 minutes before stirring and serving. • Rice will double or triple in size after cooking. Do not overfill the cooking bowl.
SOUS VIDE The SOUS VIDE setting is ideal for cooking food to a very precise temperature in a water bath. What is Sous Vide? Sous Vide is a cooking technique that allows you to cook food to the doneness you desire by heating water to a set temperature. Food items are placed in a heat-proof BPA food safe plastic bag, that is submerged and cooked to your preferred doneness without the risk of drying out through over cooking.
EN and turn the pressure release valve to the open position. and refrigerate until cold. Once the yoghurt is completely cold, transfer to an airtight container and refrigerate for up to 2 weeks. TIPS Press YOGHURT then press START. The milk will heat to 83°C and hold at the temperature for 10 minutes. The pasteurisation process kills any bad bacteria that can spoil the milk as well as to eliminate potential competitors of the active yoghurt cultures.
DELAY START The Fast Slow GO™ has a timer function to delay the start of cooking for up to 24 hours. This timer function does not apply to the keep warm and steam functions. The DELAY START function is disabled for MEAT food preset. CAUTION Never allow meat, poultry, seafood, eggs or other goods that require refrigeration to sit at room temperature for more than two hours. Bacteria quickly multiplies in warm temperatures between 4°C and 60°C.
EN Care & Cleaning Before cleaning, ensure the cooker is turned off. Remove the power plug from the power outlet and remove the connector end of the power cord from the cooker base. Allow the cooker and all accessories to cool completely before disassembling and cleaning. Wash removable cooking bowl with warm soapy water and a clean soft cloth or sponge. Rinse with clean water and dry thoroughly.
WARNING If the silicone rubber gasket is not fitted correctly into the holder, the lid will not seal properly. This may cause the appliance to malfunction and leak steam or hot liquid which can cause burns or scalding. TIP A mixture of ½ cup (125ml) lemon juice, 1 tablespoon lemon rind plus 500ml hot water cooked at HIGH pressure for 5 minutes can help eliminate food odours. STORAGE: • Ensure the cooker is turned off. The cooker is off when all lights are off on the display.
EN Troubleshooting PROBLEM EASY SOLUTION The LID led is flashing and the buzzer is sounding • Turn the lid to the correct position for pressure cooking or slow cooking. Steam is escaping from the lid • Assemble the lid correctly ensuring there is no gap between lid arm and the stainless steel lid. The sealing nut should be screwed on tightly. • Ensure the silicone lid seal is clean, free from damage or cracks and is properly inserted. • Ensure that the safety locking pin can move freely up and down.
Guarantee 2 YEAR LIMITED GUARANTEE Sage Appliances guarantees this product for domestic use in specified territories for 2 years from the date of purchase against defects caused by faulty workmanship and materials. During this guarantee period Sage Appliances will repair, replace, or refund any defective product (at the sole discretion of Sage Appliances). All legal warranty rights under applicable national legislation will be respected and will not be impaired by our guarantee.
EN Notes 27
GBR BRG Appliances Limited Unit 3.