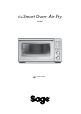
the Smart Oven TM SOV860 EN QUICK GUIDE Air Fry
Contents 2 Sage® recommends safety first 6 Components 8 Before first use 10 Functions – OPERATING YOUR BREVILLE OVEN – AUTO EJECT RACK 11 – GRILL 11 – TOAST 12 – CRUMPET 13 – BAKE 14 – PIZZA 16 – WARM 17 – AIR FRY 17 – SLOW COOK 19 – REPLACING THE OVEN LIGHT 20 21 Care & Cleaning 22 Troubleshooting SAGE® RECOMMENDS SAFETY FIRST At Sage® we are very safety conscious. We design and manufacture consumer products with the safety of you, our valued customer, foremost in mind.
EN • To avoid electric shock, do not immerse the cord, plug or motor base in water (or other liquids). • When operating the oven, keep a minimum distance of 10cm of space on both sides of the appliance and 15cm above. • The temperature of accessible surfaces may be high when the appliance is operating Do not touch hot surfaces. To avoid burns, use extreme caution when removing pans, dishes and accessories such as the included grilling rack and baking pan, that contain hot oil or other hot liquids.
• This appliance is not intended for use by persons (including children) with reduced physical, sensory or mental capabilities, or lack of experience and knowledge, unless they have been given supervision or instruction concerning the use of the appliance by a person responsible for their safety. • Children should be supervised to ensure that they do not play with the appliance. • It is recommended to regularly inspect the appliance and power cord.
EN WARNING TO REDUCE THE RISK OF FIRE, ELECTRIC SHOCK, EXPOSURE TO EXCESSIVE UV RADIATION, OR INJURY TO PERSONS: • Always unplug the oven and let all parts (including the bulb housing, glass cover and enclosure) cool completely before replacing bulb. • Only use a 25 Watt, 220–240V, G9 type oven bulb. • Always use a soft cloth when handling the bulb and do not directly touch the surface as oil from your skin can damage the bulb. • Do not look directly at a glowing bulb.
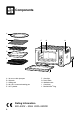
Components A B F G H C D TEMP E Darkne J I A. B. C. D. E. 30 cm non-stick pizza pan Wire rack Grilling rack 28 x 33.5 cm enamel roasting pan Air Fry basket F. G. H. I. J.
EN A. LCD screen K B. FUNCTION dial C. TEMPERATURE dial/toast and crumpet darkness control D. TIME dial/toast and crumpet selection FUNCTION E. START/CANCEL button START/CANCEL L O P S F. OVEN LIGHT button G. CONVECTION button H. FROZEN button I.
Functions PREPARING THE OVEN Before first use, please run the oven empty for 20 minutes to remove protective substances from the heating elements. Ensure the area is well ventilated as the oven may emit vapors. These vapors are safe and are not detrimental to the performance of the oven. 1. Remove and safely discard any packing material, promotional labels and tape from the oven. 2. Remove the crumb tray, wire racks, grilling rack, roasting pan, air fry basket and pizza pan from the polyfoam packaging.
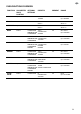
EN OVEN FUNCTIONS OVERVIEW FUNCTION GRILL SUGGESTED RACK POSITION OPTIONAL SETTINGS Top PRESETS PREHEAT RANGE HI 10 MINS No HI-MED-LO Up to 20 MINS TOAST Middle FROZEN Darkness 4 Slices 4 No Darkness 1-7 Slices 1-6 CRUMPET Top FROZEN Darkness 4 Slices 4 No Darkness 1-7 Slices 1-6 BAKE Bottom CONVECTION 160°C TEMPERATURE CONVECTION CONVERSION 30 MINS Yes 50°C–230°C Up to 2:00 HRS ROAST Bottom CONVECTION 175°C TEMPERATURE CONVECTION CONVERSION 1:00 HRS Yes 50°C–230°C Up to 2:00
TIME DIAL Functions OPERATING YOUR BREVILLE OVEN 1. Position the wire rack so the spokes face upward and insert it into the desired rack position. The rack positions are conveniently printed on the oven door window. 2. Turn the FUNCTION dial until the indicator on the LCD screen reaches the desired setting. 3. The top figure on the LCD screen indicates the preset cooking temperature for the selected setting. For the TOAST and CRUMPET settings it indicates the darkness level.
EN NOTE The cooking cycle can be stopped at any time by pressing the START/CANCEL button. This will cancel the cycle and the button backlight will illuminate blue. NOTE Press the CONVECTION button to choose between no convection, convection and super convection. Convection and super convection may adjust the temperature to compensate for the faster air flow. Super convection will deliver a crispier food result.
The top figure on the LCD screen indicates the preset darkness setting ‘4’, while the bottom figure indicates the preset number of slices ‘4’. START/CANCEL 8. At the end of the TOAST cycle, the oven alert will sound. The START/CANCEL button backlight will go out and the LCD screen will illuminate blue. NOTE 5. The darkness setting and number of slices can be adjusted before or during the toasting cycle. a) The darkness setting is indicated by the row of circles at the top of the LCD screen.
EN START/CANCEL START/CANCEL 8. At the end of the CRUMPET cycle, the oven alert will sound. The START/CANCEL button backlight will go out and the LCD screen will illuminate blue. 5. The darkness setting and number of crumpets can be adjusted before or during the toasting cycle. a) The darkness setting is indicated by the row of triangles at the top of the LCD screen. Turn the TEMPERATURE dial to the left to reduce the darkness setting, or to the right to increase it.
9. At the end of the BAKE cycle, the oven alert will sound. The START/CANCEL button backlight will go out and the LCD screen will illuminate START/CANCELblue. ROAST FUNCTION 4. The baking temperature, time and convection settings can be adjusted before or during the baking cycle. a) The baking temperature is displayed as the top figure on the LCD screen. Turn the TEMPERATURE dial to adjust the baking temperature from 50°C to a maximum of 230°C.
EN 6. Once the oven has finished preheating, an alert will sound and food can be inserted into the oven. 7. Place food, positioned on the included roasting pan or other oven-proof dish, on the center of the wire rack so air will flow around all sides of the food. Close the oven door. 8. After the PREHEATING alert has sounded, the timer will automatically begin to count down. The cycle can be stopped at any time by pressing the START/CANCEL button. START/CANCEL 9.
9. At the end of the PIZZA cycle, the oven alert will sound. The START/CANCEL button backlight will go out and the LCD screen will illuminate blue. NOTE If using the included pizza pan, place it in the oven during the preheating cycle for the best result. Carefully place pizza on the heated pizza pan. 5. The reheating temperature, time, convection and frozen settings can be adjusted before or during the reheating cycle. a) The reheating temperature is displayed as the top figure on the LCD screen.
EN 5. The temperature, time and convection settings can be adjusted before or during the warming cycle. a) The warming temperature is displayed as the top figure on the LCD screen. Turn the TEMPERATURE dial to adjust the temperature from 50°C to a maximum of 230°C. b) The time is displayed as the bottom figure on the LCD screen. Turn the TIME dial to adjust the time up to 2 hours. 6. Press the START/CANCEL button to activate the WARM function.
SLOW COOK FUNCTION The SLOW COOK function has cooking profiles designed for long cook times at low temperatures. 1. Insert the wire rack, with the spokes facing upward, into the bottom rack height position. 2. Close the oven door. 3. Turn the FUNCTION dial until the indicator on the LCD screen reaches the SLOW COOK function. The top figure on the LCD screen indicates the preset SLOW COOK temperature of ‘HI’, while the bottom figure indicates the preset time of ‘:4HRS’.
EN REPLACING THE OVEN LIGHT WARNING Always unplug oven and let cool before replacing bulb. Only use a 25-Watt, 220-240V, G9 type oven bulb. 1. Remove the wire rack from the oven before replacing the light. 2. The light is positioned on the lefthand side of the oven cavity. Position your fingers on the outside of the light housing and gently pull the glass cover away from the oven wall to remove it.
Care & Cleaning Before cleaning, ensure the oven is turned off by removing the power plug from the power outlet. Allow the oven and all accessories to cool completely before disassembling and cleaning. Cleaning the outer body and door 1. Wipe the outer body with a soft, damp sponge. A non-abrasive liquid cleanser or mild spray solution may be used to avoid build-up of stains. Apply the cleanser to the sponge, not the oven surface, before cleaning. 2.
EN Troubleshooting POSSIBLE PROBLEM EASY SOLUTION Oven will not switch "ON" • Check that the power plug is securely inserted into the outlet. • Insert the power plug into an independent outlet. • Insert the power plug into a different outlet. • Reset the circuit breaker if necessary. The LCD display light has gone out • The oven goes into standby mode if not used for 10 minutes. When in standby mode, the LCD screen will cease to illuminate, however all function options will still be visible.
POSSIBLE PROBLEM EASY SOLUTION The ‘preheat’ alert sounds at a lower temperature than what is displayed on the LCD screen • The ‘preheat’ alert sounds at 75% of the target temperature. This provides the fastest, combined preheating and cooking time. The LCD screen displays 'E01' • The LCD screen will display 'E01' when there is a non-resettable issue with the appliance. Should this occur, immediately remove the power cord from the power outlet and call Breville Consumer Support.
EN 23
UK BRG Appliances Limited Unit 3.2, Power Road Studios, 114 Power Road, London, W4 5PY Freephone (UK Landline): 0808 178 1650 Mobile Calls (National Rate): 0333 0142 970 www.sageappliances.com Registered in England & Wales No. 8223512. Due to continued product improvement, the products illustrated or photographed in this document may vary slightly from the actual product. Copyright BRG Appliances 2018.