the Nutri Juicer‰ Cold Plus BJE530/SJE530 EN QUICK GUIDE DE KURZANLEITUNG FR GUIDE RAPIDE NL SNELSTARTGIDS IT GUIDA RAPIDA ES GUÍA RÁPIDA PT MANUAL RÁPIDO
Contents 2 Sage® Recommends Safety First 5 Components 6 Assembly 7 Functions 9 Care & Cleaning 10 Troubleshooting 12 Guarantee SAGE® RECOMMENDS SAFETY FIRST At Sage® we are very safety conscious. We design and manufacture consumer products with the safety of you, our valued customer, foremost in mind. In addition we ask that you exercise a degree of care when using any electrical appliance and adhere to the following precautions.
EN • • • • • • • allowed to cool before cleaning, attempting to move or storing. Always turn the appliance to the off position, switch off at the power outlet and unplug at the power outlet when the appliance is not in use. Do not use the appliance if the power cord, plug, or appliance becomes damaged in any way. If damaged or maintenance other than cleaning is required, please contact Sage Customer Service or go to sageappliances.
• Do not push food into the feed chute with your fingers or other utensils. Always use the food pusher provided. Do not place hand or fingers into the food chute when it is attached to the appliance. • Do not juice stone fruit unless seeds and/or stones have been removed. • Do not operate the juice extractor without the pulp and juice container in place.
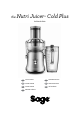
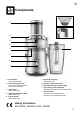
EN Components D A J B C D I E F G H A. Food pusher (not dishwasher safe) B. Interlocking safety arm Stops juicer operating without cover locked into place. C. Juicer cover (dishwasher safe) D. Stainless steel filter basket (dishwasher safe) E. Pulp container (dishwasher safe) F. Filter bowl surround (dishwasher safe) G. 2 Speed control and off dial H. Overload protection indicator light I. 2 litre juice jug and sealing lid with built in froth separator (dishwasher safe) J.
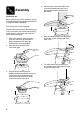
Assembly 4. Place the juicer cover over the filter bowl surround, positioning the lower part of the feed chute over the stainless steel filter basket. Before first use Before using your juicer for the first time, remove and safely discard any packaging materials and promotional stickers and labels. Ensure the power cord is unplugged. Wash the filter bowl surround, filter basket, juicer cover, food pusher, pulp container and juice jug and lid in warm, soapy water with a soft cloth.
EN 7. Slide the food pusher down the food chute by aligning the groove in the food pusher, with the small protrusion on the inside of the top of the feed tube. Food pusher groove Small protrusion inside feed tube 8. Place the pulp container into position by tilting and lifting the motor base slightly. Insert the pulp container under the juicer cover on the back ensuring it is supported by the juicer cover and motor base. 9. Fit the lid to the juice jug and position jug under juice spout.
SPEED SELECTOR GUIDE NOTE FOOD TYPE SPEED APPLES High BABY SPINACH High BEETS High BELL PEPPER High BLUEBERRIES High BROCCOLI High CABBAGE High CARROT High CELERY High CITRUS FRUITS (peeled) Low CUCUMBER High GINGER High GRAPES (seedless) Low HONEYDEW MELON (peeled) High KALE High KIWI (peeled) Low MANGO (peeled, pit removed) High MINT High PEACH (pit removed) High PEARS High PINEAPPLE (peeled) High RHUBARB High SQUASH High STRAWBERRIES High TOMATOES High
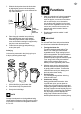
EN Care & Cleaning Ensure the juicer is turned off by turning the juicer dial to the OFF position. Then unplug the power cord. Filter basket Cleaning If pulp is left to dry, it may clog the fine pores of the filter mesh, which can affect juicing performance. The filter basket can be soaked in hot soapy water for 10 minutes, if necessary. 1. Remove Juice Jug. 2. Remove Pulp Container. 3. Disengage Locking Bar, pull up entire Juice Collector Assembly and take to sink.
Troubleshooting Juicer will not work when switched ON • The safety locking arm may not be correctly engaged in the vertical operating position. Check the top cover is properly aligned and the locking arm is located firmly into the two grooves on either side of the juicer cover. • Motor overload protection may have operated (see below). Overheating with excessive loads • The juicer is equipped with an internal self-resetting overload to prevent the motor from damage under heavy or continuous loads.
EN Motor appears to stall when overload protection LED flashes • Wet pulp can build up under the juicer cover and stall the juicer if the juicer is used excessively without cleaning. If this occurs, disassemble and follow the cleaning instructions to clean the filter bowl surround, the stainless steel filter basket and the juicer cover. The juicer can also stall if excessive force is used to push produce down the feed chute.
Guarantee 2 YEAR LIMITED GUARANTEE AND 5 YEAR LIMITED MOTOR GUARANTEE Sage Appliances guarantees this product for domestic use in specified territories for 2 years for all parts of the product and 5 years for the product’s motor from the date of purchase against defects caused by faulty workmanship and materials. During this guarantee period Sage Appliances will repair, replace, or refund any defective product (at the sole discretion of Sage Appliances).
GBR BRG Appliances Limited Unit 3.