the Nutri Juicer® Cold BJE430/SJE430 EN QUICK GUIDE DE KURZANLEITUNG FR GUIDE RAPIDE NL SNELSTARTGIDS IT GUIDA RAPIDA ES GUÍA RÁPIDA PT MANUAL RÁPIDO *
Contents 2 Important Safeguards 6 Assembly 5 8 9 Components Functions Care & Cleaning 10 Troubleshooting 11 Guarantee SAGE® RECOMMENDS SAFETY FIRST At Sage® we are very safety conscious. We design and manufacture consumer products with the safety of you, our valued customer, foremost in mind. In addition we ask that you exercise a degree of care when using any electrical appliance and adhere to the following precautions.
EN • Do not let the power cord hang over the edge of a bench or table, touch hot surfaces or become knotted. • Always ensure the appliance is turned OFF, unplugged at the power outlet and has been allowed to cool before cleaning, attempting to move or storing. • Always turn the appliance to the OFF position, switch off at the power outlet and unplug at the power outlet when the appliance is not in use. • Do not use the appliance if the power cord, plug, or appliance becomes damaged in any way.
• • • • • • supervision or instruction concerning use of the appliance in a safe way and understand the hazards involved. This appliance shall not be used by children. Do not leave the appliance unattended when in use. Do not push food into the feed chute with your fingers or other utensils. Always use the food pusher provided. Do not place hand or fingers into the food chute when it is attached to the appliance. Do not juice stone fruit unless seeds and/or stones have been removed.
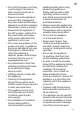
EN Components A B C I D E F J G H K A. Food pusher (not dishwasher safe) B. Wide feed chute C. Interlocking safety arm D. Juicer cover (not dishwasher safe) E. Stainless steel filter basket (top shelf dishwasher safe) F. Pulp container (dishwasher safe) G. 2 speed control and off dial H. Cord storage I. Filter bowl surround (dishwasher safe) J. 2 litre juice jug and sealing lid (dishwasher safe) K.
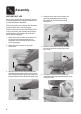
Assembly BEFORE FIRST USE Before using your juicer for the first time, remove and safely discard any packaging materials and promotional stickers and labels. 4. Place the juicer cover over the filter bowl surround, positioning the lower part of the feed chute over the stainless steel filter basket. Ensure the appliance is switched off at the power outlet and the power cord is unplugged.
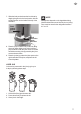
EN 7. Slide the food pusher down the food chute by aligning the groove in the food pusher, with the small protrusion on the inside of the top of the feed tube. Food pusher groove NOTE Storage time depends on the ingredients being juiced and the freshness of the fruit prior to juicing. Juice must be stored in the refrigerator between 2°C to 4°C. Small protrusion inside feed tube 8. Place the pulp container into position by tilting the motor base slightly to the right.
Functions 1. Plug the power cord into a 220–240V power outlet. Turn the power ON at the power outlet. Adjust the speed to the desired setting. Turn the dial to either the LOW or HIGH setting depending on the type of fruit or vegetable being juiced. Use the speed selector as a guide for juicing different fruits and vegetables. 2. With the motor running, place food into the feed chute and use the food pusher to gently guide food down.
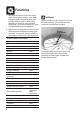
EN Care & Cleaning Ensure the juicer is turned off by turning the juicer dial to the OFF position. Then switch the appliance off at the power outlet and unplug the power cord. FILTER BASKET CLEANING If pulp is left to dry, it may clog the fine pores of the filter mesh, which can effect juicing performance. The filter basket can be soaked in hot soapy water for 10 minutes, if necessary. Rinse all parts after use (except the motor base) under running water to clear away the majority of juice and pulp.
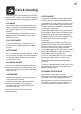
Troubleshooting Juicer will not work when switched ON • The safety locking arm may not be correctly engaged in the vertical operating position. Check the top cover is properly aligned and the locking arm is located firmly into the two grooves on either side of the juicer cover. • Motor overload protection may have operated (see below). Overheating with excessive loads • The juicer is equipped with an internal self-resetting overload to prevent the motor from damage under heavy or continuous loads.
EN Motor appears to stall when juicing • Wet pulp can build up under the juicer cover and stall the juicer if the juicer is used excessively without cleaning. If this occurs, disassemble and follow the cleaning instructions to clean the filter bowl surround, the stainless steel filter basket and the juicer cover. • The juicer will automatically stop operating if either too much food is being processed at one time or the pieces are not small enough.
Guarantee 2 YEAR LIMITED GUARANTEE AND 5 YEAR LIMITED MOTOR GUARANTEE Sage Appliances guarantees this product for domestic use in specified territories for 2 years for all parts of the product and 5 years for the product’s motor from the date of purchase against defects caused by faulty workmanship and materials. During this guarantee period Sage Appliances will repair, replace, or refund any defective product (at the sole discretion of Sage Appliances).
the Nutri Juicer® Cold DE KURZANLEITUNG *
Inhalte 2 5 6 8 9 10 12 Wichtige Sicherheitshinweis Beschreibung der Einzelteile Montage Funktionen Pflege & Reinigung Fehlerbehebung Garantie SAGE® EMPFIEHLT: SICHERHEIT GEHT VOR Wir bei Sage® sind sehr sicherheitsbewusst. Beim Design und bei der Herstellung unserer Geräte denken wir zu allererst an Ihre Sicherheit. Darüber hinaus bitten wir Sie, bei der Verwendung jedes Elektrogeräts angemessene Sorgfalt anzuwenden und sich an die folgenden Vorsichtsmaßnahmen zu halten.
DE • • • • • • • • Arbeitsplatten oder Tischkanten hängen lassen, von heißen Oberflächen fern halten, Kabelgewirr vermeiden. Gerät immer ausschalten, Netzstecker ziehen und abkühlen lassen, ehe Sie es bewegen, reinigen oder lagern. Gerät immer ausschalten, sofern möglich auch an der Steckdose, und Netzstecker ziehen, wenn es nicht in Gebrauch ist. Gerät nicht verwenden, wenn das Netzkabel, der Netzstecker oder das Gerät selbst in irgendeiner Weise beschädigt ist.
• • • • • • • oder mit mangelnder Erfahrung und fehlenden Kenntnissen genutzt werden, sofern sie beaufsichtigt werden oder in den sicheren Gebrauch des Geräts eingewiesen wurden und sich der entsprechenden Risiken bewusst sind. Gerät nicht von Kindern bedienen lassen. Gerät während des Betriebs nicht unbeaufsichtigt lassen. Motor nach jedem Betrieb 1 Minute lang ruhen lassen. Zutaten nie mit den Fingern oder anderen Utensilien als dem mitgelieferten Stopfer in den Einfüllschacht pressen.
DE Beschreibung der Einzelteile A B C I D E F J G H A. B. C. D. K Stopfer (nicht spülmaschinenfest) Weiter Einfüllschacht Sicherheitsverriegelungsbügel Entsafterabdeckung (nicht spülmaschinenfest) E. Edelstahl-Filterkorb (spülmaschinenfest im obersten Korb) F. Tresterbehälter (spülmaschinenfest) G. Drehregler für die Wahl zwischen 2 Geschwindigkeiten und ‘OFF‘ (AUS) H. Kabelaufbewahrung I. Saftfilterschale (spülmaschinenfest) J. 2 Liter Saftkrug und Verschlussdeckel (spülmaschinenfest) K.
Montage VOR DEM ERSTEN GEBRAUCH Bevor Sie den Entsafter zum ersten Mal verwenden, entfernen Sie und entsorgen Sie das gesamte Verpackungsmaterial, Werbeaufkleber und Etiketten. 4. Platzieren Sie die Entsafterabdeckung über der Saftfilterschale, der untere Teil des Einfüllschachts wird über dem EdelstahlFilterkorb positioniert. Vergewissern Sie sich, dass das Gerät ggf. an der Steckdose ausgeschaltet und der Netzstecker abgezogen ist.
DE 7. Stecken Sie den Stopfer in den Einfüllschacht indem Sie dabei die Rille an dem Stopfer mit der kleinen Anhebung an der oberen Innenseite des Einfüllschachts ausrichten. Rille am Stopfer HINWEIS Die Haltbarkeit hängt davon ab, was Sie entsaften und wie frisch die Früchte vor dem Entsaften waren. Der Saft muss im Kühlschrank bei einer Temperatur von 2°C bis 4°C aufbewahrt werden. Kleine Erhebung auf der Innenseite des Einfüllschachts 8.
Funktionen 1. Schließen Sie den Netzstecker an eine 220-240V Steckdose. Schalten Sie den Strom ggf. an der Steckdose an. Stellen Sie die gewünschte Geschwindigkeit ein. Stellen Sie den Drehregler entweder auf LOW (niedrig) oder auf HIGH (hoch), je nachdem, welche Früchte oder Gemüse entsaftet werden sollen. Benutzen Sie die Geschwindigkeitstabelle als Richtlinie für das Entsaften verschiedener Früchte und Gemüse. 2.
DE Pflege & Reinigung Vergewissern Sie sich, dass der Entsafter ausgeschaltet ist, in dem Sie den Drehregler auf OFF (AUS) stellen. Schalten Sie dann das Gerät ggf. an der Steckdose ab und ziehen Sie das Stromkabel ab. REINIGUNG Spülen Sie nach dem Gebrauch alle Teile des Geräts (mit Ausnahme des Motorsockels) unter laufendem Wasser, um den Großteil des Safts und Tresters ab zu waschen. Reinigen Sie die Teile in seifigem Wasser mit einem weichen Tuch.
Fehlerbehebung Der Entsafter arbeitet nicht, wenn er auf ON (eingeschaltet) ist • Der Verriegelungsbügel könnte nicht ordentlich in seiner senkrechten Arbeitsposition positioniert sein. Vergewissern Sie sich, dass die obere Abdeckung ordentlich ausgerichtet und der Verriegelungsbügel in die beiden Rillen auf beiden Seiten der Entsafterabdeckung eingerastet ist. • Der Motorüberlastungsschutz könnte aktiviert worden sein (siehe unten).
DE Der Motor scheint beim Entsaften stecken zu bleiben • Feuchter Trester kann sich unter der Entsafterabdeckung ansammeln und den Entsafter blockieren, wenn der Entsafter übermäßig benutzt wird, ohne zwischendurch gereinigt zu werden. Wenn dies passiert, zerlegen Sie den Entsafter und befolgen Sie die Reinigungsanleitungen, um die Saftfilterschale, den Edelstahl-Filterkorb und die Entsafterabdeckung zu reinigen.
Garantie 2 JAHRE BESCHRÄNKTE GARANTIE UND 5 JAHRE BESCHRÄNKTE MOTORGARANTIE Sage Appliances gibt auf dieses Produkt für den häuslichen Gebrauch in bestimmten Gebieten eine Garantie über 2 Jahre für alle Bestandteile des Produkts und 5 Jahre für den Produktmotor ab Kaufdatum für Mängel, die durch fehlerhafte Verarbeitung und Materialien verursacht wurden.
the Nutri Juicer® Cold FR GUIDE RAPIDE *
Table des matières 2 5 6 8 9 10 12 Mesures importantes de sécurité Composants Assemblage Fonctions Entretien et nettoyage Dépannage Garantie SAGE® RECOMMANDE LA SÉCURITÉ EN PREMIER Chez Sage®, la sécurité est une priorité.Nous concevons et fabriquons des produits consommateurs en mettant la sécurité de nos clients importants, c’est-à-dire vous, au premier plan. Nous vous demandons également de faire attention lorsque vous utilisez un appareil électrique et de respecter les consignes suivantes.
FR • • • • • • • • bord d’un banc ou d’une table, toucher des surfaces chaudes ou se nouer. Assurez-vous toujours que l’appareil est hors tension, débranché de la prise électrique et qu’il a refroidi avant de le nettoyer, de le déplacer ou de le ranger. Assurez-vous toujours que l’appareil est HORS TENSION, éteint et débranché au niveau de la prise électrique lorsqu’il n’est pas utilisé.
• L’appareil peut être utilisé par des personnes aux capacités mentales ou physiques réduites, ou ayant peu d’expérience et de connaissances uniquement sous supervision ou si elles ont reçu des instructions sur l’utilisation sécuritaire de l’appareil et qu’elles comprennent les risques impliqués. • Cet appareil ne doit pas être utilisé par des enfants. • Ne laissez pas l’appareil sans surveillance lorsqu’il est en marche.
FR Composants A B C I D E F J G H K A. Poussoir (non lavable au lave-vaisselle) B. Goulot d’alimentation à grande ouverture C. Arceau de verrouillage de sûreté D. Couvercle de l’extracteur de jus (non lavable au lave-vaisselle) E. Filtre en acier inoxydable (lavable au lave-vaisselle étage supérieur) F. Récipient à pulpe (lavable au lave-vaisselle) G. Bouton d’arrêt et de contrôle à 2 vitesses H. Rangement du cordon I. Contenant du filtre (lavable au lave-vaisselle) J.
Assemblage AVANT LA PREMIÈRE UTILISATION Avant d’utiliser votre extracteur de jus pour la première fois, retirez et jetez en lieu sûr les emballages et les étiquettes promotionnelles. 4. Placez le couvercle de l’extracteur sur le contenant du filtre, en plaçant la partie inférieure du goulot d’alimentation sur le panier-filtre en acier inoxydable. Assurez-vous toujours que l’appareil est éteint au niveau de la prise électrique et que le cordon d’alimentation est débranché.
FR 7. Faites glisser le poussoir dans le goulot d’alimentation en alignant la fente du poussoir sur la petite saillie à l’intérieur du rebord du tube d’alimentation. REMARQUE La durée de conservation dépend des ingrédients et de la fraîcheur du fruit avant l’extraction. Conservez le jus au réfrigérateur à une température comprise entre 2 et 4 °C. Fente du poussoir Petite saillie à l’intérieur du tube d’alimentation 8.
Fonctions 1. Branchez le cordon d’alimentation à une prise de courant de 220 à 240 V. Branchez la prise de courant pour allumer l’appareil. Réglez à la vitesse souhaitée. Mettez en position BASSE ou ÉLEVÉE en fonction du type de fruit ou de légume à extraire. Servez-vous de la sélection de vitesses comme guide pour préparer des jus avec plusieurs fruits et légumes. 2. Lorsque le moteur est en marche, placez les aliments dans le goulot d’alimentation.
FR Entretien et nettoyage Éteignez l’extracteur en plaçant le bouton sur la position OFF. Puis éteignez l’appareil au niveau de la prise électrique et débranchez le cordon d’alimentation. PANIER-FILTRE NETTOYAGE Lorsque la pulpe sèche sur le filtre, elle peut boucher les petits pores du filtre, ce qui peut modifier les performances de l’extraction. Vous pouvez tremper le panier-filtre dans de l’eau chaude savonneuse pendant 10 minutes, si cela s’avère nécessaire.
Dépannage L’extracteur ne fonctionne pas lorsqu’il est allumé • L’arceau de blocage de sûreté n’est peut-être pas correctement engagé en position de fonctionnement verticale. Vérifiez que le couvercle supérieur est correctement aligné, et que l’arceau de blocage de sûreté est fermement placé sur les deux encoches situées de part et d’autre du couvercle de l’extracteur. • La protection contre les surcharges du moteur a peut-être fonctionné (voir ci-dessous).
FR Le moteur semble caler pendant l’extraction • De la pulpe humide peut s’accumuler sous le couvercle et ralentir l’extracteur s’il est utilisé trop souvent sans être nettoyé. Dans ce cas, démontez-le et suivez les instructions de nettoyage pour nettoyer le contenant du filtre, le panier-filtre en acier inoxydable, ainsi que le couvercle de l’extracteur. • L’extracteur s’arrêtera automatiquement de fonctionner s’il y a trop d’aliments mixés simultanément ou si les morceaux ne sont pas assez petits.
Garantie GARANTIE LIMITÉE 2 ANS ET GARANTIE LIMITÉE 5 ANS DES MOTEURS Sage Appliances garantit ce produit pour un usage domestique sur les territoires spécifiés pendant 2 ans pour toutes les pièces du produit et pendant 5 ans pour le moteur, à compter de la date d’achat, contre les défauts de fabrication et de matériaux. Au cours de cette période de garantie, Sage Appliances s’engage à réparer, remplacer ou rembourser tout produit défectueux (à sa seule discrétion).
FR Déclaration à l'intention du consommateur SAGE FRANCE - GARANTIE LIMITÉE Sage Appliances garantit ce produit pour un usage domestique sur les territoires spécifiés pendant 2 ans à compter de la date d’achat initiale du produit contre les défauts de fabrication et de matériaux. La période de garantie peut-être supérieure pour certains produits ou pour certaines pièces de produits.
Remarques 14
the Nutri Juicer® Cold NL SNELSTARTGIDS *
Inhoud 2 5 6 8 9 10 12 Belangrijke veiligheidsmaatregelen Onderdelen Montage Functies Onderhoud en reiniging Problemen oplossen Garantie SAGE® STELT VEILIGHEID VOOROP Bij Sage® gaan we zeer veiligheidsbewust te werk. Bij het ontwerpen en produceren van onze consumentenproducten staat de veiligheid van onze gewaardeerde klanten voorop. Daarnaast vragen wij u voorzichtig om te gaan met elektrische apparaten en de volgende voorzorgsmaatregelen in acht te nemen.
NL • • • • • • • • met hete oppervlakken of in de knoop raakt. Zorg er altijd voor dat het apparaat UIT staat, de stekker uit het stopcontact is gehaald en het apparaat is afgekoeld voordat u het schoonmaakt, probeert te verplaatsen of opbergt. Zet het apparaat altijd UIT en trek de stekker uit het stopcontact wanneer het apparaat niet in gebruik is. Gebruik het apparaat niet als het netsnoer, de stekker of het apparaat op enigerlei wijze beschadigd is.
• • • • • • capaciteiten of een gebrek aan ervaring en kennis, alleen als zij worden begeleid of instructies hebben gekregen over het veilige gebruik van het apparaat en als zij de gevaren ervan begrijpen. Dit apparaat mag niet door kinderen worden gebruikt. Laat het apparaat niet onbeheerd achter tijdens gebruik. Gebruik nooit uw vingers of keukengerei om ingrediënten door de vultrechter te duwen. Gebruik altijd de meegeleverde fruit- en groentedrukker.
NL Onderdelen A B C I D E F J G H K A. Fruit- en groentedrukker (niet vaatwasserbestendig) B. Brede vultrechter C. Vergrendelbare veiligheidshendel D. Deksel van sapcentrifuge (niet vaatwasserbestendig) E. Filtermand van roestvrij staal (vaatwasserbestendig, enkel bovenste lade) F. Opvangbak voor pulp (vaatwasserbestendig) G. Tweevoudige snelheidsregelaar en OFF-knop H. Snoeropbergruimte I. Behuizing van filterkom (vaatwasserbestendig) J.
Montage VOOR HET EERSTE GEBRUIK Voordat u uw sapcentrifuge voor het eerst gebruikt, verwijdert u het verpakkingsmateriaal en de promotiestickers en -labels en gooit u deze op een veilige manier weg. 4. Plaats het deksel van de sapcentrifuge over de behuizing van de filterkom. Schuif de onderkant van de vultrechter over de filtermand van roestvrij staal. Zorg dat het apparaat is uitgeschakeld en dat de stekker uit het stopcontact is getrokken.
NL 7. Schuif de fruit- en groentedrukker in de vultrechter. Zorg hierbij dat de groef in de drukker is uitgelijnd met de kleine uitstulping aan de binnenkant bovenaan de vultrechter. Groef in fruit- en groentedrukker 1. Haal het deksel van de kan en draai het 180°. 2. Druk het deksel stevig omlaag om het terug te plaatsen. 3. Bewaar het sap in de ijskast. OPMERKING Kleine uitstulping in vultrechter De bewaartijd is afhankelijk van de geperste ingrediënten en de versheid van het fruit vóór het persen.
Functies 1. Sluit het netsnoer aan op een stopcontact van 220 ‑ 240 V. Zet het apparaat aan. Kies de gewenste snelheid. Draai de knop naar de lage (LOW) of hoge (HIGH) instelling, afhankelijk van type fruit of groenten dat u wilt persen. Gebruik de tabel voor snelheidskeuze als richtlijn voor het persen van verschillende soorten groenten en fruit. 2.
NL Onderhoud en reiniging Zorg dat de sapcentrifuge is uitgeschakeld door de draaiknop op OFF te zetten. Trek vervolgens de stekker uit het stopcontact. FILTERMAND REINIGEN Als u de pulp laat aankoeken, kunnen de fijne gaatjes in de filterzeef verstopt raken, wat mogelijk van invloed is op de prestaties van het apparaat. U kunt de filtermand zo nodig 10 minuten in warm zeepsop laten weken.
Problemen oplossen Sapcentrifuge werkt niet wanneer deze is ingeschakeld • De vergrendelingshendel staat mogelijk niet goed in de verticale positie. Controleer of het bovenste deksel goed is uitgelijnd en dat de vergrendelingshendel stevig in de groeven aan weerszijden van het deksel van de sapcentrifuge vastzit. • Beveiliging voor motoroverbelasting is mogelijk ingeschakeld (zie hieronder).
NL Motor lijkt af te slaan tijdens het gebruik • Vochtige pulp kan zich onder het deksel van de sapcentrifuge ophopen en ervoor zorgen dat de motor afslaat als het apparaat te vaak wordt gebruikt zonder dat het wordt gereinigd. In dit geval haalt u het apparaat uit elkaar en volgt u de reinigingsinstructies om de behuizing van de filterkom, de filtermand van roestvrij staal en het deksel van de sapcentrifuge schoon te maken.
Garantie BEPERKTE GARANTIE VAN 2 JAAR EN BEPERKTE GARANTIE OP DE MOTOR VAN 5 JAAR Sage Appliances biedt een garantie op dit product voor huishoudelijk gebruik in genoemde gebieden gedurende 2 jaar op alle productonderdelen en 5 jaar op de motor van het product vanaf de datum van aankoop tegen defecten veroorzaakt door gebrekkige afwerking en materialen. Gedurende deze garantieperiode zal Sage Appliances defecte producten repareren, vervangen of terugbetalen (naar eigen goeddunken van Sage Appliances).
the Nutri Juicer® Cold IT GUIDA RAPIDA *
Sommario 2 5 6 8 9 10 12 Norme di sicurezza importanti Componenti Montaggio Funzioni Manutenzione e pulizia Risoluzione dei problemi Garanzia SAGE® CONSIGLIA: LA SICUREZZA PRIMA DI TUTTO In Sage® abbiamo molto a cuore la sicurezza. Creiamo e commercializziamo prodotti di consumo tenendo sempre presente la sicurezza dei nostri clienti. Inoltre, invitiamo i clienti a prestare molta attenzione durante l'utilizzo degli apparecchi elettrici e a osservare le seguenti precauzioni.
IT • • • • • • • • banco da lavoro, tocchi superfici calde o formi nodi. Prima di pulire, spostare o riporre l'elettrodomestico, assicurarsi sempre che sia spento e scollegato dalla presa di alimentazione e che si sia raffreddato a sufficienza. Quando non in uso, impostare sempre l'elettrodomestico su OFF, spegnere l'interruttore di alimentazione e scollegare il cavo dalla presa.
• • • • • • utilizzino sotto la supervisione di qualcuno o secondo specifiche istruzioni ricevute in merito all'uso in sicurezza dell'elettrodomestico e che comprendano i rischi associati. Evitare che l'elettrodomestico venga utilizzato dai bambini. Non lasciare l'elettrodomestico incustodito durante il funzionamento. Non spingere gli ingredienti nell'imbuto con le dita o con altri utensili. Utilizzare sempre l'apposito spingitore fornito con l'elettrodomestico.
IT Componenti A B C I D E F J G H K A. Spingitore (non lavabile in lavastoviglie) B. Ampio imbuto C. Leva del blocco di sicurezza D. Coperchio dello spremiagrumi (non lavabile in lavastoviglie) E. Cestello filtrante in acciaio inossidabile (lavabile nel ripiano superiore della lavastoviglie) F. Contenitore raccogli-polpa (lavabile in lavastoviglie) G. Manopola spegnimento e controllo a 2 velocità H. Avvolgicavo I. Copertura del filtro (lavabile in lavastoviglie) J.
Montaggio PREPARAZIONE AL PRIMO UTILIZZO Prima di usare l'elettrodomestico per la prima volta, rimuovere e smaltire in sicurezza i materiali di imballaggio e le etichette promozionali. Assicurarsi sempre che l'interruttore di alimentazione sia spento e che il cavo sia scollegato dalla presa. 3.
IT 6. La leva del blocco di sicurezza dovrebbe adesso trovarsi in posizione verticale ed essere fissata alla parte superiore del coperchio dello spremiagrumi. 7. Far scorrere lo spingitore verso il basso nell'imbuto allineando il solco dello spingitore con la piccola sporgenza presente nella parte interna dell'imboccatura dell'imbuto. Solco dello spingitore BOCCALE RACCOGLI-SUCCO È possibile conservare il succo nel boccale raccogli-succo fino a 3 giorni seguendo queste istruzioni: 1.
Funzioni 1. Collegare il cavo di alimentazione a una presa di corrente da 220-240 V. Spostare l'interruttore di alimentazione su ON. Regolare la velocità per l'impostazione desiderata. Ruotare la manopola sull'impostazione LOW (alta) o HIGH (bassa) a seconda del tipo di frutta o ortaggi selezionati. Utilizzare la tabella di selezione della velocità come guida per i diversi tipi di frutta e ortaggi. 2.
IT Manutenzione e pulizia Assicurarsi che lo spremiagrumi sia spento ruotando la manopola su OFF. Spegnere l'interruttore di alimentazione e scollegare il cavo dalla presa. CESTELLO FILTRANTE PULIZIA Se i residui di polpa si seccano sul filtro possono causare l'ostruzione delle finissime maglie del filtro e ridurre l'efficienza dello spremiagrumi. Se necessario, è possibile immergere il cestello filtrante in acqua calda saponata per 10 minuti.
Risoluzione dei problemi L'apparecchio non funziona quando è impostato su ON • La leva del blocco di sicurezza potrebbe non essere fissata correttamente in posizione verticale. Controllare che la copertura superiore sia allineata correttamente e che la leva del blocco di sicurezza sia fissata nei due solchi sui lati del coperchio dello spremiagrumi. • Potrebbe essere entrata in funzione la protezione da sovraccarico del motore (vedere di seguito).
IT Il motore sembra fermarsi durante il funzionamento • La polpa bagnata può accumularsi sotto il coperchio dello spremiagrumi e provocare un blocco se l'azione dello spremiagrumi è troppo vigorosa. Se ciò si verifica, smontare l'elettrodomestico e seguire le istruzioni per la pulizia della copertura del filtro, del cestello filtrante in acciaio inossidabile e del coperchio dello spremiagrumi.
Garanzia GARANZIA LIMITATA DI 2 ANNI E GARANZIA LIMITATA DI 5 ANNI SUL MOTORE Sage Appliances offre una garanzia per l’utilizzo domestico di questo prodotto in specifiche aree geografiche; la copertura è di 2 anni per l’intero prodotto e di 5 anni per il motore, a partire dalla data di acquisto. La garanzia copre eventuali malfunzionamenti causati da difetti di fabbricazione o dei materiali.
the Nutri Juicer® Cold ES GUÍA RÁPIDA *
Índice 2 5 6 8 9 10 12 Sage® recomienda seguridad ante todo Componentes Ensamblaje Funciones Cuidado y limpieza Resolución de problemas Garantía SAGE® RECOMIENDA SEGURIDAD ANTE TODO En Sage® nos preocupa enormemente la seguridad. Para el diseño y la fabricación de nuestros productos de consumo tenemos en cuenta antes que nada la seguridad de nuestros clientes, como tú. También te rogamos que actúes cuidadosamente al usar cualquier electrodoméstico y que tomes las precauciones siguientes.
ES • • • • • • • • una mesa, entre en contacto con superficies calientes o se enrede. Antes de limpiar, mover o guardar el electrodoméstico, asegúrate siempre de que esté apagado y desenchufado de la toma de corriente, y de que se haya enfriado tras el uso. Cuando no utilices el electrodoméstico, debe estar apagado (en la posición OFF) y desenchufado de la toma de corriente. No lo utilices si el cable de alimentación, el enchufe o el aparato propiamente dicho están dañados.
• El aparato puede ser utilizado por personas con discapacidades físicas o mentales, o sin experiencia ni conocimientos de uso, siempre y cuando reciban supervisión o instrucciones para el uso seguro del dispositivo y comprendan los riesgos de ese uso. • Este aparato no debe ser utilizado por niños. • Supervisa el aparato en todo momento mientras esté en funcionamiento. • No introduzcas alimentos en la abertura para alimentos con los dedos u otros utensilios.
ES Componentes A B C I D E F J G H K A. Empujador de alimentos (no apto para lavavajillas) B. Abertura para alimentos ancha C. Brazo con bloqueo de seguridad D. Tapa de la licuadora (no apta para lavavajillas) E. Filtro de acero inoxidable (apto para la bandeja superior del lavavajillas) F. Depósito de pulpa (apto para lavavajillas) G. Control de 2 velocidades y apagado H. Compartimento para cable I. Cubeta del recipiente de filtrado (apta para lavavajillas) J.
Ensamblaje ANTES DEL PRIMER USO Antes de usar la licuadora por primera vez, retira y desecha de forma apropiada cualquier material de embalaje, así como etiquetas y pegatinas promocionales. Asegúrate de que el aparato no esté conectado a la toma de corriente y el cable de alimentación esté desenchufado. Lava la cubeta del recipiente de filtrado, el filtro, la tapa de la licuadora, el empujador de alimentos, el depósito de pulpa y la jarra de zumo con tapa con agua tibia y jabón con un paño suave.
ES 7. Desliza el empujador de alimentos por la abertura para alimentos alineando la ranura del empujador de alimentos con la pequeña protuberancia en el interior de la parte superior del tubo de alimentación. Ranura del empujador de alimentos NOTA El tiempo de almacenamiento depende de los ingredientes que se licuen y de la frescura de la fruta antes del licuado. El zumo se debe conservar en la nevera a una temperatura comprendida entre 2°C y 4°C. Protuberancia pequeña dentro del tubo de alimentación 8.
Funciones 1. Enchufa el cable de alimentación a una toma de corriente de 220-240 V. Enciende el aparato mientras esté conectado a la toma de corriente. Ajusta la velocidad al ajuste deseado. Gira la rueda a la velocidad LOW (Baja) o HIGH (Alta) en función del tipo de fruta o verdura que se esté licuando. Utiliza el selector de velocidad como guía para licuar diferentes frutas y verduras. 2.
ES Cuidado y limpieza Asegúrate de que la licuadora esté apagada girando la rueda del selector hasta la posición OFF. A continuación, apaga el aparato de la toma de corriente y desenchufa el cable de alimentación. FILTRO LIMPIEZA Si se deja secar la pulpa, podría obstruir los finos poros del filtro de malla, lo que puede afectar al rendimiento de la licuadora. El filtro se puede poner a remojo en agua jabonosa caliente durante 10 minutos, si es necesario.
Resolución de problemas La licuadora no funciona cuando está encendida • Puede que el brazo de bloqueo de seguridad no esté correctamente colocado en la posición de operación vertical. Comprueba que la tapa superior esté correctamente alineada y que el brazo de bloqueo esté firmemente colocado en las dos ranuras a cada lado de la tapa de la licuadora. • Puede que se haya usado protección de sobrecarga de motor (véase a continuación).
ES El motor parece detenerse cuando se extrae zumo • La pulpa húmeda puede acumularse bajo la tapa de la licuadora y hacer que se detenga la licuadora si esta se usa en exceso sin limpiarla. Si sucede esto, desensámblala y sigue las instrucciones de limpieza para limpiar la cubeta del recipiente de filtrado, el filtro de acero inoxidable y la tapa de la licuadora.
Garantía GARANTÍA LIMITADA DE 2 AÑOS Y GARANTÍA MOTORA LIMITADA DE 5 AÑOS La garantía de Sage Appliances cubre este producto para uso doméstico en territorios específicos durante 2 años para todas las piezas del producto y 5 años para el motor, a partir de la fecha de compra, contra fallos causados por mano de obra y materiales defectuosos. Durante el plazo de la garantía, Sage Appliances reparará o sustituirá productos defectuosos (a criterio de Sage Appliances).
the Nutri Juicer ® Cold * PT MANUAL RÁPIDO
Índice 2 6 7 9 A Sage® recomenda a segurança como máxima prioridade Componentes Montagem Funções 10 Cuidados e limpeza 11 Resolução de problemas 13 Garantia A SAGE® RECOMENDA A SEGURANÇA COMO MÁXIMA PRIORIDADE Na Sage®, temos a máxima preocupação com a segurança. Concebemos e produzimos produtos para o consumidor principalmente com a sua segurança, o nosso prezado cliente, em mente. Além disso, pedimos que tenha cuidado quando utilizar qualquer aparelho elétrico e que cumpra as precauções seguintes.
PT • • • • • afastado da extremidade e não utilize próximo de uma fonte de calor, como uma placa térmica, forno ou bico de gás. A vibração durante a operação pode fazer com que o aparelho se mova. Não deixe o cabo de alimentação pendurado sobre a extremidade de uma mesa ou bancada, em contacto com superfícies quentes nem permita que o cabo se enrosque.
• • • • • • • 4 afastados das peças móveis ou rotativas durante o funcionamento. Não utilize o aparelho para outra função que não a preparação de alimentos e/ou bebidas. Não ligue um dispositivo de comutação externo (como um temporizador) ou ligue o aparelho a um circuito que possa ligar e desligar regularmente o aparelho para evitar o possível risco do arranque do aparelho devido à reinicialização acidental da proteção contra sobrecarga.
PT de interbloqueio enquanto o liquidificador está em funcionamento. O símbolo apresentado indica que este aparelho não deve ser eliminado juntamente com os resíduos domésticos normais. Deve ser encaminhado para um centro de recolha de resíduos da autoridade local designado para este fim ou um revendedor que forneça este serviço. Contacte a Câmara Municipal local para obter mais informações.
Componentes A B C I D E F J G H K A. Empurrador de alimentos (não adequado para máquina de lavar louça) B. Calha de alimentação larga C. Braço de segurança de interbloqueio D. Cobertura do liquidificador (não adequado para máquina de lavar louça) E. Cesto de filtro de aço inoxidável (adequado para a prateleira superior da máquina de lavar louça) F. Recipiente de polpa (adequado para máquina de lavar louça) G. Botão de controlo de duas velocidades e de desligar H. Armazenamento do cabo I.
PT Montagem ANTES DA PRIMEIRA UTILIZAÇÃO Antes de usar o seu liquidificador pela primeira vez, remova e elimine em segurança qualquer material de embalagem e etiquetas promocionais. 4. Coloque a cobertura o liquidificador sobre a taça do filtro, posicionando a parte mais baixa da calha de alimentação sobre o cesto do filtro de aço inoxidável. Certifique-se de que o aparelho está desligado e que a ficha do cabo de alimentação não está numa tomada elétrica.
7. Deslize o empurrador de alimentos para baixo da calha de alimentos, alinhando a ranhura no empurrador de alimentos com a pequena protuberância no interior do topo do tubo de alimentação. Ranhura do empurrador de alimentos Protuberância pequena dentro do tubo de alimentação 8. Coloque o recipiente de polpa na posição, inclinando ligeiramente a base do motor para a direita.
PT Funções 1. Ligue o cabo de alimentação a uma tomada elétrica de 220–240 V. Ligue a ficha do cabo de alimentação da tomada elétrica. Ajuste a velocidade para a definição pretendida. Rode o botão para definição LOW (Baixa) ou HIGH (Alta) consoante o tipo de fruta ou vegetais que utiliza para o sumo. Utilize o seletor de velocidades como guia para fazer sumo de diferentes frutos e legumes. GUIA SELETOR DE VELOCIDADE 2.
Cuidados e limpeza Certifique-se de que o liquidificador está desligado, rodando o botão para a posição OFF (Desativar). Desligue o aparelho na tomada elétrica e desligue o cabo de alimentação. CESTO DE FILTRO LIMPEZA Se deixar secar a polpa no filtro, pode entupir os poros finos da rede do filtro, que pode afetar o desempenho de fazer sumo. O cesto do filtro pode ser embebido em água quente com sabão durante 10 minutos, se necessário.
PT Resolução de problemas O liquidificador não funciona quando é LIGADO • O braço de bloqueio de segurança pode não estar bem encaixado na posição de operação vertical. Verifique se a cobertura superior está bem alinhada e se o braço de bloqueio está localizado firmemente nas duas ranhuras de cada lado da cobertura do liquidificador. • Proteção de sobrecarga do motor pode ter sido ativada (ver abaixo).
O motor aparenta bloquear quando está a trabalhar • A polpa pode acumular-se na cobertura do liquidificador e bloqueá-lo se for usado excessivamente sem limpeza. Se ocorrer, desmonte e siga as instruções de Limpeza e limpe a taça do filtro, a calha de alimentação sobre o cesto do filtro de aço inoxidável e baixe-o para a posição. • O liquidificador para automaticamente de funcionar se estiver a processar demasiada comida ao mesmo tempo ou os pedaços não são muito pequenos.
PT Garantia GARANTIA LIMITADA DE 2 ANOS E GARANTIA LIMITADA DO MOTOR DE 5 ANOS A Sage Appliances fornece uma garantia para este produto para uso doméstico nos territórios especificados de 2 anos para todas as peças do produto e de 5 anos para o motor do produto a partir da data de compra contra avarias provocadas por defeitos na mão-de-obra e nos materiais.
GBR BRG Appliances Limited Unit 3.