the Smart Grill ™ BGR820/SGR820 EN QUICK GUIDE DE KURZANLEITUNG FR GUIDE RAPIDE NL SNELSTARTGIDS IT GUIDA RAPIDA ES GUÍA RÁPIDA PT MANUAL RÁPIDO
Contents 2 6 8 9 12 14 16 16 Sage Recommends Safety First Components Assembly Functions Tips Care & Cleaning Troubleshooting Guarantee SAGE RECOMMENDS SAFETY FIRST At Sage we are very safety conscious. We design and manufacture consumer products with the safety of you, our valued customer, foremost in mind. In addition, we ask that you exercise a degree of care when using any electrical appliance and adhere to the following precautions. Misuse can cause potential injuries.
EN • Position the appliance on a stable, heat resistant, level, dry surface away from the edge and do not operate on or near a heat source such as a hot plate, oven or gas hob. • Do not let the power cord hang over the edge of a bench or table, touch hot surfaces or become knotted. • Position the appliance at least 20cm from walls or heat/steam sensitive materials and provide adequate space above and on all sides for air circulation.
• Do not use the appliance • Cleaning of the if the power cord, plug, appliance should not be or appliance becomes carried out by children damaged in any way. If unless they are 8 years damaged or or older and supervised. maintenance other than • The appliance and its cleaning is required, cord should be kept out please contact Sage of reach of children aged Customer Service or go 8 years and younger. to sageappliances.
EN The symbol shown indicates that this appliance should not be disposed of in normal household waste. It should be taken to a local authority waste collection centre designated for this purpose or to a dealer providing this service. For more information, please contact your local council office. To protect against electric shock, do not immerse the power plug, cord or appliance in water or any liquid.
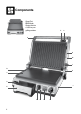
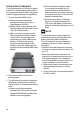
Components Open Flat BBQ Mode Opens flat into a 1650 sq. cm grilling surface.
EN A. Stainless Steel Housing with Die-Cast Arms B. Cast Aluminium, Non-Stick Plates Coated with titanium infused Quantanium”’ for scratch resistance and oil free cooking. C. Removable, Dishwasher Safe Plates Flat plate for eggs and pancakes, ribbed plate to sear meats. D. Bottom PLATE RELEASE Removes the bottom cooking plate. independently remove the top and bottom cooking plates for easy cleaning or to interchange plate positions. E.
Assembly PREPARING THE GRILL FOR USE 1. Remove and safely discard any packing material and promotional labels from the grill. 2. Wipe the cooking plates and drip tray with a soft damp sponge. Dry thoroughly. 3. Ensure the drip tray is correctly inserted into the grill. 4. Ensure the cooking plates are correctly inserted and securely locked into position. 5. Place the grill on a flat, dry surface. Ensure there is a minimum distance of 10cm of space on both sides of the appliance. 6.
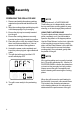
EN Functions OPERATING YOUR NEW APPLIANCE PREHEATING THE GRILL 1. Ensure the top plate of the grill is in the closed position, with the Height Control Clip in the OPEN position. This will ensure faster, more efficient preheating. 2. Turn the temperature dial to adjust the temperature in 5°C increments. Rotate the dial to SEAR (210°C–230 °C) for fast preheating, PANINI (sandwich) (180°C– 205°C), LOW (160°C –175°C) or select an alternative temperature. 3.
USE IN OPEN FLAT BBQ MODE The grill opens flat into a 1650 sq. cm grilling surface. The ribbed cooking plate is perfect for searing meats while the flat cooking plate is ideal for eggs, pancakes and vegetables. 1. To open the grill into BBQ mode: a) Ensure the grill has completely preheated and the LCD screen no longer displays HEATING. b) Ensure the top cooking plate is in the closed position, with the Height Control Clip in the OPEN position. c) With your left hand, grip the handle.
EN USE AS A SANDWICH OR PANINI PRESS 1. To open the grill: a) Ensure the grill has completely preheated and the LCD screen no longer display HEATING. b) Ensure the top cooking plate is closed. The Adjustable Height Control Clip, located on the right side of the top plate, should be in the OPEN position. c) Use the handle to open the top plate to a 90-degree position. 2. Place food on the bottom cooking plate. 3. Use the handle to close the top cooking plate.
Tips GRILLING TIPS Meats Recommended cuts: • Beef - sirloin (New York), rump, rib eye (scotch fillet), fillet. • Lamb - trim lamb leg steaks, fillet eye of loin, cutlets and diced lamb. • Pork – butterfly loin steaks, spareribs, leg steaks, fillets, diced pork. • It is not recommended to cook items with thick bones such as T-bone steaks. • Tougher cuts such as beef blade, topside steak, lamb forequarter or neck chops can be used.
EN Well done Cook on one side until moisture is pooling on top surface. Tum and cook on second side until moisture is pooling on top. Reduce heat slightly and continue to cook until steak feels very firm with back of tongs. A meat thermometer will show the internal temperature of a well done steak as 75°C. NOTE Steaks do not need turning if cooking in contact position. Turn steaks once only when grilling in open flat BBQ mode.
Care & Cleaning Ensure the grill is turned OFF by turning the Temperature dial to the OFF position. The grill is OFF when the LCD screen displays Off and the default ‘0’ zero time. Remove the power plug from the wall outlet. Allow the grill to cool completely before disassembling and cleaning. Always dean the outer body, drip tray and cooking plates after each use to prevent a build-up of ingredients.
EN NOTE The underside of the cooking plate may discolour over time and can form a layer of corrosion. This is normal. Any discolouration that may occur to either side of the cooking plate will only detract from the appearance of the plate and will not affect the cooking performance. To remove discoloration or corrosion, use a non-abrasive plastic scouring pod or nylon washing brush. Rinse and dry thoroughly. NOTE Ensure the round pad on the underside of the plate is clean. 5. Rinse and dry thoroughly.
Troubleshooting ERROR MODE When the LCD screen displays ‘Err’ error mode: 1. Unplug the grill from the wall outlet 2. Ensure the grill is completely cool. 3. Ensure the cooking plates are correctly and securely inserted into position. 4. Re-insert the plug into the wall outlet. 5. The LCD screen should no longer display ‘Err’ error Mode. 6. If the problem continues call Breville Customer Service.
the Smart Grill ™ BGR820/SGR820 DE KURZANLEITUNG
Inhalt 2 Bei Sage steht Sicherheit an erster Stelle 6 Komponenten 8 Montage 9 Funktionen 12 Tipps 14 Pflege und Reinigung 16 Störungsbehebung 16 Garantie BEI SAGE STEHT SICHERHEIT AN ERSTER STELLE Wir bei Sage sind sehr sicherheitsbewusst. Beim Design und bei der Herstellung denken wir zuallererst an Ihre Sicherheit. Wir bitten Sie, bei der Verwendung aller Elektrogeräte angemessene Sorgfalt walten zu lassen und sich an die folgenden Vorsichtsmaßnahmen zu halten.
DE Verwenden Sie das Gerät nicht in fahrenden Fahrzeugen oder Booten. Verwenden Sie das Gerät nicht im Freien. Fehlgebrauch kann zu Verletzungen führen. • Rollen Sie das Kabel vor Inbetriebnahme ganz aus. • Stellen Sie das Gerät auf eine stabile, hitzebestän dige, ebene, und trockene Fläche in einem sicheren Abstand zur Kante und betreiben Sie es nicht in der Nähe einer Hitzequelle, wie beispielsweise Kochplatten, Backöfen oder Gaskochfelder.
• Stellen Sie keine Gegenstände auf den Grill, wenn der Deckel geschlossen ist oder wenn das Gerät gerade verwendet oder aufbewahrt wird. Das Gerät ist mit dem Symbol für eine heiße Oberfläche gekenn zeichnet. Der Deckel und andere Oberflächen erhitzen sich während des Gerätebetriebs und bleiben auch noch einige Zeit nach dem Gebrauch heiß. Verwenden Sie zum Vermeiden von Verbren nungen immer isolierte Ofenhandschuhe oder hitzeisolierte Griffe, sofern vorhanden.
DE Kenntnis mangelt, nur unter Beaufsichtigung benutzt werden oder wenn sie in die sichere Handhabung des Geräts eingewiesen wurden und die damit verbunde nen Gefahren verstehen. • Kinder dürfen das Gerät nur reinigen, wenn sie ein Mindestalter von 8 Jahren erreicht haben und während der Reinigung beaufsichtigt werden. • Das Gerät und das Netzkabel müssen außerhalb der Reich weite von Kindern unter 8 Jahren aufbewahrt werden.
Komponenten Offener, flacher BBQ-Modus mit einer ebenen Grillfläche von 1650 cm².
DE A. Edelstahlgehäuse mit DruckgussScharnierklinken B. Antihaftbeschichtete Aluminium gussplatten Die Beschichtung aus mit Titanium versetztem QuanTanium™ bietet hohe Kratzfestigkeit und ermöglicht Kochen ohne Öl. C. Herausnehmbare, spülmaschinenfeste Grillplatten Flache Platte für Spiegelei und Pfannkuchen, geriffelte Platte zur Fleischzubereitung. D. PLATE RELEASE-Knopf (untere Plattenentriegelung) Dient zum Herausnehmen der unteren Grillplatte.
Montage VORBEREITUNG DES GRILLS 1. Entfernen und entsorgen Sie jegliches Verpackungsmaterial und Aufkleber vom Grill. 2. Wischen Sie die Grillplatten und die Abtropfschale mit einem weichen, feuchten Schwamm ab. Trocknen Sie alles gründlich ab. 3. Vergewissern Sie sich, dass die Abtropfschale richtig in den Grill eingesetzt ist. 4. Stellen Sie sicher, dass die Grillplatten richtig eingesetzt und sicher eingerastet sind. 5. Stellen Sie den Grill auf eine ebene, trockene Fläche.
DE Funktionen EINSATZ IHRES NEUEN GERÄTES VORHEIZEN DES GRILLS 1. Achten Sie darauf, dass die obere Platte des Grills geschlossen ist, der Clip zur verstellbaren Höhenkontrolle sich dabei aber in der OPEN-Position befindet. Dadurch heizt das Gerät schneller und effizienter vor. 2. Mit dem TEMP-Drehregler können Sie die Temperatur in 5-Grad-Schritten anpassen.
VERWENDUNG IM OFFENEN BBQ-MODUS Sie können den Grill öffnen, um eine ebene Grillfläche von 1650 cm² zu erhalten. Die geriffelte Grillplatte ist ideal für das Anbraten von Fleisch, während sich die Grillplatte mit flacher Oberfläche ideal für Eier, Pfannkuchen und Gemüse eignet. 1. Um den Grill vollständig in den BBQModus zu öffnen: a) Stellen Sie sicher, dass der Grill komplett vorgeheizt ist und die HEATING-Anzeige nicht mehr leuchtet.
DE VERWENDUNG ALS SANDWICHODER PANINI-PRESSE 1. So öffnen Sie den Grill: a) Stellen Sie sicher, dass der Grill komplett vorgeheizt ist und die HEATING-Anzeige nicht mehr leuchtet. b) Stellen Sie sicher, dass die obere Grillplatte abgesenkt ist. Der Clip für die anpassbare Höheneinstellung auf der rechten Seite der oberen Platte muss auf die Position OPEN (offen) eingestellt sein. c) Heben Sie die obere Platte mit dem Griff an, damit sie im rechten Winkel von der Bodenplatte absteht. 2.
Tipps GRILLTIPPS Fleisch Empfohlene Fleischstücke: • Rind: Lende, Rumpsteak, Ribeye-Steak, Filet. • Lamm: Mageres Lammkeulensteak, Lendenfilet, Kotelett, gewürfeltes Fleisch. • Schwein: Schmetterlingssteak von der Lende, Rippchen, Keulensteak, Filet, gewürfeltes Fleisch. • Wir empfehlen Ihnen, mit diesem Grill keine Fleischstücke mit großen Knochen zuzubereiten, beispielsweise T-BoneSteaks.
DE Rosa Eine Seite grillen, bis sich auf der Oberfläche Feuchtigkeit sammelt. Nur einmal wenden. Andere Seite grillen, bis Flüssigkeit zu sehen ist. Vom Grill nehmen, wenn sich das Steak beim Testen mit der Zangenrückseite elastisch anfühlt. Bei einem rosafarbenen Steak zeigt ein Fleischthermometer eine Innentemperatur von 65–70 °C. Halbrosa Eine Seite grillen, bis sich auf der Oberfläche Feuchtigkeit sammelt. Andere Seite grillen, bis sich auf der Oberfläche Feuchtigkeit sammelt.
Pflege und Reinigung Schalten Sie den Grill aus, indem Sie den TEMP-Drehregler auf OFF drehen. Wenn auf dem LCD-Display die Anzeige OFF erscheint und im Zeitfenster eine Null angezeigt wird, ist der Grill ausgeschaltet. Ziehen Sie den Netzstecker aus der Steckdose. Lassen Sie den Grill vollständig abkühlen, bevor Sie das Gerät zerlegen und reinigen. Reinigen Sie das Gehäuse, die Abtropfschale und die Grillplatten nach jedem Einsatz, damit sich kein Belag bilden kann.
DE 3. Platzieren Sie die Grillplatten in der Geschirrspülmaschine (ausschließlich im oberen Fach). 4. Alternativ können Sie die Platten in heißem Seifenwasser mit einem weichen, feuchten Schwamm abwaschen. Verwenden Sie einen nicht scheuernden Flüssigreiniger, um Ablagerungen zu verhindern. Tragen Sie das Reinigungs mittel vor dem Reinigen auf den Schwamm und nicht auf die Grillplatte auf.
Störungsbehebung FEHLERMODUS Wenn im LCD-Display die Fehlermeldung „Err“ angezeigt wird: 1. Ziehen Sie den Netzstecker aus der Steckdose. 2. Stellen Sie sicher, dass der Grill vollständig abgekühlt ist. 3. Vergewissern Sie sich, dass die Grillplatten korrekt eingesetzt sind. 4. Stecken Sie den Grill wieder ein. 5. Nun sollte die Fehlermeldung „Err“ vom LCD-Display verschwunden sein. 6. Wenn das Problem weiterhin besteht, wenden Sie sich an den Sage Kundendienst.
the Smart Grill ™ BGR820/SGR820 FR GUIDE RAPIDE
Table des matières 2 Sage recommande la sécurité avant tout 6 Composants 8 Assemblage 9 Fonctions 12 Astuces 14 Entretien et nettoyage 16 Dépannage 16 Garantie CONSIGNES DE SÉCURITÉ IMPORTANTES LISEZ TOUTES LES INSTRUCTIONS AVANT UTILISATION ET CONSERVEZ-LES POUR RÉFÉRENCE ULTÉRIEURE • Une version téléchar geable de ce document est également disponible sur sageappliances.com.
FR pas en plein air. Une mauvaise utilisation peut engendrer des blessures. • Déroulez entièrement le cordon d'alimentation avant utilisation. • Placez l'appareil sur une surface stable, résistante à la chaleur, plane et sèche, loin du bord. Ne l'utilisez pas sur ou à proximité d'une source de chaleur (plaque chauffante, four ou cuisinière au gaz). • Ne laissez pas le cordon d'alimentation pendre au bord d'un plan de travail ou d'une table, entrer en contact avec des sur faces chaudes ou se nouer.
brûlures, utilisez toujours • Cet appareil peut être des gants isolants, les utilisé par des enfants poignées ou les boutons âgés de 8 ans ou plus au besoin. et des personnes aux • Assurez-vous toujours capacités mentales, que l'appareil est hors sensorielles ou physi tension, débranché de ques réduites, ou ayant la prise électrique et peu d'expérience et de refroidi avant de le connaissances, unique nettoyer, de le déplacer ment sous supervision ou de le ranger.
FR • L'installation d'un com mutateur de sécurité de courant résiduel est recommandée pour fournir une sécurité supplémentaire lors de l'utilisation de tous les appareils électriques. Les interrupteurs diffé rentiels avec un courant de fonctionnement nomi nal maximal de 30 mA sont recommandés. Consultez un électricien pour obtenir des conseils professionnels. Le symbole illustré indique que cet appareil ne doit pas être jeté dans les ordures ménagères.
Composants Le mode barbecue à plat offre une surface plane de grillage de 1 650 cm².
FR A. Conteneur en acier inoxydable avec bras en métal moulé B. Plaques antiadhésives en aluminium moulé Recouvertes de Quantanium™ renforcé au titane offrant une résistance aux rayures et une cuisson sans huile. C. Plaques amovibles lavables au lave-vaisselle Plaque plate pour les œufs et les crêpes, plaque nervurée pour griller les viandes. D. RETRAIT DE LA PLAQUE inférieure Retire la plaque de cuisson inférieure.
Assemblage PRÉPARATION DU GRIL EN VUE DE SON UTILISATION 1. Retirez tous les emballages et les étiquettes promotionnelles du gril et éliminez-les de façon sûre. 2. Essuyez les plaques de cuisson et le bac d'égouttement avec une éponge douce et humide. Séchez soigneusement. 3. Assurez-vous que le bac d'égouttement est correctement inséré dans le gril. 4. Assurez-vous que les plaques de cuisson sont correctement insérées et bien verrouillées en place. 5. Placez le gril sur une surface plane et sèche.
FR Fonctions FONCTIONNEMENT DE VOTRE NOUVEL APPAREIL PRÉCHAUFFAGE DU GRIL 1. Assurez-vous que la plaque supérieure du gril est en position fermée et que le bouton d'ajustement de la hauteur est en position OPEN (ouverte). Le préchauffage sera ainsi plus rapide et plus efficace. 2. Tournez le bouton de température pour ajuster la température par incréments de 5 °C.
UTILISER LE MODE BARBECUE À PLAT Le gril est ouvert à plat sur une surface de grillage de 1 650 cm². La plaque de cuisson striée est idéale pour griller des viandes, tandis que la plaque de cuisson plate est parfaitement adaptée pour les œufs, les crêpes et les légumes. 1. Pour ouvrir le gril en mode barbecue : a) Assurez-vous que le gril est entièrement préchauffé et que l'écran LCD n'indique plus « HEATING ».
FR UTILISER LE PRESSE-SANDWICHS OU LE PRESSE-PANINIS 1. Pour ouvrir le gril : a) Assurez-vous que le gril est entièrement préchauffé et que l'écran LCD n'indique plus « HEATING ». b) Vérifiez que la plaque de cuisson supérieure est bien fermée. Le bouton de contrôle de la hauteur à droite de la plaque supérieure doit être en position OPEN (ouverte). c) Utilisez la poignée pour ouvrir la plaque supérieure à 90°. 2. Placez les aliments sur la plaque de cuisson inférieure. 3.
Astuces ASTUCES DE GRILLAGE Viandes Morceaux recommandés : • Bœuf - aloyau (New York), rumsteck, entrecôte, filet. • Agneau - steaks de gigot d'agneau, filet de longe, côtelettes et dés d'agneau. • Porc - steaks d'échine fendus en deux, côtes levées, gigots, filets, dés de porc. • Il n'est pas recommandé de cuisiner des aliments contenant des os épais comme les biftecks d'aloyau. • Des morceaux plus durs tels que la lame de bœuf, le gîte de bœuf, le quartier avant d'agneau ou le cou peuvent être utilisées.
FR À point Faites cuire d'un côté jusqu'à ce que l'humi dité s'accumule à la surface. Retournez une seule fois. Faites cuire de l'autre côté jusqu'à ce que l'humidité soit visible. Le steak sera cuit à point lorsque sa surface aura une texture élastique en appuyant avec le dos d'une pince. Un thermomètre à viande indiquera une température interne de 65-70 °C pour un steak à point. Cuit Faites cuire d'un côté jusqu'à ce que l'humi dité s'accumule à la surface.
Entretien et nettoyage Éteignez le gril en tournant le bouton de température en position OFF (arrêt). Le gril est éteint lorsque l'écran LCD affiche OFF (arrêt) et le temps par défaut affiche zéro « 0 ». Débranchez le cordon d'alimentation de la prise murale. Laissez le gril refroidir complètement avant de le démonter et de le nettoyer. Nettoyez toujours le corps extérieur, le bac d'égouttement et les plaques de cuisson après chaque utilisation pour éviter que les ingrédients ne s'y accumulent.
FR NETTOYAGE DES PLAQUES DE CUISSON 1. Essuyez les plaques de cuisson avec un chiffon doux pour enlever les résidus d'aliments. 2. Vous pouvez également retirer les plaques de cuisson : • Assurez-vous toujours que le gril est complètement refroidi. • Utilisez la poignée pour ouvrir la plaque supérieure à 90°.
Dépannage MODE D'ERREUR Lorsque l'écran LCD affiche le mode d'erreur « Err » : 1. Débranchez le gril de la prise murale. 2. Laissez le gril refroidir complètement. 3. Assurez-vous que les plaques de cuisson sont correctement insérées. 4. Remettez la fiche dans la prise murale. 5. L'écran LCD ne doit plus afficher le mode d'erreur « Err ». 6. Si le problème persiste, appelez le service client Sage.
the Smart Grill ™ BGR820/SGR820 NL SNELSTARTGIDS
Inhoud 2 6 8 9 12 14 16 16 Sage stelt veiligheid voorop Onderdelen Montage Functies Tips Onderhoud en reiniging Problemen oplossen Garantie SAGE STELT VEILIGHEID VOOROP Bij Sage gaan we veiligheidsbewust te werk. Bij het ontwerpen en produceren van onze consumentenproducten staat de veiligheid van onze gewaardeerde klanten voorop. Daarnaast vragen wij u voorzichtig om te gaan met elektrische apparaten en de volgende voorzorgs maatregelen in acht te nemen. Verkeerd gebruik kan tot letsel leiden.
NL Verkeerd gebruik kan tot letsel leiden. • Wikkel het netsnoer volledig af voordat u het apparaat gebruikt. • Plaats het apparaat op een stabiele, hitte bestendige, vlakke, droge ondergrond, weg van de rand, en gebruik het niet op of in de buurt van een warmtebron zoals een kookplaat, oven of gasfornuis. • Zorg dat het netsnoer niet over de rand van een aanrecht of tafel hangt, in aanraking komt met hete oppervlakken of in de knoop raakt.
• Zorg er altijd voor dat het apparaat UIT staat, de stekker uit het stopcontact is getrokken en het apparaat is afge koeld voordat u het schoonmaakt, verplaatst of opbergt. • Gebruik het apparaat niet als het netsnoer, de stekker of het apparaat op enigerlei wijze beschadigd is. Neem contact op met de klantenservice van Sage of ga naar sageappliances.com als er sprake is van schade of als er ander onderhoud dan reiniging is vereist.
NL • Het wordt aanbevolen een aardlekschakelaar te installeren voor extra veiligheid bij het gebruik van alle elektrische apparaten. Veiligheids schakelaars met een nominale bedrijfsstroom van niet meer dan 30 mA worden aanbevolen. Raadpleeg een elektri cien voor professioneel advies. Het weergegeven symbool geeft aan dat dit apparaat niet met het normale huis houdelijk afval mag worden weggegooid.
Onderdelen Wanneer het apparaat helemaal is opengeklapt in de BBQ-modus heeft het een grilloppervlak van 1650 cm2.
NL A. Roestvrijstalen behuizing met gegoten hendel B. Gegoten aluminium, antiaanbakplaten Voorzien van met titanium gecoate Quantanium™ voor krasbestendigheid en bakken zonder olie. C. Afneembare, vaatwasserbestendige platen Platte plaat voor eieren en pannenkoeken, geribbelde plaat voor het braden van vlees. D. Knop voor ONTGRENDELING VAN BODEMPLAAT Geeft de onderste grillplaat vrij voor verwijdering.
Montage DE GRILL VOORBEREIDEN VOOR GEBRUIK 1. Verwijder verpakkingsmaterialen en promotielabels van de grill en gooi ze op een veilige manier weg. 2. Veeg de grillplaten en opvangbak schoon met een zachte, vochtige spons. Droog alles grondig af. 3. Zorg ervoor dat de opvangbak correct in de grill is teruggeplaatst. 4. Zorg dat de kookplaten correct zijn geplaatst en goed zijn vergrendeld. 5. Plaats de grill op een vlak, droog oppervlak. Houd minimaal 10 cm ruimte vrij aan weerszijden van het apparaat. 6.
NL Functies UW NIEUWE APPARAAT GEBRUIKEN DE GRILL VOORVERWARMEN 1. Zorg dat de bovenste plaat van de grill gesloten is en dat de clip voor hoogteinstelling in de positie OPEN staat. Dit zorgt voor een snellere, efficiëntere voorverwarming. 2. Draai de temperatuurknop om de temperatuur in stappen van 5 °C aan te passen. Zet de draaiknop op SEAR (210 °C – 230 °C) voor snelle voorverwarming, PANINI (sandwich) (180 °C – 205 °C), LOW (160 °C – 175 °C) of kies een andere temperatuur. 3.
• Als u de standaardweergave voor de temperatuur van Celsius in Fahrenheit heeft gewijzigd, blijft de instelling behouden in het geheugen van de grill tot de knop voor temperatuurconversie nogmaals wordt ingedrukt of de stekker van de grill uit het stopcontact wordt getrokken. Wanneer u de stekker van de grill weer in het stopcontact steekt, wordt de temperatuurweergave automatisch teruggezet op de voorinstelling Celsius.
NL GEBRUIK ALS SANDWICHOF PANINIGRILL 1. Open de grill: a) Zorg dat de grill volledig is voorver warmd en dat HEATING niet meer op het lcd-scherm wordt weergegeven. b) Zorg dat de bovenste grillplaat gesloten is. De clip voor hoogte-instelling, die zich aan de rechterkant van de bovenplaat bevindt, moet in de stand OPEN staan. c) Gebruik de hendel om de bovenplaat in een positie van 90 graden te openen. 2. Plaats etenswaren op de onderste grillplaat. 3.
Tips TIPS VOOR HET GRILLEN Vlees Aanbevolen stukken vlees: • Rundvlees - lendebiefstuk (New York-stijl), biefstuk, ribeye (zonder botten), filet. • Lamsvlees - lamsboutsteaks, lamsfilet, lamskoteletten en blokjes lamsvlees. • Varkensvlees - varkenslende, spareribs, hamlappen, filetlapjes, varkensblokjes. • Het wordt niet aanbevolen om vlees met dikke botten te grillen, zoals T-bonesteaks.
NL Doorbakken Bak het vlees aan de ene kant tot zich vocht heeft opgehoopt op de bovenkant. Draai het vlees om en bak het aan de andere kant tot zich vocht heeft opgehoopt op de bovenkant. Verlaag de temperatuur een beetje en bak verder tot de biefstuk stevig aanvoelt met de achterkant van een keukentang. Met een vleesthermometer kunt u de temperatuur in het vlees meten. Bij een doorbakken biefstuk moet de temperatuur 70-75 °C zijn.
Onderhoud en reiniging Zorg dat de grill is uitgeschakeld door de temperatuurknop op OFF te zetten. De grill is UIT wanneer op het lcd-scherm OFF en de standaardtijd 0 (nul) worden weergegeven. Haal de stekker uit het stopcontact. Laat de grill volledig afkoelen voordat u het apparaat uit elkaar haalt en reinigt. Maak de buitenkant, de opvangbak en de grillplaten na elk gebruik schoon om aangekoekte etensresten te voorkomen.
NL OPMERKING De onderkant van de grillplaat kan na verloop van tijd verkleuren en er kan een corrosielaag ontstaan. Dit is normaal. Verkleuring van een van de kanten van de grillplaat tast alleen het uiterlijk van de plaat aan, maar heeft geen invloed op de bakprestaties. Verkleuring of corrosie kan worden verwijderd met een niet-schurend plastic sponsje of nylon afwasborstel. Spoel en droog alles goed af. OPMERKING Zorg ervoor dat de ronde opvulling aan de onderkant van de plaat schoon is. 5.
Problemen oplossen FOUTMODUS Ga als volgt te werk wanneer de foutmodus Err wordt weergegeven op het lcd-scherm: 1. Haal de stekker van de grill uit het stopcontact. 2. Zorg dat de grill volledig is afgekoeld. 3. Zorg dat de grillplaten zich correct en stevig op hun plaats bevinden. 4. Steek de stekker weer in het stopcontact. 5. De foutmodus Err moet nu niet meer te zien zijn op het lcd-scherm. 6. Blijft het probleem zich voordoen, neem dan telefonisch contact op met de klantenservice van Sage.
the Smart Grill ™ BGR820/SGR820 IT GUIDA RAPIDA
Sommario 2 Sage consiglia: la sicurezza prima di tutto 6 Componenti 8 Montaggio 9 Funzioni 12 Suggerimenti 14 Manutenzione e pulizia 16 Risoluzione dei problemi 16 Garanzia SAGE CONSIGLIA: LA SICUREZZA PRIMA DI TUTTO In Sage abbiamo molto a cuore la sicurezza. Creiamo e commercializziamo prodotti di consumo tenendo sempre presente la sicurezza dei nostri clienti. Inoltre, invitiamo i clienti a prestare molta attenzione durante l'utilizzo degli apparecchi elettrici e a osservare le seguenti precauzioni.
IT • Questo apparecchio è destinato esclusiva mente all'uso domestico. Non utilizzare per usi diversi da quello previsto. Non utilizzare su veicoli in movimento o barche. Non utilizzare all'aperto. L'uso non corretto potrebbe provocare lesioni. • Svolgere completamente il cavo prima dell'uso. • Posizionare l'elettro domestico su una superficie stabile, resis tente al calore, piana e asciutta, lontano dal bordo della superficie.
L'elettrodomestico pulizia, contattare è contrassegnato il Servizio clienti Sage con un simbolo che o visitare il sito Web rappresenta superfici sageappliances.com. calde. Quando l'elettro • Qualsiasi operazione domestico è in funzione di manutenzione diversa e per qualche tempo dalla pulizia deve essere dopo l'uso, il coperchio eseguita da un centro e le altre superfici saranno assistenza Sage® calde. Per evitare ustioni, autorizzato.
IT • La pulizia dell'elettro domestico può essere effettuata da bambini di età non inferiore a 8 anni e con la supervisione di un adulto. • Tenere l'elettrodomes tico e il cavo fuori dalla portata dei bambini di età pari o inferiore agli 8 anni. • Si consiglia l'installa zione di un interruttore salvavita per una maggiore sicurezza durante l'utilizzo di tutti i dispositivi elettrici. Si consiglia l'uso di un salvavita con corrente operativa nominale non superiore a 30 mA.
Componenti La modalità Open Flat BBQ consente di ottenere una superficie di cottura aperta di 1650 cm².
IT A. Involucro in acciaio inossidabile con manici in metallo pressofuso B. Piastre antiaderenti in alluminio fuso Rivestimento Quantanium™ con titanio per resistenza ai graffi e cottura senza oli. C. Piastre rimovibili e lavabili in lavastoviglie Piastra liscia per uova e pancake, piastra scanalata per scottare la carne. D. Rilascio piastra inferiore Meccanismo per rimuovere la piastra di cottura inferiore.
Montaggio PREPARAZIONE DEL GRILL PER L'USO 1. Rimuovere e smaltire in sicurezza tutti i materiali di imballaggio e le etichette promozionali dal grill. 2. Pulire le piastre di cottura e il vassoio raccogligocce con una spugna morbida e umida. Asciugare a fondo. 3. Assicurarsi che il vassoio raccogligocce sia inserito correttamente nel grill. 4. Assicurarsi che le piastre di cottura siano inserite correttamente e bloccate saldamente in posizione. 5. Posizionare il grill su una superficie piana e asciutta.
IT Funzioni UTILIZZO DEL NUOVO APPARECCHIO PRERISCALDAMENTO DEL GRILL 1. Assicurarsi che la piastra superiore sia nella posizione chiusa con la leva di controllo dell'altezza nella posizione OPEN (aperta). Ciò garantirà un preriscaldamento più rapido ed efficiente. 2. Ruotare la manopola della temperatura per regolare la temperatura con incrementi di 5 °C.
• Se è stata modificata l'unità predefinita Celsius in Fahrenheit, l'impostazione rimane nella memoria del grill fino a quando il pulsante di conversione della temperatura non viene premuto una seconda volta o il grill viene scollegato dalla presa di corrente. Quando il grill viene collegato nuovamente alla presa di corrente, l'unità della temperatura torna automaticamente all'impostazione predefinita Celsius.
IT UTILIZZO COME PRESSA PER SANDWICH O PANINI 1. Per aprire il grill: a) Assicurarsi che il grill sia completamente preriscaldato e che sullo schermo LCD non sia più visualizzato HEATING (riscaldamento). b) Assicurarsi che la piastra di cottura superiore sia chiusa. La leva di controllo dell'altezza regolabile, situata sul lato destro della piastra superiore, deve trovarsi nella posizione OPEN (aperta). c) Utilizzare la maniglia per aprire la piastra superiore in una posizione a 90°. 2.
Suggerimenti SUGGERIMENTI PER LA GRIGLIA Carne Tagli consigliati: • Manzo - Controfiletto, groppa, costola, filetto. • Agnello - Bistecche di coscia, filetto, cotolette e dadini. • Maiale - Bistecche di lonza, costine, bistecche di coscia, filetti, dadini. • Si sconsiglia di cucinare tagli con ossa molto spesse, come le fiorentine. • È invece possibile cucinare tagli con carne meno tenera come il reale o la sottofesa di manzo e la spalla o le bistecche di collo di agnello.
IT Media/ben cotta Cuocere su un lato fino a quando si raccoglie umidità sulla superficie. Girare e cuocere sull'altro lato fino a quando si raccoglie umidità sulla superficie. Ridurre leggermente il calore e continuare a cuocere fino a quando la bistecca non risulta solida toccandola con la pinza da grill. Un termometro per carne mostrerà la temperatura interna di una bistecca media/ ben cotta a 70-75 °C Ben cotta Cuocere su un lato fino a quando si raccoglie umidità sulla superficie.
Manutenzione e pulizia Assicurarsi che il grill sia spento ruotando la manopola della temperatura nella posizione OFF. Il grill è spento quando lo schermo LCD visualizza OFF e il timer indica "0". Scollegare il cavo di alimentazione dalla presa di corrente. Lasciare raffreddare completamente il grill prima di smontarlo e pulirlo. Pulire sempre il corpo esterno, il vassoio raccogligocce e le piastre di cottura dopo ogni utilizzo per evitare l'accumulo di residui.
IT 4. In alternativa, lavarle in acqua calda e sapone con una spugna morbida e umida. Per evitare l'accumulo di macchie è possibile utilizzare un detergente liquido non abrasivo. Applicare il detergente sulla spugna, non sulla piastra, prima di pulire. Rimuovere i residui più tenaci con una spugnetta di plastica non abrasiva o una spazzola lavapiatti in nylon. NOTA La parte inferiore della piastra di cottura può scolorirsi nel tempo e formare uno strato di corrosione. Questo è normale.
Risoluzione dei problemi CODICE ERRORE Quando lo schermo LCD mostra il codice di errore "Err": 1. Scollegare il grill dalla presa di alimenta zione. 2. Assicurarsi che il grill sia completamente freddo. 3. Assicurarsi che le piastre di cottura siano inserite correttamente e bloccate saldamente in posizione. 4. Reinserire la spina nella presa di alimentazione. 5. Lo schermo LCD non deve più mostrare il codice di errore "Err". 6. Se il problema persiste, contattare il Servizio clienti Sage.
the Smart Grill ™ BGR820/SGR820 ES GUÍA RÁPIDA
Índice 2 Sage recomienda seguridad ante todo 6 Componentes 8 Ensamblaje 9 Funciones 12 Consejos 14 Cuidado y limpieza 16 Resolución de problemas 16 Garantía SAGE RECOMIENDA SEGURIDAD ANTE TODO En Sage nos preocupa mucho la seguridad. Para el diseño y la fabricación de nuestros productos de consumo tenemos en cuenta, antes que nada, la seguridad de nuestros clientes, como tú. También te rogamos que actúes cuidadosamente al usar cualquier electrodoméstico y que tomes las precaucio nes siguientes.
ES utilizar en vehículos o embarcaciones en movimiento. No se debe utilizar al aire libre. El uso inapropiado podría cau sar lesiones. • Desenrolla completamente el cable de alimentación antes de usar el aparato. • Coloca el aparato sobre una superficie estable, resistente al calor, nive lada y seca. No lo pongas muy cerca del borde ni cerca de una fuente de calor (por ejemplo, una placa de cocina eléctrica, un quemador de gas o un horno).
Este símbolo indica que la superficie está caliente. La tapa y las demás superficies estarán calien tes mientras el aparato esté en funcionamiento y durante un tiempo después del uso. Para evitar quemaduras, utiliza manoplas aislantes o usa las asas y diales según sea apropiado. • Antes de limpiar, mover o guardar el aparato, asegúrate siempre de que esté apagado (OFF) y desenchufado de la toma de corriente, y de que se haya enfriado tras el uso.
ES • El aparato y el cable deben mantenerse fuera del alcance de los niños menores de 8 años. • Se recomienda la instalación de un interruptor diferencial para ofrecer seguridad adicional al usar todos los aparatos eléctricos. Se recomienda usar interruptores de seguri dad con una corriente de funcionamiento nominal de no más de 30 mA. Solicita asesoramiento profesional a un electricista. Este símbolo indica que este aparato no debe desecharse con la basura doméstica normal.
Componentes El modo abierto tipo parrilla ofrece una superficie de 1650 cm².
ES A. Carcasa en acero inoxidable con asa moldeada a presión B. Placas antiadherentes de aluminio fundido Gracias al revestimiento de Quantanium™ con titanio, son resistentes a los arañazos y no requieren aceite para cocinar. C. Placas extraíbles aptas para lavavajillas Usa la placa plana para huevos y tortitas o la acanalada para sellar carnes. D. Desbloqueo de la placa inferior Permite extraer la placa inferior de forma independiente.
Ensamblaje PREPARAR LA PARRILLA PARA EL USO 1. Retira y desecha de forma segura los materiales de embalaje y etiquetas promocionales de la parrilla. 2. Limpia las placas de cocción y la bandeja de goteo con una esponja suave y húmeda. Seca bien todo. 3. Comprueba que la bandeja de goteo esté colocada correctamente. 4. Comprueba que las placas de cocción estén bien colocadas y bloqueadas en la posición correcta. 5. Coloca el aparato en una superficie plana y seca.
ES Funciones MANEJO DE TU NUEVO APARATO PRECALENTAMIENTO DE LA PARRILLA 1. Asegúrate de que la placa superior de la parrilla esté en la posición cerrada, con el clip de control de altura en la posición OPEN. De este modo, se calentará más rápida y eficientemente. 2. Gira el dial de temperatura para ajustarla en incrementos de 5 °C. Gira el dial a SEAR (210 °C – 230 °C) para precalentar rápidamente, PANINI (180 °C – 205 °C), LOW (160 °C – 175 °C) o selecciona una temperatura alternativa. 3.
USAR EN MODO ABIERTO TIPO PARRILLA La parrilla se abre en forma plana en una superficie de parrilla de 1650 cm². La placa de cocción acanalada es perfecta para sellar carnes, mientras que la placa plana es ideal para hacer huevos, tortitas y verduras. 1. Para abrir el grill al modo parrilla: a) Asegúrate de que la parrilla se haya precalentado completamente y que la pantalla LCD ya no muestre la palabra HEATING.
ES USAR COMO PRENSA DE SÁNDWICH O PANINI 1. Para abrir la parrilla: a) Asegúrate de que la parrilla se haya precalentado completamente y de que la pantalla LCD ya no muestre la palabra HEATING. b) Comprueba que la placa de cocción superior esté cerrada. El clip de control de altura ajustable, ubicado en el lado derecho de la placa superior, debe estar en la posición OPEN. c) Usa el asa para abrir la placa superior a 90°. 2. Coloca la comida en la placa inferior. 3. Usa el asa para cerrar la placa superior.
Consejos COCINAR A LA PARRILLA Carnes Cortes recomendados: • Ternera - solomillo, cadera, costillar y lomo bajo. • Cordero - filetes de pierna de cordero sin hueso, chuletillas de riñonada, costillas y cordero troceado. • Cerdo - filetes de lomo abiertos, costillas, filetes de jamón, filetes, cerdo troceado. • No se recomienda cocinar cortes con huesos gruesos como los filetes de T-bone.
ES Hecho Cocina el filete por un lado hasta que la humedad se acumule en la superficie. Dale la vuelta y cocina el otro lado hasta que la humedad se acumule en la superficie. Reduce la temperatura un poco y sigue cocinándolo hasta que al tocarlo con las pinzas lo notes firme. Puedes usar un termómetro para carne para medir la temperatura interna. Un filete hecho debería estar entre 70-75 °C. Muy hecho Cocina el filete por un lado hasta que la humedad se acumule en la superficie.
Cuidado y limpieza Gira el dial de temperatura hasta la posición OFF para asegurarte de que el aparato esté apagado. La parrilla está apagada cuando la pantalla LCD muestra OFF y el temporizador está a 0. Desenchufa el cable de la toma de corriente. Deja que la parrilla se enfríe completamente antes de desensamblarla y limpiarla. Siempre limpia el exterior, la bandeja de goteo y las placas de cocción después de cada uso para evitar la acumulación de alimentos.
ES 3. Coloca las placas de cocción en la parte superior del lavavajillas (nunca en la parte inferior). 4. También puedes lavarlas en agua tibia con jabón usando una esponja suave y húmeda. Se pueden usar limpiadores líquidos no abrasivos para evitar la acumulación de manchas. Aplica el producto limpiador en la esponja y no directamente en las placas. Elimina los residuos más difíciles de limpiar con un cepillo de nailon para lavar platos o un estropajo plástico no abrasivos.
Resolución de problemas MODO DE ERROR Cuando la pantalla LCD muestra el modo de error “Err”: 1. Desenchufa la parrilla de la toma de corriente. 2. Asegúrate de que la parrilla se haya enfriado completamente. 3. Asegúrate de que las placas de cocción estén correctamente insertadas en su posición. 4. Vuelve a enchufar el aparato. 5. La pantalla LCD ya no debería mostrar el modo de error “Err”. 6.
the Smart Grill ™ BGR820/SGR820 PT MANUAL RÁPIDO
Índice 2 A Sage recomenda a segurança como máxima prioridade 6 Componentes 8 Montagem 9 Funções 12 Dicas 14 Cuidados e limpeza 16 Resolução de problemas 16 Garantia CUIDADOS IMPORTANTES LEIA TODAS AS INSTRUÇÕES ANTES DE UTILIZAR E GUARDE-AS PARA REFERÊNCIA FUTURA • Está disponível uma versão transferível deste documento em sageappliances.
PT no exterior. A utilização incorreta pode causar ferimentos. • Desenrole completa mente o cabo de alimentação antes de utilizar. • Coloque o aparelho numa superfície plana, estável, resistente ao calor e seca, afastado da extremidade e não utilize próximo de uma fonte de calor, como uma placa térmica, forno ou bico de gás. • Não deixe o cabo de alimentação pendurado sobre a extremidade de uma mesa ou bancada, em contacto com superfícies quentes nem permita que o cabo se enrosque.
e durante algum tempo após a utilização. Para evitar queimaduras, utilize sempre luvas de forno ou utilize pegas quando apropriado. • Certifique-se sempre de que o aparelho está desligado e que a ficha foi retirada da tomada elétrica e arrefeceu totalmente antes de o limpar, mover ou armazenar. • Não use o aparelho se o cabo de alimentação, ficha ou o próprio aparelho estiverem danificados de qualquer maneira. Contacte o serviço de aten dimento ao cliente da Sage ou aceda a sageappliances.
PT • O aparelho e o cabo devem ser mantidos fora do alcance das crianças com idade inferior a 8 anos. • Recomendamos a instalação de um comutador de segurança da corrente residual para fornecer segurança adicional ao utilizar todos os aparelhos elétricos. Recomendamos o uso de comutadores de segurança com uma corrente operacional nominal não superior a 30 mA. Consulte um eletricista para obter aconselhamento profissional.
Componentes Abre na horizontal para uma superfície de grelhador de 1650 cm2.
PT A. Cobertura de aço inoxidável com braços fundidos B. Placas de alumínio fundido antiaderentes Revestidas com titânio e Quantanium™ para resistir a arranhões e utilização sem óleo. C. Placas removíveis adequadas para máquina de lavar louça Placa plana para ovos e panquecas, placa ondulada para selar carne. D. LIBERTAÇÃO DA PLACA inferior Retira a placa inferior. Remova individualmente as placas superior e inferior para uma limpeza mais fácil ou para intercambiar a posição das placas. E.
Montagem PREPARAR O GRELHADOR PARA UTILIZAÇÃO 1. Remova e elimine em segurança todos os materiais da embalagem e etiquetas promocionais do grelhador. 2. Limpe as placas do grelhador e a bandeja de gotejamento com uma esponja macia humedecida. Seque devidamente. 3. Certifique-se de que a bandeja de gotejamento está corretamente instalada no grelhador. 4. Certifique-se de que as placas estão corretamente instaladas e bloqueadas na posição correta. 5. Coloque o grelhador numa superfície plana e seca.
PT Funções FUNCIONAMENTO DO APARELHO PRÉ-AQUECIMENTO DO GRELHADOR 1. Certifique-se de que a placa superior do grelhador está na posição fechada, com a patilha de controlo de altura na posição OPEN (Aberto). Deste modo, o préaquecimento será mais rápido e eficiente. 2. Rode o botão de Temperatura para ajustar a temperatura em incrementos de 5 °C.
• Se alterou a leitura de temperatura predefinida de Celsius para Fahrenheit, a definição mantém-se guardada na memória do grelhador até que prima novamente o botão Conversão da Temperatura ou se desligar o cabo de alimentação do grelhador na tomada elétrica. Quando liga novamente a ficha do cabo de alimentação à tomada elétrica, a leitura de temperatura regressa automaticamente á predefinição Celsius.
PT 4. Quando terminar de cozinhar a carne, retire a carne do grelhador utilizando utensílios de plástico ou madeira. 5. Para desligar o grelhador, rode o botão de temperatura para a posição OFF. UTILIZAR COMO PRENSA DE PANINIS OU SANDUÍCHES 1. Para abrir o grelhador: a) Certifique-se de que o grelhador termi nou o pré-aquecimento e o ecrã LCD não apresenta HEATING (Aquecimento). b) Certifique-se de que a placa superior está fechada.
Dicas DICAS PARA GRELHAR Carnes Cortes recomendados: • Carne de bovino – lombo (Nova Iorque), alcatra, entrecosto (filete escocês), filete. • Cordeiro – bifes da paleta, lombo, costeletas e cordeiro em cubos. • Carne de porco – bifes de lombo, costeletas, bifes da perna, filetes, carne em cubos. • Não é recomendável cozinhar peças com ossos grandes, como costeletas T-Bone. • Pode também utilizar carnes mais duras, como pá de vaca, pojadouro, paleta ou costeletas de cordeiro.
PT Ao ponto para bem passado Cozinhe de um lado até que a humidade se acumule na superfície superior. Vire e cozinhe o outro lado até acumular a humidade por cima. Reduza ligeiramente o fogo e continue a cozinhar até que o bife pareça firme com a parte de trás de um garfo. Um termómetro de carne apresenta a temperatura interna do bife ao ponto para bem passado como 70-75 °C Bem passado Cozinhe de um lado até que a humidade se acumule na superfície superior.
Cuidados e limpeza Certifique-se de que o grelhador está desligado, rodando o botão da Temperatura para a posição OFF (Desligar). O grelhador está desligado quando o ecrã LCD apresenta "OFF" e o tempo predefinido é "0". Retire a ficha do cabo de alimentação da tomada elétrica. Aguarde até que o grelhador arrefeça completamente antes de desmontar e limpar. Limpe sempre o exterior do aparelho, a bandeja de gotejamento e as placas do grelhador após cada utilização para evitar a acumulação de ingredientes.
PT 3. Coloque as placas do grelhador na máquina de lavar louça (apenas na prateleira superior). 4. Em alternativa, lave as placas do grelha dor com água morna e detergente com uma esponja macia e húmida. Pode utilizar um produto de limpeza líquido não abrasivo para evitar a acumulação de manchas. Aplique o produto de limpeza líquido à esponja e não diretamente na placa. Remova resíduos persistentes com um esfregão plástico não abrasivo ou uma escova de nylon.
Resolução de problemas MODO DE ERRO Quando o ecrã LCD apresenta o modo de erro "Err": 1. Desligue e remova o cabo de alimentação da tomada elétrica. 2. Certifique-se de que o grelhador arrefeceu completamente. 3. Certifique-se de que as placas estão corretamente instaladas e bloqueadas na posição correta. 4. Ligue novamente a ficha na tomada elétrica. 5. O ecrã LCD deve deixar de apresentar o modo de erro "Err". 6. Se o problema persistir, contacte o serviço de atendimento ao cliente da Sage.
PT Notas 17
Notas 18
PT Notas 19
GBR BRG Appliances Limited Unit 3.