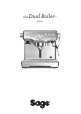
the Dual Boiler™ BES920
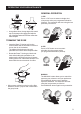
PAGE HEADER..... CONTENTS 2 5 7 17 21 Sage® recommends safety first Know your new appliance Operating your new appliance Care & cleaning Troubleshooting • • SAGE® RECOMMENDS SAFETY FIRST At Sage® we are very safety conscious. We design and manufacture appliances with your safety foremost in mind. We also ask that you exercise a degree of care when using any electrical appliance and adhere to the following precautions.
PAGE WE RECOMMEND HEADER..... SAFETY FIRST • • • • • • power plug, cord or appliance in water or any liquid Always ensure the appliance is turned OFF, unplugged at the power outlet and has been allowed to cool before cleaning, attempting to move or storing. Always turn the appliance to the off position, switch off at the power outlet and unplug at the power outlet when the appliance is not in use. Regularly inspect the supply cord, plug and actual appliance for any damage.
PAGE WE RECOMMEND HEADER..... SAFETY FIRST • • • • • • or a lack of experience and knowledge, only if they have been given supervision or instruction concerning use of the appliance in a safe way and understand the hazards involved. Use only tap water in the water tank. Do not use any other liquid. Never use the appliance without water in the water tank. Ensure the portafilter is firmly inserted and secured into the brewing head before using the machine.
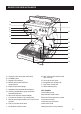
PAGE HEADER..... KNOW YOUR NEW APPLIANCE I A B C D E J K F G L H M N O A P Q A. B. C. D. E. F. G. H. I. J. K. L. Top fill 2.
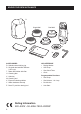
PAGE HEADER..... KNOW YOUR NEW APPLIANCE R Single Wall Dual Wall T S U X Z W Y ACCESSORIES R. Stainless steel frothing jug S. Single & dual wall filter baskets (1 & 2 cup) T. Water filter holder with filter U. Cleaning disc V. Allen key W. Cleaning tool X. Espresso cleaning tablets Y. Water hardness test strip Z.
PAGE HEADER..... OPERATING YOUR NEW APPLIANCE WARNING Both the STEAM LEVER and HOT WATER dial must be in the CLOSED position for the machine to enter START UP mode. BEFORE FIRST USE Machine Preparation Remove and discard all labelling and packaging materials attached to your espresso machine. Ensure you have removed all parts and accessories before discarding the packaging.
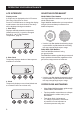
PAGE HEADER..... OPERATING YOUR NEW APPLIANCE LCD INTERFACE Display modes 3 modes can be displayed on the LCD screen: Shot Temp, Shot Clock or Clock. Press UP or DOWN arrow to change the display mode between shot clock & clock. Shot temp will be displayed during an extraction. 1. Shot Temp Displays selected extraction temperature (default set at 93°C), but can be changed from 86°C - 96°C. See ‘Extraction Temperature’, page 15.
PAGE HEADER..... OPERATING YOUR NEW APPLIANCE GENERAL OPERATION 1 CUP Press 1 CUP once to extract a single shot of espresso at the pre-programmed duration (30secs). The extraction will start using the low pressure pre-infusion. • As a guide to dose, the top edge of the metal cap on the tamper should be level with the top of the filter basket AFTER the coffee has been tamped.
PAGE HEADER..... OPERATING YOUR NEW APPLIANCE HOT WATER EXTRACTION GUIDE OVER EXTRACTED BITTER • ASTRINGENT BALANCED UNDER EXTRACTED UNDERDEVELOPED • SOUR GRIND SHOT TIME TOO FINE OVER 40 SEC OPTIMUM 25-35 SEC TOO COARSE UNDER 20 SEC For instant hot water, rotate the HOT WATER dial to OPEN position. The Hot Water LED will be On. STEAM For instant steam, move STEAM LEVER to OPEN position. The Steam LED will be On. To turn HOT WATER off, rotate the HOT WATER dial to CLOSED position.
PAGE HEADER..... OPERATING YOUR NEW APPLIANCE SHOT DURATION 1 CUP Duration Programming Press MENU button until SHOT VOL icon flashes and 1 CUP is displayed on the LCD screen. Press 1 CUP button to start water flow from the group head. Press 1 CUP again once required extraction duration has been reached. The machine will beep twice to indicate the new 1 CUP duration has been set. 2 CUP Duration Programming Press MENU button until SHOT VOL icon flashes and 2 CUP is displayed on the LCD screen.
PAGE HEADER..... OPERATING YOUR NEW APPLIANCE EXTRACTION TEMPERATURE Press MENU button until SHOT TEMP icon flashes. The LCD will display the current shot temperature setting. Press UP or DOWN arrow to adjust SHOT TEMP to the desired setting (range 86°C – 96°C). The new SHOT TEMP setting will be displayed on the LCD screen. 12 AUTO START To use AUTO START, first ensure clock has been set.
PAGE HEADER..... OPERATING YOUR NEW APPLIANCE Press MENU button and the current Auto Start time will be displayed on the LCD screen. Press EXIT button. Press UP or DOWN arrow to adjust AUTO START to the desired time (default AUTO START time set at 7:00am). Press EXIT button. SET CLOCK CLEAN CYCLE Press MENU button until CLEAN CYCLE icon flashes and PUSH is displayed on the LCD screen. To start the CLEAN CYCLE press the illuminated MANUAL button. Press MENU button until SET CLOCK icon flashes.
PAGE HEADER..... OPERATING YOUR NEW APPLIANCE ADVANCED ESPRESSO FUNCTIONS Press & Hold - 1 CUP Press & hold 1 CUP to bypass the pre-infusion phase and deliver water to the group head at the full 9 bar pressure. Release button to stop extraction. This function can be used when purging the group head. Press & Hold - 2 CUP Press & hold 2 CUP to bypass the pre-infusion phase and deliver water to the group head at the full 9 bar pressure. Release button to stop extraction.
PAGE HEADER..... OPERATING YOUR NEW APPLIANCE Temperature Unit - ˚C/˚F (SEt) Temperature Unit will be displayed on the LCD screen as SEt. Press MENU to Select. Use UP and DOWN arrows to select desired temperature unit. Press MENU to set. Machine will beep once to confirm selection. Press EXIT to return to STANDBY mode. Steam Temperature (StEA) Machine Audio (Snd) Machine Audio refers to the volume level of the ‘beeps’ heard.
PAGE HEADER..... OPERATING YOUR NEW APPLIANCE ADVANCED FEATURES ALERTS Pre-Infusion Duration The LCD will display the current Pre-Infusion Duration. Press UP or DOWN arrow to vary time. HOT WATER LED Flashing At START UP The machine will not enter START UP mode when the HOT WATER dial is in the OPEN position and the HOT WATER LED is flashing. Move the HOT WATER dial to the CLOSED position for the machine to enter START UP mode.
PAGE HEADER..... CARE & CLEANING CLEAN ME! The machine will detect when 200 extractions have been carried out since the last clean cycle. The CLEAN ME! icon will be displayed on the LCD screen the next time the machine enters START UP mode. CLEANING CYCLE • CLEAN ME! will be displayed on LCD to indicate when a cleaning cycle is required (approx. 200 shots). • Insert the supplied cleaning disc, followed by 1 cleaning tablet into the 1 CUP filter basket. • Insert the portafilter and lock into group head.
PAGE HEADER..... CARE & CLEANING CLEANING THE SHOWER SCREEN • The group head interior and shower screen should be wiped with a damp cloth to remove any ground coffee particles. • Periodically run hot water through the machine with the filter basket and portafilter in place, without ground coffee, to rinse out any residual coffee. CLEAR WATER BACK-FLUSH • Insert the cleaning disc into the 1 cup filter basket. • Insert portafilter into the group head.
PAGE HEADER..... CARE & CLEANING 2 – Empty Boilers a) Remove the grey silicone cover on the lower front panel marked DESCALE ACCESS. DESCALE ACCESS DESCALE ACCESS REMOVE b) Place a cloth over the drip tray to prevent steam escaping. e) Empty the drip tray, use caution as the drip tray may be hot. f) Empty water tank, remove water filter. g) Dissolve 1 sachet of Sage® Descaler™ into 1 litre of warm water. Pour solution into the water tank.
PAGE HEADER..... CARE & CLEANING 4 – Flush Boilers a) Press 1 Cup button and the LCD screen will show countdown time (20 minutes). During this time, the machine will fill boilers with fresh clean water and heat to temperature. You can proceed to the next step at any time by pressing the 1 Cup button. b) Place a cloth over the drip tray to stop steam escaping. c) Empty boilers by repeating steps 2c and 2d. d) Empty drip tray and insert back to place.
PAGE HEADER..... TROUBLESHOOTING PROBLEM POSSIBLE CAUSES WHAT TO DO The Hot Water LED flashes when the machine is turned On. • Hot Water dial is open. Turn the Hot Water dial to the CLOSED position. The Steam LED flashes when the machine is turned On. • Steam Lever is open. Move the Steam Lever to the CLOSED position. Water does not flow from the group head. • Machine has not reached operating temperature. Allow time for the machine to reach operating temperature.
TROUBLESHOOTING PAGE HEADER..... PROBLEM Espresso just drips from the portafilter spouts. POSSIBLE CAUSES WHAT TO DO • Coffee is ground too finely. Use slightly coarser grind. • Too much coffee in the filter basket. Lower dose of coffee using the RAZOR™ dosing tool. • The filter basket may be blocked. Use the fine pin on the provided cleaning tool to clear the outlet hole(s) on the underside of the filter basket.
TROUBLESHOOTING PAGE HEADER..... PROBLEM Espresso runs out around the edge of the portafilter. POSSIBLE CAUSES WHAT TO DO • Portafilter not inserted in the group head correctly. Ensure portafilter is rotated to the right until the handle is past the centre and is securely locked in place. Rotating past the centre will not damage the silicone seal. • There are coffee grounds around the filter basket rim. Clean excess coffee from the rim of the filter basket to ensure a proper seal in group head.
Sage ® Freephone (UK Landline): 0808 178 1650 Mobile Calls (National Rate): 0333 0142 970 www.sageappliances.co.uk customerservice@sageappliances.co.uk Register your product and get more from your purchase What’s on your mind? Our constant aim is to improve the quality and features of our appliances. We welcome your comments and ideas in assisting our ongoing development. Product registration takes only a few minutes and ensures a record of your purchase.