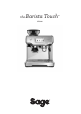
the Barista Touch™ SES880
Contents 2 5 7 13 17 Important Safeguards Components Functions Care & Cleaning Troubleshooting SAGE® RECOMMENDS SAFETY FIRST At Sage® we are very safety conscious. We design and manufacture consumer products with the safety of you, our valued customer, foremost in mind. In addition we ask that you exercise a degree of care when using any electrical appliance and adhere to the following precautions.
• • • • • • • allowed to cool before cleaning, attempting to move or storing. Always turn the appliance to the off position, switch off at the power outlet and unplug at the power outlet when the appliance is not in use. Do not use the appliance if the power cord, plug, or appliance becomes damaged in any way. If damaged or maintenance other than cleaning is required, please contact Sage Customer Service or go to sageappliances.
• Use only tap water in the water tank. Do not use any other liquid. • Never use the appliance without water in the water tank. • Ensure the portafilter is firmly inserted and secured into the brewing head before using the machine. • Never remove the portafilter during the brewing operation as the machine is under pressure. • Do not place anything, other than cups for warming, on top of the appliance. • Heating element surface is subject to residual heat after use.
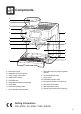
Components A B C D K E F G L H M I N O P Q J A. B. C. D. E. F. G. H. I. 250g bean hopper Integrated conical burr grinder Touch screen control panel GRIND SIZE selector POWER button Integrated removable 54mm tamper Grind outlet Hands free grinding cradle 54mm stainless steel portafilter J. Removable wet & dry coffee separator drip tray K. 2L removable water tank L. Group Head M. Dedicated hot water outlet N. Extra-tall cup clearance for tall mugs O. Easy clean steam wand P.
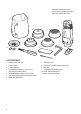
All parts of the Barista Touch™ that come into contact with coffee, water and milk are BPA Free. 1 6 4 5 2 3 7 8 9 10 11 ACCESSORIES 1. 2. 3. 4. Stainless steel milk jug Cleaning disc Cleaning tablets Dual Wall filter baskets (1 cup & 2 cup) Use with pre-ground coffee. 5. Single Wall filter baskets (1 cup & 2 cup) Use when grinding fresh whole coffee beans. 6. Water filter and holder 6 7. Cleaning brush 8. The Razor™ precision dose trimming tool 9. Allen key To disassemble shower screen 10.
Functions INSTALLING THE WATER FILTER • Remove the water filter and water filter holder from the plastic bag. • Soak the filter in cold water for 5 minutes. • Wash the filter holder with cold water. • Fill the water tank with cold water before sliding back into position at the back of the machine and locking into place. FIRST USE 1. Press POWER button to turn the machine on. 2. Follow the instructions on screen to guide you through first use setup. 3.
DRINK SELECTION To enter Drinks Menu screen, touch the Home icon . Swipe & select your drink. Touch the ‘Help & Tip’ icon to see Barista Touch™ Guide. Select your drink Espresso Long Black Latte Flat White Cappuccino NOTE Please keep the touch screen dry and clean to ensure that the machine functions properly.
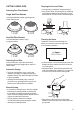
SETTING GRIND SIZE Tamping the Ground Coffee Selecting Your Filter Basket Single Wall Filter Baskets Use Single Wall filter baskets if grinding fresh whole coffee beans. 1 CUP 2 CUP Dual Wall Filter Baskets Use Dual Wall filter baskets if using pre-ground coffee. 1 CUP • Once grinding is complete, Tamp down firmly. • As a guide to dose, the top edge of the metal cap on the tamper should be level with the top of the filter basket AFTER the coffee has been tamped.
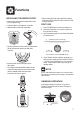
Purging the Group Head Before placing the portafilter into the group head, run a short flow of water through the group head by touching the ‘Hot Water’ button. This will stabilise the temperature prior to extraction. Inserting the Portafilter Insert the portafilter into the group head and rotate the handle towards the centre until resistance is felt. TEXTURING MILK MAX MIN LOCK TIGHT MILK MUST COVER THIS RING NOTE ESPRESSO EXTRACTION Touch the ‘Brew’ button on the display to start extraction.
MANUAL MILK TEXTURING Auto milk texturing and auto shut-off are disabled during manual milk texturing mode. Lift the steam wand. Start frothing by touching the button. When frothing is done, touch the Milk button to stop. Wipe the wand & tip with a clean damp cloth. Lower steam wand to the down position and the wand will automatically purge. CAUTION: BURN HAZARD Pressurised steam can still be released, even after machine has been switched off. Children must always be supervised.
EXTRACTION GUIDE CORRECT EXTRACTION • Flow starts after 8-12 secs • Flow slow like warm honey • Crema is golden brown with a fine mousse texture • Espresso is dark brown UNDER EXTRACTION • • • • • Flow starts after 1-7 secs Flow fast like water Crema is thin and pale Espresso is pale brown Tastes bitter/sharp, weak and watery Used grinds will form a coffee 'puck'. If the puck is wet, refer to the 'Under Extraction' section.
Care & Cleaning COLOUR TOUCH SCREEN DISPLAY Please keep the touch screen dry and clean to ensure that the machine functions properly. REPLACING THE WATER FILTER 1 Set current month 2 3 4 5 6 Soak Filter (refer to p11) Assemble water filter parts Ensure parts are connected Install filter in tank Install water tank ! Replace filter after 90 days or after 40L The provided water filter helps prevent scale build-up in and on many of the inner functioning components.
CLEANING THE CONICAL BURR GRINDER This grinder cleaning cycle removes oil build-up on the burrs which can impede performance. 1 2 3 4 5 6 7 PUSH Unlock hopper Empty hopper Replace hopper Lock hopper Run grinder empty Unlock hopper 8 9 10 11 12 Remove top burr Clean top burr with Clean lower burr brush with brush IGN AL LOC K Unlock top burr Clean chute with brush WARNING Care should be taken as the grinder burrs are extremely sharp.
CLEANING THE STEAM WAND • The steam wand should always be cleaned after texturing milk. Wipe the steam wand with a damp cloth. • If any of the holes in the tip of the steam wand become blocked, it may reduce frothing performance. • Go to ‘Settings’ > ‘Steam wand cleaning’ and follow the guide on the screen. CLEANING THE FILTER BASKETS AND PORTAFILTER • The filter baskets and portafilter should be rinsed under hot water immediately after use to remove all residual coffee oils.
USING THE ALLEN KEY Over time, the silicone seal surrounding the shower screen will need to be replaced to ensure optimum brewing performance. 6. Remove the silicone seal with your fingers or a pair of long-nose pliers. Insert the new seal, flat side first, so the ribbed side is facing you. 1. Press the POWER button to switch the machine off and unplug the cord from the power outlet. 2. Carefully remove the water tank and drip tray, taking particular care if they are full. 3.
Troubleshooting PROBLEM POSSIBLE CAUSES EASY SOLUTION Water does not flow from the group head. No hot water. Water tank is empty. Fill tank. Water tank is not fully inserted and locked into position. Push water tank down completely to lock into place. Machine needs to be descaled. Perform descale cycle. Coffee is ground too finely and/or too much coffee in filter basket and/or over tamping and/or filter basket is blocked. See below, ‘Espresso only drips from the portafilter spouts or not at all’.
PROBLEM POSSIBLE CAUSES EASY SOLUTION Espresso runs out too quickly. Coffee is ground too coarsely. Use slightly finer grind. Refer to ‘Setting the Grind Size’, page 9 and ‘Under Extraction’, page 12. Not enough coffee in the filter basket. Increase dose of coffee. Refer to ‘Dosing’, page 9 and ‘Under Extraction’, page 12. Tamp then use the Razor™ dose trimming tool to trim off excess coffee. Coffee tamped too lightly. Tamp between or 15–20kg of pressure.
PROBLEM POSSIBLE CAUSES EASY SOLUTION Coffee not hot enough. Cups not pre-heated. Rinse cups under hot water outlet and place on cup warming tray. Portafilter not pre-heated. Rinse portafilter under hot water outlet. Dry thoroughly. Milk not hot enough (if making a cappuccino or latté etc). Make sure sensor is in contact. Adjust milk temperature setting on screen. Water temperature needs to be adjusted. Increase the brew temperature in 'Settings' menu. Coffee tamped too lightly.
PROBLEM POSSIBLE CAUSES EASY SOLUTION Machine is on but ceases to operate. The safety thermal-cut out may have activated due to the pump or grinder overheating. Press the POWER button to switch the machine off and unplug from the power outlet. Allow to cool for about 30–60 minutes. If problem persists, call Sage Support. No ground coffee coming from grinder. No coffee beans in hopper. Filler hopper with fresh coffee beans. Blocked grinder chamber or chute.
Sage® Freephone (UK Landline): 0808 178 1650 Mobile Calls (National Rate): 0333 0142 970 www.sageappliances.co.uk customerservice@sageappliances.co.uk What’s on your mind? Register your product and get more from your purchase Our constant aim is to improve the quality and features of our appliances. We welcome your comments and ideas in assisting our ongoing development. Product registration takes only a few minutes and ensures a record of your purchase.