
User Manual


18
Care & Cleaning
INSTALLING THE WATER FILTER
I
N
O
U
T
1 2 3 4 5 6 7
5m
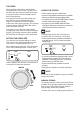
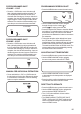
1. Remove the water lter and water lter holder
from the packaging. Set the reminder for the
next month of replacement. We recommend to
replace the lter after 3 months.
2. Soak the lter in cold water for 5 minutes.
3. Wash the lter holder with cold water.
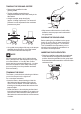
4. Insert the lter into the two parts of the lter
holder. Ensure they are connected.
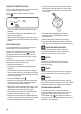
5. Remove the water tank from the machine.
Align the base of the lter holder with the
adapter inside the water tank. Push down to
lock into place.
6. Remove the water tank from the machine.
Align the base of the lter holder with the
adapter inside the water tank. Push down
to lock into place.
7. Fill the water tank with cold potable water
and reattached the machine, ensuring it is
properly attached and sitting ush to the
back of the machine.
NOTE
Replacement water lters can be purchased
from the Sage website or by contacting Sage
customer service.
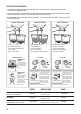
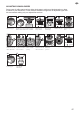
FLUSH CLEANING CYCLE
The LCD will display a FLUSH alert when
a cleaning cycle is required. The cleaning
cycle is separate from descaling.
1. Insert the cleaning disc into the lter basket
in the portalter.
2. Place a cleaning tablet on top of the
cleaning disc.
3. Lock the portalter into the group head.
4. Empty the drip tray and replace onto the
machine.
5. Fill the water tank to the MAX line then reattach
to the machine.
6. Press the MENU button to enter the
main menu.
7. Use the GRIND AMOUNT dial to navigate
the menu to FLUSH, then press to select.
The 1 CUP button will illuminate.
8. Press the 1 CUP button to start the cleaning
cycle. The remaining time for the cleaning cycle
will be displayed on the LCD.
9. Once the cleaning cycle is complete, the
machine will beep and return to READY mode. If
any of the cleaning tablet remains in the cleaning
disc, repeat the cycle.
10. Empty and rinse the portalter, cleaning disc and
drip tray.