the Barista Express™ SES875
Contents 2 6 8 14 18 Sage Recommends Safety First Components Functions Care & Cleaning Troubleshooting IMPORTANT SAFEGUARDS At Sage® we are very safety conscious. We design and manufacture consumer products with the safety of you, our valued customer, foremost in mind. In addition we ask that you exercise a degree of care when using any electrical appliance and adhere to the following precautions.
• Never remove the portafilter during the brewing operation as the machine is under pressure. • Do not move the Barista Express™ whilst in operation. • Do not leave the Barista Express™ unattended when in use. • Do not touch hot surfaces. Allow the Barista Express™ to cool down before moving or cleaning any parts. • Do not place anything, other than cups for warming, on top of the Barista Express™.
• It is recommended to regularly inspect the appliance. Do not use the appliance if power cord, power plug or appliance becomes damaged in any way. If damaged or maintenance other than cleaning is required, please contact Sage Customer Service or go to sageappliances.com • Any maintenance, other than cleaning, should be performed at an authorised Sage Service Centre. • The use of attachments not sold or recommended by Sage may cause fire, electric shock or injury. • This appliance is for household use only.
The symbol shown indicates that this appliance should not be disposed of in normal household waste. It should be taken to a local authority waste collection centre designated for this purpose or to a dealer providing this service. For more information, please contact your local council office. To protect against electric shock, do not immerse the power cord, power plug or appliance in water or any other liquid.
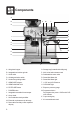
Components A U B W T X G F R ``` S I Q J K C L H P Y M D E N V A. 250g bean hopper O. Storage tray (located behind drip tray) C. Grind outlet Q. Dedicated hot water outlet B. Integrated conical burr grinder D. Grinding activation switch E. Hands free grinding cradle F. GRIND SIZE selector G. GRIND AMOUNT dial H. FILTER SIZE button I. POWER button J. Integrated removable 54mm tamper K. Group head L. 54mm stainless steel portafilter M. Extra-tall cup clearance for tall mugs N.
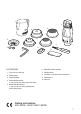
1 6 5 4 2 3 10 ACCESSORIES 7 9 8 6. Water filter holder and filter 1. Temp Control Milk Jug 7. Cleaning brush 3. Cleaning tablets 9. Cleaning tool ™ 2. Cleaning disc 4. Dual Wall filter baskets (1 cup & 2 cup) Use with pre-ground coffee. 8. The Razor™ precision dose trimming tool 10. Allen key 5. Single Wall filter baskets (1 cup & 2 cup) Use when grinding fresh whole coffee beans.
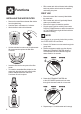
Functions INSTALLING THE WATER FILTER • • • Remove the water filter and water filter holder from the plastic bag. Soak the filter in cold water for 5 minutes. Wash the filter holder with cold water. • Fill the water tank with cold water before sliding back into position at the back of the machine and locking into place. FIRST USE • Ensure the water filter is securely fitted inside the water tank. • Fill the water tank with cold, preferably filtered water up to the MAX mark.
GENERAL OPERATION Setting the Grind Size The grind size will affect the rate of water flow through the coffee in the filter basket and the flavour of the espresso. Selecting the Filter Size Insert either the 1 CUP or 2 CUP filter basket into the portafilter. Press the FILTER SIZE button to select SINGLE if using the 1 CUP filter basket, or DOUBLE if using the 2 CUP filter basket. We recommend you start at setting 8 and adjust as required.
• • Insert the Razor™ dose trimming tool into the filter basket until the shoulders of the tool rest on the rim of the basket. Rotate the Razor™ dose trimming tool back and forth while holding the portafilter on an angle over a knock box to trim off excess coffee grinds. Purging the Group Head Before placing the portafilter into the group head, run a short flow of water through the group head by pressing the 1 CUP button.
EXTRACTION GUIDE CORRECT EXTRACTION UNDER EXTRACTION Within Espresso Range OVER EXTRACTION Under Espresso Range Over Espresso Range • Flow starts after 4–7 secs • Flow starts after 1–3 secs • Flow starts after 8 secs • Crema is golden brown with a fine mousse texture • Crema is thin and pale • Crema is dark and spotty • Flow slow like warm honey • Espresso is dark brown • Flow fast like water • Espresso is pale brown • Tastes bitter/sharp, weak and watery • Extraction takes 25–35 secs • Ext
USING THE STEAM / HOT WATER DIAL Steam • • Position the steam wand tip over the drip tray. Turn the STEAM/HOT WATER dial to the STEAM position. The STEAM/HOT WATER light will flash to indicate the machine is heating to create steam. Hot Water • • Turn the STEAM/HOT WATER dial to the HOT WATER position. To stop the hot water, return the dial to the STANDBY position.
Increase Water Temperature +1˚C: In Advanced Temperature Mode, press the 1 CUP button. AUTO OFF MODE The machine automatically switches to AUTO OFF mode after 30 minutes. Increase Water Temperature +2˚C: In Advanced Temperature Mode, press the 2 CUP button. Decrease Water Temperature -1˚C: In Advanced Temperature Mode, press the FILTER SIZE button. Decrease Water Temperature -2˚C: In Advanced Temperature Mode, press the POWER button.
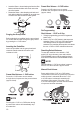
Care & Cleaning REPLACING THE WATER FILTER 1 Set current month 2 Soak filter for 5 min 3 Ensure parts are connected The provided water filter helps prevent scale build-up in and on many of the inner functioning components. Replacing the water filter after three months or 40L will reduce the need to descale the machine. The limitation of 40L is based on water hardness level 4. If you are in level 2 area, you can increase this to 60L.
Descaling the coffee component Repeat processes to complete descaling 4. Press the 1 CUP button to start the After the above processes about half (0.5 litre) of the descale solution should be left in the water tank. descaling for the coffee component of the machine. Descaling coffee component takes approximately 25 seconds. The 1 CUP button should flash continuously and remain constant once the descaling process has finished. To terminate the descaling within 25 seconds, press the 1 CUP button again.
ADVANCED CLEANING FOR THE CONICAL BURR GRINDER This step is only required if there is a blockage between the grinding burrs and the grinder outlet. 1 2 3 4 GRIND SIZE 5 GRIND SIZE 6 SPRING WASHER 7 1 FLAT WASHER 8 Set ‘GRIND SIZE’ to ‘1’ (finest) 9 SINGLE DOUBLE Use 10mm socket. Rotate ‘Clockwise’ to loosen the nut only 10 2. METAL WASHER 3.
The storage tray (located behind the drip tray) can be removed and cleaned with a soft, damp cloth. Do not use abrasive cleansers, pads or cloths which can scratch the surface. Clean centre of screw before inserting Allen Key NOTE All parts should be cleaned by hand using warm water and a gentle dish washing liquid. Do not use abrasive cleansers, pads or cloths which can scratch the surface. Do not clean any of the parts or accessories in the dishwasher.
Troubleshooting PROBLEM POSSIBLE CAUSE WHAT TO DO Machine does not heat up. • STEAM/HOT WATER dial is not in the STANDBY position. • Turn the STEAM/HOT WATER dial to the STANDBY position. Machine will commence heating. Water does not flow from the group head. • Machine has not reached operating temperature. • Allow time for the machine to reach operating temperature. The POWER button light will stop flashing and all button lights on the control panel will illuminate when ready. No hot water.
PROBLEM POSSIBLE CAUSE WHAT TO DO Espresso runs out around the edge of the portafilter. • Portafilter not inserted in the group head correctly. • Ensure portafilter is completely inserted and rotated until resistance is felt. • There are coffee grounds around the filter basket rim. • Clean excess coffee from the rim of the filter basket to ensure a proper seal in group head. • Coffee tamped too lightly. • Tamp between 15–20kg of pressure. • Portafilter not inserted in the group head correctly.
PROBLEM POSSIBLE CAUSE WHAT TO DO No crema. • Coffee tamped too lightly. • Tamp between 15-20kg of pressure. • Coffee is ground too coarsely. • Use slightly finer grind. Refer to ‘Setting the Grind Size’, page 9 and ‘Under Extraction’, page 11. • Coffee beans or pre-ground coffee are not fresh. • If grinding fresh whole coffee beans, buy freshly roasted coffee with a “roasted on” date and use within 2 weeks of this date. • The filter basket may be blocked.
PROBLEM POSSIBLE CAUSE WHAT TO DO No ground coffee coming from grinder. • No coffee beans in hopper. • Filler hopper with fresh coffee beans. • Blocked grinder chamber or chute. • Clean and clear grinder chamber and chute. Refer to ‘Advanced Cleaning for the Conical Burr Grinder’, page 16. • Water / moisture in grinder chamber and chute. • Clean and clear grinder chamber and chute. Refer to ‘Advanced Cleaning for the Conical Burr Grinder’, page16.
Sage ® Freephone (UK Landline): 0808 178 1650 Mobile Calls (National Rate): 0333 0142 970 www.sageappliances.com customerservice@sageappliances.co.uk What’s on your mind? Register your product and get more from your purchase Our constant aim is to improve the quality and features of our appliances. We welcome your comments and ideas in assisting our ongoing development. Product registration takes only a few minutes and ensures a record of your purchase.