the Bambino™ Plus SES500 EN QUICK GUIDE
PAGE HEADER..... CONTENTS 2 6 8 14 17 Sage® recommends safety first Know your new appliance Operating your new appliance Care & cleaning Troubleshooting • • SAGE® RECOMMENDS SAFETY FIRST At Sage® we are very safety conscious. We design and manufacture appliances with your safety foremost in mind. We also ask that you exercise a degree of care when using any electrical appliance and adhere to the following precautions.
EN PAGE WE RECOMMEND HEADER..... SAFETY FIRST • Always ensure the appliance is turned OFF, unplugged at the power outlet and has been allowed to cool before cleaning, attempting to move or storing. • Always turn the appliance to the off position, switch off at the power outlet and unplug at the power outlet when the appliance is not in use. • Regularly inspect the supply cord, plug and actual appliance for any damage.
PAGE WE RECOMMEND HEADER..... SAFETY FIRST • • • • • • instruction concerning use of the appliance in a safe way and understand the hazards involved. Use only tap water in the water tank. Do not use any other liquid. Never use the appliance without water in the water tank. Ensure the portafilter is firmly inserted and secured into the brewing head before using the machine. Never remove the portafilter during the brewing operation as the machine is under pressure.
EN WE RECOMMEND SAFETY FIRST • Do not leave the product unattended when in use. • Do not touch hot surfaces. Allow the product to cool down before moving or cleaning any parts. • Use caution when operating the machine, as metal surfaces are liable to get hot during use. • Use caution when descaling as hot steam may be released. Before descaling, ensure drip tray is inserted. Refer to ‘Care & Cleaning’ for further instructions.
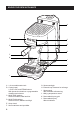
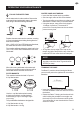
PAGE HEADER..... KNOW YOUR NEW APPLIANCE A B C E D G F H I J K L A. 1.9L removable water tank B. Control panel 1 CUP, 2 CUP and STEAM buttons With preset shot durations or programmable durations and volumes C. MILK TEMP settings Select from Warm, Ideal and Hot D. MILK FOAM settings Select from Low, Medium and High E. Group head F. 54mm stainless steel portafilter 6 G. Steam wand grip H. Extra-tall cup clearance for tall mugs I. Steam wand With automatic milk texturing J.
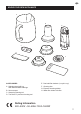
EN PAGE HEADER..... KNOW YOUR NEW APPLIANCE A B H C D E F G ACCESSORIES A. Stainless steel milk jug With MIN and MAX markings B. 54mm tamper C. Steam tip cleaning tool D. The Razor™ precision trimming tool E. F. G. H.
PAGE HEADER..... OPERATING YOUR NEW APPLIANCE BEFORE FIRST USE 5m Machine Preparation Remove and discard all labels and packaging materials attached to your machine. Ensure you have removed all parts and accessories before discarding the packaging. Clean the drip tray, drip tray grid, portafilter, filter baskets and milk jugs using warm water and a gentle dish washing liquid. Rinse well and dry thoroughly before use. INSTALLING THE WATER FILTER 1.
EN PAGE HEADER..... OPERATING YOUR NEW APPLIANCE FILLING THE WATER TANK Lift the water tank from the machine. Remove the water tank lid and add potable water to the water tank, filling to the MAX marking indicated. Replace the water tank onto the machine, ensuring it is properly attached and sitting flush against the back of the machine. If the 1 CUP, 2 CUP and STEAM buttons illuminate, the water tank has been correct attached. The machine will detect when the water level is low.
+ 2s PAGE HEADER..... OPERATING YOUR NEW APPLIANCE PRE-PROGRAMED SHOT VOLUME – 2 CUP Press the 2 CUP button once, the button will flash indicating that is has been selected. A preset single espresso volume of approximately 60mls will be extracted. The machine will automatically stop once the pre-set volume has been extracted. • Wipe excess coffee from the rim of the filter basket to ensure a proper seal is achieved in the group head.
EN PAGE HEADER..... OPERATING YOUR NEW APPLIANCE SETTING THE MILK TEMPERATURE The machine has 3 milk temperature settings; 1 Warm 3 2 Ideal 2 1 3 Hot When turning on the espresso machine, the milk temperature setting will default 3to the last chosen setting. Press the MILK2TEMP button 1 until the desired temperature is illuminated.
PAGE HEADER..... OPERATING YOUR NEW APPLIANCE MANUAL MILK TEXTURING • Auto milk texturing and auto shut-off are disabled during manual milk texturing. • Fill the milk jug to between the MIN and MAX markings. • Lift the steam wand and insert into the milk jug with the steam wand tip 1-2cm below the surface of the milk, close to the right-hand side of the jug at a 3 o’clock position. • Press the STEAM button to begin texturing.
EN PAGE HEADER..... OPERATING YOUR NEW APPLIANCE EXTRACTION TIPS A great espresso is about achieving the perfect balance between sweetness, acidity, and bitterness. The flavour of your coffee will depend on many factors, such as the type of coffee beans, degree of roast freshness, coarseness or fineness of the grind, dose of ground coffee and tamping pressure. Experiment by adjusting these factors just one at a time to achieve the taste of your preference.
CARE & CLEANING IN OUT REPLACING THE WATER FILTER 5m The provided water filter helps prevent scale build-up in and on many of the inner functioning components. Replacing the water filter after 3 months or 40L will reduce the need to descale the machine. CLEANING CYCLE The machine will detect when 200 extractions have been carried out since the last cleaning cycle; this will be shown by the 1 CUP and 2 CUP buttons alternately flashing. 5.
EN CARE & CLEANING WARNING TO DESCALE 1. Empty the drip tray and re-insert into position on the machine. 2. Fill the water tank to the DESCALE line indicated and add the descaling agent to the water. 1000 DESCALE 1000 DESCALE 2L 68oz 7. Press the 1 CUP or STEAM button to begin the descale cycle. These buttons will alternately flash throughout the cycle. & 5s 8. Once the descale solution has been used up, the descale mode will pause.
PAGE HEADER..... CARE & CLEANING • If any of the holes in the tip of the steam wand become blocked, it may reduce frothing performance. Manually purge the steam wand to try and clear the holes. • If the steam wand remains blocked, unscrew the steam wand tip and use the cleaning tool to unblock the holes; cleaning tool is located in the back of the machine, under the water tank. • Cleaning the Outer Housing • Wipe the outer housing with a soft, damp cloth and then polish with a soft, dry cloth.
EN PAGE HEADER..... TROUBLESHOOTING PROBLEM POSSIBLE CAUSES EASY SOLUTION Water does not flow from the group head. • Water tank is empty. Fill tank. • Water tank is not fully inserted and locked into position. Push water tank down completely to lock into place. • Machine needs to be descaled. Perform descale cycle. • Coffee is ground too finely and/or too much coffee in filter basket and/or over tamping and/or filter basket is blocked.
TROUBLESHOOTING PAGE HEADER..... PROBLEM POSSIBLE CAUSES EASY SOLUTION Espresso runs out too quickly. • Coffee is ground too coarsely. Use slightly finer grind. Refer to 'Coffee Dose and Tamping' on page 9 and 'Extraction Tips' on page 13. • Not enough coffee in the filter basket. Increase dose of coffee. Tamp then use the Razor™ dose trimming tool to trim off excess coffee. Refer to 'Coffee Dose and Tamping' on page 9 and 'Extraction Tips' on page 13. • Coffee tamped too lightly.
EN TROUBLESHOOTING PAGE HEADER..... PROBLEM POSSIBLE CAUSES EASY SOLUTION Coffee not hot enough. • Portafilter not pre-heated. Rinse portafilter under hot water outlet. Dry thoroughly. Milk too hot. • Jug incorrectly positioned. Ensure milk jug is correctly positioned on sensor. Adjust milk temperature setting. No crema. • Coffee tamped too lightly. Tamp betweens or 15–20kg of pressure. • Coffee is ground too coarsely. Use slightly finer grind.