
User Manual

8
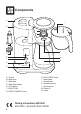
Operation
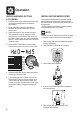
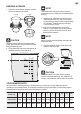
WATER HARDNESS SETTING
& FLUSHING
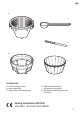
1. Ensure that the empty coee basket and empty
carafe (with lid attached) are inserted into
the machine.
2. Fill the water tank with fresh cold water to
the MAX mark on the water tank. Plug into
power outlet.
3. When rst turned on, the machine will show
‘SEt HArdnESS’ on LCD, asking you water
hardness level. Press SELECT dial once. Dip
the water hardness test strip into the lled water
tank for 1 second. Remove and wait 1 minute to
reveal the result.
4. Rotate SELECT dial until the corresponding
test result is shown on the screen. Press to set.
5. Install the water lter into the water tank before
continuing to the ush cycle.
6. The machine will show ‘FLUSH Unit’ on LCD.
Press SELECT dial to commence ush cycle.
The machine will dispense all the water from
the tank, through the system and into the empty
carafe. After ushing, empty the basket and
carafe.
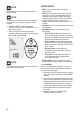
INSTALLING THE WATER FILTER
This product is designed to be used with a water
lter installed in the water tank. Not doing so will
aect the internal components and performance of
the appliance.
The lter cartridges should be replaced regularly;
when indicated on the LCD screen.
NOTE
All water tank levels will be incorrect if the machine
is used without the water lter correctly installed.
1. Remove the water lter and water lter adapter
from the packaging.
2. Soak the lter in cold water for 5 minutes.
3. Attach water lter to adapter.
4. Insert the assembled water lter and adapter
into the water tank.
5. Fill the water tank with cold water to the
indicated MAX marking.