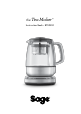
the Tea Maker ™ Instruction Book – BTM800
Contents 2 Sage® Recommends Safety First 8 Components 11 Tips 10 Functions 20 Care & Cleaning 23 Troubleshooting IMPORTANT SAFEGUARDS At Sage® we are very safety conscious. We design and manufacture consumer products with the safety of you, our valued customer, foremost in mind. In addition we ask that you exercise a degree of care when using any electrical appliance and adhere to the following precautions.
• As the colours of the wire may not correspond with the coloured markings which identify the terminals in your plug, please refer to the following: −The − Blue wire must be connected to the terminal which is marked ‘N’. −The − Brown wire must be connected to the terminal which is marked with the letter ‘L’. −The − Green & Yellow wire must be connected to the terminal which is marked with the letter E or the earth symbol . • Please note that if a 13 amp plug is used, a 13 amp fuse should be used.
• Attach the jug lid securely to the glass jug before operation. • Do not place anything on top of the jug lid. • Do not open the jug lid during operation as scalding may occur. • Extreme caution must be used when moving the glass jug containing hot liquid. • Use caution when pouring water from the glass jug as boiling water and steam will scald. Do not pour the water too quickly.
• To disconnect from the wall outlet, first turn OFF the appliance then remove the power plug from the wall outlet. • When the appliance is not in use or when left unattended, disconnect the power cord from the wall outlet. • Before attempting to move the appliance or before assembling or disassembling parts, cleaning or storing, turn OFF the appliance, allow to cool and disconnect from the wall outlet. • Allow the appliance to cool down in between brewing cycles.
WARNING • Never immerse the glass jug, power base, power cord or power plug in water or allow moisture to come in contact with these parts. WARNING • Do not wash jug exterior under running water. 6 IMPORTANT SAFEGUARDS FOR ALL ELECTRICAL APPLIANCES • This appliance is for household use only. • Unwind the power cord fully before use. • Do not let the cord hang over the edge of a table or counter, or touch hot surfaces.
• Consult a qualified electrician if the grounding instructions are not completely understood, or if doubt exists as to whether the appliance is properly grounded. WARNING • Do not operate the appliance on an inclined surface. Do not move the appliance while it is switched on. • he symbol shown T indicates that this appliance should not be disposed of in normal household waste.
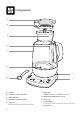
Components A B C E F G I H A. B. C. D. E. 8 J Jug lid Stainless steel scale filter Tea basket lid Stainless steel tea basket Jug post Magnetically attaches the tea basket. F. Glass jug 1500ml water max, 1200ml tea max G. Immersed temperature sensor H. Tea scoop I. Cord storage Concealed on the underside of the power base J. Power base.
Components K S L T M N O K. AUTO START button Set the Tea Maker™ to automatically begin brewing at a pre-selected time. L. KEEP WARM button Keeps the brewed tea or heated water warm for up to 60 minutes. M. BASKET button Auto lifts & lowers the tea basket. The movement allows water to circulate freely around the tea leaves for maximum infusion. N. TEA TYPE button Preset brew temperatures recommended for green, black, white, herbal & oolong tea. P Q R O.
leaves, roots or seeds. Common herbal beverages are chamomile, peppermint, fennel, rose hip, and lemon verbena. Herbal infusions that do not contain tea will generally not become bitter with extended brews. These can often be brewed with boiling water 3 times without jeopardising the taste. Functions TEA TYPES There are four main types of tea from the tea plant camellia sinensis. The picking and processing methods determine the type of tea finally produced.
Water to Tea Scoop Ratio GLASS JUG MARKING CUPS TEA SCOOPS 500mL Approx. 2 Cups/500ml 2 Scoops 750mL Approx. 3 Cups/750ml 3 Scoops 1000mL Approx. 4Cups/1000ml 4 Scoops 1200mL Approx. 5 Cups/1200ml 5 Scoops BEFORE FIRST USE PREPARING THE TEA MAKER™ FOR USE In order to remove any dust or protective residues from the manufacturing process, it is recommended to run a boiling cycle then discard the water. 1.
7. Press the left ARROW UP button until the LCD screen displays 100°C. The 'Custom' LED will automatically illuminate. 8. Press the HOT WATER/Cancel button to start the cycle. The button surround will illuminate and the LCD screen will display 'ON' and the real-time heating progress in increments of 5°C. 9. Once the water reaches 100°C, the tea alert will sound three times and the HOT WATER/Cancel button surround will cease to illuminate. 10. Discard the water. The Tea Maker™ is now ready to use. 2.
GREEN TEA WHITE TEA PRESET BREW TEMP 80˚C 85˚C 90˚C 100˚C 100˚C PRESET BREW TIME 3:00 3:00 3:00 4:00 2:00 TEA TYPE SELECTING THE TEA STRENGTH The desired tea strength determines the brew time. The correct brew time depends on the tea type and your personal tea strength preference. The Tea Maker™ has 5 preset tea strengths recommended to achieve Strong, Medium or Mild tea brews. It also features a customisable brew time setting to suit your personal taste (see Page 16, Customising Brew Time).
SELECTING THE ‘KEEP WARM’ FEATURE This feature allows the brewed tea or heated water to remain warm for up to 60 minutes. The ‘Keep Warm’ temperature ranges between 50–80°C depending on the original brew temperature selected. The lower the brew temperature, the lower the ‘Keep Warm’ temperature. Original Brew Temp. Approximate Keep Warm Temp. 50˚C - 65˚C 50˚C 70˚C - 80˚C 70˚C 85˚C 75˚C 90˚C - 100˚C 80˚C NOTE During the ‘Keep Warm’ cycle, brewed tea will continue to develop flavour.
2. During the brewing cycle, the BASKET button surround will flash while the basket slowly lifts and lowers within the heated water. 3. The ‘Basket Cycle’ feature can be cancelled anytime during the tea brewing cycle. Press the BASKET button once. The button surround will cease to illuminate and the LCD screen will no longer display BASKET CYCLE. The basket will return to the bottom of the glass jug for the remaining brewing time.
CUSTOMISING BREW TEMPERATURE & TIME CUSTOMISING BREW TEMPERATURE In addition to the 5 preset brew temperatures (see page 12, Selecting the Tea Type), the Tea Maker™ also features a customisable brew temperature setting for other tea varieties or to suit your personal taste. To customise a brew temperature: 1. Press the left ARROW UP button to increase the temperature, or the left ARROW DOWN button to decrease the temperature.
ii) Continue to press the right ARROW UP button. The LCD screen will display ‘MANUAL LIFT’ and ‘- - : - -‘ on the right side of the LCD. iii) Once the Tea Maker™ is activated and the correct water temperature is reached, the basket will automatically lower. Setting the ‘Auto Start’ Feature 1. Press and hold the AUTO START button for 2 seconds. The button surround will illuminate and the tea alert will sound. 2.
NOTE Insufficient water may discolour your Tea Maker™ base! 8. Once the selected START TIME is reached, the Tea Maker™ will automatically commence the tea brewing or water heating cycle. During this time, the AUTO START button surround will no longer illuminate until the cycle is complete. Re-selecting the ‘Auto Start’ feature using previous START TIME 1. Press the AUTO START button once. The HOT WATER/Cancel and TEA/Cancel buttons will flash. 2.
TEMPERATURE CONVERSION (˚C TO ˚F) The temperature reading on the Tea Maker™ is preset to Celsius but can be converted to Fahrenheit. Simultaneously press and hold the TEA TYPE and TEA STRENGTH buttons for 2 seconds. The corresponding ‘°C’ or ‘°F’ symbol will be displayed on the LCD screen.
Care & Cleaning CLEANING THE GLASS JUG 1. After each use, empty the glass jug. Do not allow brewed tea to stand overnight. 2. Wipe the interior of the glass jug with a soft damp sponge or rinse with warm water. Tea deposits will enhance the flavour of the brewed tea, so if only using as a Tea Maker™ do not wash with soapy water. 3. Wipe the exterior of the glass jug with a soft damp cloth to clean. 4.
Ensure the Tea Maker™ is turned OFF by pressing the TEA/Cancel button (when brewing tea) or the HOT WATER/Cancel button (when heating water) on the power base. The Tea Maker™ is OFF when the button surround illumination goes out. Remove the power plug from the wall outlet. NOTE Allow all parts of the Tea Maker™ to cool completely before disassembling and cleaning. NOTE Only the jug lid, tea basket, tea basket lid and tea scoop are dishwasher safe.
DESCALING STORAGE 1. Empty one sachet (25g) into 1 litre of warm water, stir to dissolve. 1. Ensure the Tea Maker™ is switched off, cleaned and dried before storing. 2. Ensure that the assembled tea basket is securely attached to the magnetic post within the glass jug. 3. Ensure that jug lid is securely in place. 4. Wrap the power cord around the power cord storage under the power base. 5. Stand the Tea Maker™ upright on the power base. Do not store anything on top. 2. Pour into the kettle or tea maker.
Troubleshooting PROBLEM Tea Maker™ will not switch ‘ON’ The Tea Maker™ will not work The LCD light has gone out? I cannot select a certain function The LCD screen displays ‘RESET’ POSSIBLE CAUSE • • • • • • • • • • • The LCD screen displays ‘ERROR’ • Check the power plug is securely inserted into the outlet. Insert the power plug into an independent outlet. Insert the power plug into a different outlet. Reset the circuit breaker if necessary.
Troubleshooting PROBLEM I would like to have the Tea Maker™’s default settings back The ‘BASKET CYCLE’ feature / BASKET button does not work After boiling water, bubbles appear around the temperature sensor My tea tastes too weak or too strong There is a rattling noise inside the glass jug 24 WHAT TO DO • • • • • • • • Even when unplugged from the wall outlet, the Tea Maker™ will remember the last setting used for each function.
DE AT Sage Appliances GmbH Johannstraße 37, 40476 Düsseldorf, Deutschland Für den Kundendienst besuchen Sie bitte www.sageappliances.com UK IE BRG Appliances Limited Unit 3.2, Power Road Studios, 114 Power Road, London, W4 5PY Freephone (UK Landline): 0808 178 1650 Mobile Calls (National Rate): 0333 0142 970 www.sageappliances.com Registered in Germany No. HRB 81309 (AG Düsseldorf). Registered in England & Wales No. 8223512.