the Smart Grill ™ BGR840 / SGR840 EN QUICK GUIDE Pro
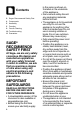
Contents 2 4 5 5 9 10 11 Sage® Recommends Safety First Components Assembly Function Care & Cleaning Troubleshooting Guarantee SAGE® RECOMMENDS SAFETY FIRST At Sage® we are very safety conscious. We design and manufacture appliances with your safety foremost in mind. In addition, we ask that you exercise a degree of care when using any electrical appliance and adhere to the following precautions.
EN • Do not place anything on top of the grill when lid is closed, when in use and when stored. • • • • • The appliance is marked with a HOT surface symbol. The lid and other surfaces will be hot when the appliance is operating and for some time after use. To prevent burns always use insulated oven mitts or use handles or knobs where appropriate. Always ensure the appliance is turned OFF, unplugged at the power outlet and has been allowed to cool before cleaning, moving or storing.
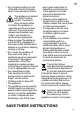
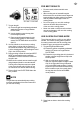
Components N M A L Open Flat BBQ Mode Opens flat into a 1650 sq. cm grilling surface. K J B C I Q O H P D A. B. C. D. E. F. G. H. I. J. K. L.
EN Assembly Functions PREPARING THE GRILL FOR USE PREHEATING THE GRILL material and promotional labels from the grill. 2. Wipe the cooking plates and drip tray with a soft damp sponge. Dry thoroughly. 3. Ensure the drip tray is correctly inserted into the grill. 4. Ensure the cooking plates are correctly inserted and securely locked into position. 5. Place the grill on a flat, dry surface. Ensure there is a minimum distance of 10cm of space on both sides of the appliance. 6.
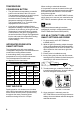
TEMPERATURE CONVERSION BUTTON • • The grill features a temperature conversion button on the left side of the LCD screen. The temperature reading on the grill is preset to Celsius. Pressing the temperature conversion button converts the Celsius temperature reading into Fahrenheit. The corresponding °C or °F symbol will be displayed on the LCD screen.
EN FOR BEST RESULTS • FOOD • SET TEMP SET TEMP PLATE TEMP 7. To open the grill: a) Ensure the grill has completely preheated and the LCD screen no longer flashes PLATE TEMP. b) Use the handle to open the top plate to a 90 degree position. c) Place meat with probe inserted on the bottom cooking plate. For best results, ensure PLATE TEMP dial is set on SEAR (230°C). 8. Use the handle to close the top cooking plate.
If using the probe, repeat steps 3–6 on how to insert the probe and select desired doneness setting before placing meat on the grill. NOTE The probe and smart settings have been optimised for cooking in contact mode. As a result, additional cooking time may be required when using the probe in BBQ mode. For best results, it is recommended to flip meat regularly. 3.
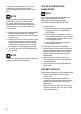
EN Care & Cleaning Ensure the grill is turned OFF by turning the PLATE TEMP dial to the OFF position. The grill is OFF when the LCD screen displays OFF. Remove the power plug from the wall outlet. Allow the grill to cool completely before disassembling and cleaning. Always clean the probe, outer body, drip tray and cooking plates after each use to prevent a build-up of ingredients. CLEANING THE PROBE Wipe the metal probe and cord with a soft, damp sponge.
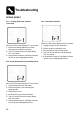
Troubleshooting ERROR MODES Er1 – Cooking Plates are inserted incorrectly. When the LCD screen displays ‘Er1’ error mode: 1. Ensure the cooking plates are correctly and securely inserted into position. 2. The LCD screen should no longer display ‘Er1’ error Mode. 3. If the problem continues, call Sage Customer Service or go to sageappliances.com Er2 – Probe temperature has exceeded 180°C. When the LCD screen displays ‘Er2’ error mode: 1. Unplug the grill from the wall outlet. 2.
EN Guarantee 2 YEAR LIMITED GUARANTEE Sage Appliances guarantees this product for domestic use in specified territories for 2 years from the date of purchase against defects caused by faulty workmanship and materials. During this guarantee period Sage Appliances will repair, replace, or refund any defective product (at the sole discretion of Sage Appliances). All legal warranty rights under applicable national legislation will be respected and will not be impaired by our guarantee.
GBR BRG Appliances Limited Unit 3.