
User Guide


02
Getting Started
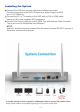
Before you begin installation, be sure to have the following:
PC or TV monitor
VGA or HDMI cable
Router (WAN)
Hard drive.
(If you purchased a system with a pre-installed hard drive,please ignore it.However
if the system you purchased is without hard drive,please install hard drive inside the
nvr box for recording.Please help check the following instructions about how to install
a hard drive.If needed,please contact us at service@clocktida.com, our
customer service team will send a video about it for your reference)
Do not attempt to install your cameras until you are able to view
images on your TV or PC monitor first.
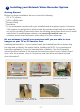
Installing the hard drive – if your system has a pre-installed hard drive, please skip
this step and go directly the section below, Installing the NVR. If you purchased a
hard drive separately, it must be formatted after installed it. See the Frequently
Asked Questions section of this manual for instructions about how to format a hard
drive, refer the question, How do I format my new hard drive and check my hard
drive information?
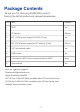
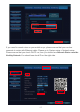
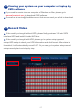
1 Installing your Network Video Recorder System
Remove the cover from the unit,
and remove the top two screws
Remove the cover
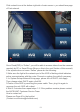
Insert the hard drive, secure it
to the bottom of the unit with the
four screws
Connect the data wire and
power wire as shown
Replace the cover and fasten screws