3-Ease Stroller/ Carriola “3-Ease” CV204 User Guide / Guía del Usuario Weight: up to 50 lbs (22.7-kg) Peso: hasta 50 libras (22.7-kg) ©2011 Dorel Juvenile Group. All Rights Reserved. Todos derechos reservados. www.djgusa.com (800) 544-1108 www.safety1st.com Made in CHINA. Hecho en CHINA. Styles and colors may vary. Los estilos y los colores pueden variar. Distributed by (distribuido por) Dorel Juvenile Group, Inc., 2525 State St. Columbus, IN 47201-7494 Dorel Distribution Canada, 873 Hodge, St.
i WARNING: For the safety of your child, please read the following warnings and assembly instructions and keep for future reference. • Adult assembly required. • CAUTION: Keep small parts away from children during assembly. • NEVER LEAVE CHILD UNATTENDED. ALWAYS keep child in view when in stroller. • AVOID SERIOUS INJURY from falling or sliding out. ALWAYS use seat belt. Check frequently to make sure it is secure.
1 ADVERTENCIA: Por la seguridad de su hijo, por favor lea las siguientes advertencias e instrucciones de ensamble, y guárdelas para consulta futura. • El montaje debe realizarlo un adulto. • PRECAUCIÓN: Durante el armado, mantenga las piezas pequeñas fuera del alcance de los niños. • NUNCA DEJE AL NIÑO SIN SUPERVISIÓN. SIEMPRE mantenga al niño a la vista cuando esté en la carriola. • EVITE UNA LESIÓN GRAVE por caída o resbalamiento. SIEMPRE use el cinturón de seguridad.
Parts / Lista de piezas 2 parent tray charola para los padres child tray charola para el niño 1 rear axle 1 eje trasero 2 rear wheels 2 ruedas traseras 2 cotter pins 2 pasadores de chaveta 2 hubcap 2 tapas de cubos 4 washers dual front wheel 4 arandelas rueda doble delantera Keep These Instructions For Future Use • Hardware for rear wheel assembly is located on the axle. • Read all instructions before assembly and use. • Do not return this product to the place of purchase.
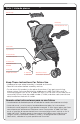
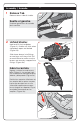
Assembly / Armado 3 1 Release Tab 1 Release tab on side of stroller Suelte el gancho Suelte el gancho en el costado de la carriola. 2 Unfold Stroller 2 Hold and lift the handlebar (Figure 2). Stroller will click when completely open and locked (Figure 2a). Slide lower braces into fittings on rear legs until they click. Pull on each brace to make sure the braces are securely snapped into fittings (Figure 2b). 2a Abra la carriola Agarre y suba el asa del manubrio (Figura 2).
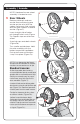
Assembly / Armado NOTE: Hardware for rear wheel assembly is located on axle. 4 3 3 Rear Wheels Remove cotter pin and one washer from axle leaving one washer on the axle. With the spokes facing out, slide a wheel onto the axle. Slide on a second washer (Figure 3). Insert straight side of cotter pin through hole in axle (Figure 3a). Repeat steps on other rear wheel. Snap hub caps onto both wheels (Figure 3b). 2 Washers 2 Arandelas 3a Turn stroller upside down.
Assembly / Armado 5 4 Dual Front Wheel 4 Slide dual front wheel onto frame tube. Wheel will click when installed properly. Rueda doble delantera Dual front wheel Rueda doble delantera Deslice rueda doble delantera en el tubo del armazón. La rueda hará clic cuando quede bien instalada. 4a 5 Parent Tray Open canopy. Slide bottom edge of parent tray onto the frame above the canopy and snap onto handlebar tubes. Charola para los padres Abra la capota.
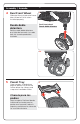
Assembly / Armado 6 Child Tray 6 6 Guide tray tabs into slots on stroller frame. Push until tray clicks into place. To remove tray, pull out finger tabs on both sides and slide tray out. Charola para el niño Guíe las lengüetas de la charola dentro de las ranuras del armazón de la carriola. Empuje hasta que la charola encaje en su lugar con un clic. Para quitar la charola, con los dedos jale hacia fuera las lengüetas en ambos lados y deslice la charola hacia fuera.
To Use / Para Uso 7 8 Recline 89 To Lower Seat Back: Locate release clip behind backrest. Squeeze release clip, pull away from the stroller and lower seat back (Figure 8). NOTE: Do not adjust the seat when your child is in the stroller. To Raise Seat Back: Holding the ring on the strap, squeeze release clip and push toward the seat back (Figure 8a). Reclinación Para bajar el respaldo del asiento: Localice el sujetador de liberación que se encuentra detrás del respaldo.
To Use / Para Uso 9 Restraint System 8 9a 9 Place your child in the stroller, with the crotch strap between the child’s legs. Fasten both buckles (Figure 9). Tighten straps snugly around your child (Figure 9a). To tighten strap, pull out bottom loop to desired tightness, then pull on strap end (Figure 9b). Bottom Loop Lazo inferior 9b To loosen strap, pull out bottom loop for slack, then pull out top loop to desired looseness, then pull on the buckle (Figure 9b).
To Use / Para Uso 10 To Fold Stroller 9 10 Lock rear brakes and remove your baby. Slide the button on handlebar to the left and squeeze (Figure 10). Hold the button in and swing the handlebar down (Figure 10a). Hook tab on the left of the handlebar onto post on stroller frame tube (Figure 10b). 10a Stroller will stand on its own. Para plegar la carriola Ponga los frenos traseros y saque al bebé. Deslice hacia la izquierda el botón del asa del manubrio y apriete (Figura 10).
To Use / Para Uso 10 11 To Install Infant Car Seat NOTE: Car seat sold separately. Para instalar los autoasientos de bebé NOTA: Autoasientos de bebé vende por separado. WARNING To avoid serious injury: • Use ONLY Safety 1st ® onBoard™, onBoard™ 35, onBoard™ 35 Air, Safety 1st ® Comfy Carry Elite Plus, Cosco® Comfy Carry, Eddie Bauer® Sure Fit, Eddie Bauer® Sure Fit 35, infant car seats with this stroller. • Please refer to the manufacturer’s instructions for the use of your infant car seat.
To Use / Para Uso 11 11 (continued) (continuación) Car seat must be positioned so child faces the stroller handle. El autoasiento debe quedar colocado de modo que el niño mire hacia la manija del carriola. Coloque el autoasiento sobre la carriola de manera que la superficie plana vertical trasera del autoasiento A se apoye en la superficie vertical trasera de la charola del niño B. Baje el autoasiento directamente sobre la carriola y empuje la manija hacia abajo.
To Use / Para Uso 12 To Remove Infant Car Seat To remove the car seat, pull the release lever as shown (Figure 12). Lift car seat. Para quitar el autoasiento Para quitar el autoasiento, tire de la palanca de liberación, como se muestra (Figura 12). Levante el autoasiento.
To Use / Para Uso 13 Stroller Care and Maintenance • To clean stroller fabric and seat pad, use a sponge or damp cloth with cold water and mild soap. Air dry only. Do not use harsh household cleaners or bleach to clean stroller. • Restraint and crotch straps should be surface washed and air dried only. Do not place in washing machine or dryer. • Periodically, check for loose screws, worn parts, torn material or loose stitching. Tighten or replace parts as needed.
14 One-Year Limited Warranty Dorel Juvenile Group, Inc. warrants to the original purchaser that this product (3-Ease Stroller), is free from material and workmanship defects when used under normal conditions for a period of one (1) year from the date of purchase. Should the product contain defects in material or workmanship Dorel Juvenile Group, Inc., will repair or replace the product, at our option, free of charge.