
User`s guide


AIRSHIP © 2009
Page 164
Clip Export
The Video Clip controls allow you to select a section of video and export it as a video file
for later viewing.
Clips are stored as video embedded within an executable program. You'll notice that the
file extension is EXE, meaning it is a program, with the selected video contained inside.
This has two main advantages:
1. You can give the Clip to any one with a Windows PC, and they can play the Clip.
2. Video Authentication is built in, making it practically impossible to edit the video
without the viewer knowing that this has occurred.
You can export the Clip is a raw MPG file using the Clip Export tool noted here. Further,
you can use the External Player to convert that MPG file to a raw, uncompressed AVI
file, which can be used by most video editing suites and DVD authoring programs.
(NOTE: MPG and AVI formats lose the video authentication features of the EXE clip
format.)
Best Practices
30 Minutes or Less:
We recommend creating Clips of 30 minutes or less in most cases, keeping the individual
files small enough to easily share. This also tends to be a best-practice for making sure
that a network problem does not interrupt the Clip process, resulting in an unusable
Clip.
Less Than 2 GB:
No matter how long the Clip in minutes, creating a Clip of more than 2 Gigabytes should
be avoided. Some versions of Windows in certain instances cannot correctly create a file
larger than 2 Gigabytes, so you would not be able to share the clip with all users. 2
Gigabytes can be anywhere from 1 to 1000 hours of video depending on the video
resolution and frame rate, so make a few sample clips with your installed system to see
how large your clip files are for 10 minute segments. Then you will have a good rule of
thumb to follow when it's important to make good clip files.
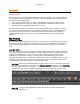
Clip Mode: Click on the Clip Mode button to start. When you do so, the label on the Clip
Mode button will change to Save Clip. The Timeline Control will display a blue Clip Time
bar with white start and end pointers.. The clip time can be adjusted by moving the clip
start and clip end position indicators located on the ends of the Clip Time bar. The
Orange pointer shows the location of the video you are currently viewing.
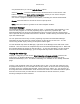
Save Clip: Clicking the Clip Mode/Save Clip button again will bring up the Export
Recording dialogue box: