
User`s guide


AIRSHIP © 2009
Page 161
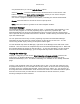
Camera and Date/Time Search
Start playback by simply dragging a Camera onto the Playback Display area. From there
you can use the Calendar and Timeline controls to choose what time you want to view.
First, drag a Camera from the list on the right onto a Display Screen. When you drop the
Camera, playback of available recordings will start immediately, beginning with the first
recordings from today. (If there are no recordings today, it will start with the beginning of
yesterday or whatever most recent date has recordings.)
The Calendar at the bottom starts with the current day selected. Dates in Orange also have
recordings available for the camera selected. Double-click on a date with recordings to
choose a previous date and playback will start immediately at the beginning of the chosen
day.
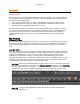
Recording Period Indicators
The red and gray bars on the Minutes and Hours Display Bars show time periods for which
there are recordings.
Orange indicates Alarm recordings.
Gray indicates Manual or Scheduled recordings.
Yellow indicates a Bookmark. Hover over it to see Bookmark Notes taken at that time.
Minutes Display Bar: This bar shows the minute-by-minute breakdown of the currently
selected hour for the currently highlighted channel. Here you can double-click in the Display
Bar to fine-tune the Start Position for playback.
Hour Display Bar: This grid shows the currently selected date broken down by hours. Inside
you see the Recording Period Indicators for each channel, giving you a quick view of
recording events. Double-click on the Hour Display Bar grid to go to the desired time.