
User`s guide


AIRSHIP © 2009
Page 131
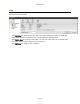
Groups
The Group folder contains the Camera Groups available for this Client.
Click Add Group button to create a new Group. Enter the Group Name.
Click Delete Group button to delete the selected Group.
Click Edit Group button to modify a Group name.
Auto-Load Group on Client Startup allows you to choose which Group of cameras will
automatically connect when the Client is started.
Configure Camera Groups
1. Click on the Group folder on the left.
2. Click the Add Group button to create a new camera group. This is basically a label for
the group. Click OK.
3. The Group name icon will appear on the left. Click on the icon.
4. To the right you will see a tree listing the Server you just configured. Click the + sign
there to branch the tree down.
5. You can simply drag the overall "Cameras" icon to the grid on the right to add all
cameras from that Server to this Group, or you can select individual cameras one by
one.
6. Click the Apply button to save your new Group configuration.
7. Repeat the above steps to add more Groups. Click OK when you are done.