
Operation Manual


English
19
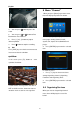
10 Menu “Installation”
When you enter to “Installation” menu, there
will display the screen like below:
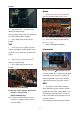
10.1 Satellite Installation
1. Satellite: Press [ENTER] key to enter the
Satellite list.
2. Press [/] key to select satellite. Press
[Page+/Page-] key to page up or page down.
In this menu:
Press [GREEN] button to rename for this
satellite.
Press [GREEN] button to enter into "edit
satellite" Menu.
Press [YELLOW] button to enter into
"Transponder" Menu.
Press [BLUE] button to auto Diseqc.
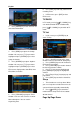
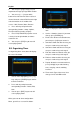
10.1.1 Edit
In "satellite" menu, press [GREEN] key to
enter into "edit satellist" menu. In this menu.
Press [RED] button to scan channels.
Press [GREEN] button to rename for this
satellite.
Press [YELLOW] button to enter into "motor"
Menu.
Press [BLUE] button to auto Diseqc.
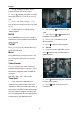
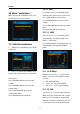
10.1.1.1 LNB
In this item, press [/] to switch among
“C-Band(5150)”, “KU Band(11300)” "One
Cable L", ''One Cable
H","Uni(9750/10600)" ,"Uni(9750/10750)","Lo
w Band(9750)",and "High Band(10600)"
mode.
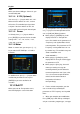
10.1.1.2 DiSEqC
DiSEqC: You can use [/] key to switch
options. There are several options for your
selection:
OFF: without DiSEqC.
1/4, 2/4, 3/4, 4/4: 4 ports DiSEqC
1/16, 2/16….16/16: 16 ports DiSEqC
10.1.1.3 22K
You can use [/] key to switch “ON / Off”.
When this item is switched to “ON”, receiver
will receive TV and radio input signal from
22K port. If the item is switched to “Off”, the
receiver will receive all signal from 0K port.