English High Definition Digital Satellite Receiver and Media Player Weather Forecast&RSS Reader Functions Online User's Manual&F.A.Q.
English CONTENTS 1 SAFETY PRECAUTIONS....................................................................... 4 2 INTRODUCTION .................................................................................... 5 3 FEATURES............................................................................................. 5 4 REMOTE CONTROL.............................................................................. 7 5 FRONT PANEL.........................................................................
English 11 MENU “SYSTEM” ................................................................................. 21 11.1 IN “SYSTEM” MENU: ................................................................................................21 11.2 PVR/HDD SETTING ...............................................................................................26 11.3 NET SETTING .........................................................................................................27 11.4 UPGRADE ......................
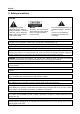
English 1 Safety precautions CAUTION: The lightning flash with arrowhead symbol, within an equilateral triangle, is intended to alert the user to "dangerous voltage" and to prevent from a risk of electric shock. Warning: To reduce the risk of electric shock, don't open the cabinet. Refer servicing to qualified personnel only. The exclamation point within an equilateral triangle is intended to alert the user to important operating and maintenance (servicing).
English Note: Moisture may be formed on the lens In the following conditions: when the unit is suddenly moved from a cold environment or an air-condition room to a warm place. immediately after a heater has been turned on. in a steamy or very humid room. If the moisture forms inside the unit, it may not operate properly. To correct this problem, turn on the power and wait about two hours for the moisture to evaporate.
English S/PDIF for digital audio or Dolby digital bitstream output DiSEqC 1.0, 1.1, 1.2 and USALS HDMI HD Video/Audio Output USB 2.
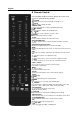
English 4 Remote Control You can power on/off the receiver, operate on screen menu, and use a variety of hot key function. POWER To switch your receiver on from standby or standby to on. MUTE Used to enable or disable the audio NUMERIC KEYS Used to select channels or enter programming parameters (TV / RADIO) Receiver switches between TV and Radio mode. (ZOOM) Press key select zoom times, from X1 to X16. RECALL Return to the previous menu or status. TV/SAT Receiver switches between TV and receive mode.
English USB To remove the USB Hard Disk safely. TMS(Time Shift) Press this button to display Time Shift info bar. Play To play the MP3, JPEG, or Record files. Stop To stop the Time Shift, recording, or MP3/JPEG player. PAUSE Used to select the freeze function. Press once to freeze the screen picture. FB To start Fast Backward function. FF To start Fast Forward function. SB No function SF No function PREV To play the former file in play list. To jump the head place in timeshift playback.
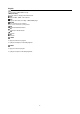
English 5 Front panel POWER KEY: To switch the receiver power on/stand by MENU KEY:Displays the Main Menu on the screen, or return to the previous menu or status. <,> KEY: To adjust volume level, or to move cursor left or right in the menu. ^, v KEY : To change channels, or to move cursor up or down in the menu OK KEY: To see TV/Radio channel list, or to confirm in the menu.
English 3. Connect one end of RCA cable to the RCA jack on the back of the receiver and the other end to a RCA jack on your TV. Finally connect the coaxial cable from the operator to the CVBS jack on the receiver. With External Audio / Hi-Fi System To connect any external Audio Hi-Fi system, the receiver has been provided with two RCA connectors at the back of the receiver marked with Audio L and R.
English In full screen, press [/] or [ vol+/vol-] to 8 Basic operations adjust volume. Turn on STB Number First, press the [ POWER] to turn on the In full screen, use number key and press unit. [ENTER] on the Remote Control Unit to When the STB is first used, there will play the change channel. first channel from the default Channel List. If Mute the STB is not first used, STB will play the 1. same channel as last time before turning off.
English Audio 1. In full screen, press [AUDIO] key can open the “Audio” window on the screen. 2. You can press [/] keys to select different “Favorite Group”. Pressing [Page+/Page-] keys can implement the “Page up/Page down” function 2. 3. [/] key and modify the audio mode by Press [Exit] key to exit the current You can modify the audio track by press window. press [/] key. SAT 3. 1.
English 6. Press [REC] key to directly add timer for recording event. 7. In EPG menu, press [EXIT] to close EPG screen. TV/RADIO In TV mode, pressing [ (TV / RADIO)] key can switch to Radio mode. In Radio mode, 2. Press [ENTER] key in each item can see press [ more detail information. (TV / RADIO)] key to switch to TV mode. TV List 1. In full screen, press [ENTER] key to enter “TV List”. 3. Press [RED] key to open the “Group” window.
English 1. In Channel list, press [Page+/Page-] key can page up and page down the channel list. TXT 1. Press [YELLOW] key in full screen, you can open teletext &subtitle menu and choose teletext, then press [ENTER] key on the channel which has teletext information. 2. 1. If the channel has no teletext Press[ (FIND)] key in full screen can open the "Channel Find” window. You can information, it will show “No Teletext ” on the presrd then press number keys to input the screen.
English 1. The [ (ZOOM)] key allows you to magnify a certain area on the images 2. Press [ (ZOOM)] key again, the image will enlarge rotate as x1, x2, x4, x6, x8, x12, x16. 3. In “x2 ~ x16” mode, using [,,,] keys to move the image center area you want to see. 4. In zoom mode, press [EXIT] to close 2. You can press [ ] button to pause the “Zoom” Window. video NVOD 3. Press [GREEN] key in full screen, it display Backward or Fast Forward. NVOD menu if it has NVOD.Or it will show"no 4.
English 9 Menu “Channel” When you press [Menu] key to enter menu, there will display the picture like below: 4. You can press [ ] button to pause the video. 5. You can press [ ] or [ ] button to Fast Backward or Fast Forward. 1. 6. menu pages among channel, Install,, Press [] or [] button to jump to Press [/] and [/]key to select different position. System, CA, Spark, file list,donwload and 7. plug in. Press [ ] button to stop the recording. 2.
English 9.1.4. Rename Mark the service you want to rename, use [ENTER] button to select one Rename item, use [] and [/] button to choose rename icon and press [ENTER] button to display keyboard, and rename it. After renaming it press [red] button on keyboard to save. 1. 9.1.5. Skip You can restrain and Skip (hide) the services.
English 2. You can press [Page+/Page-] keys to implement the Page Up/Page Down function. 3. You can use [/] key to switch between list of all channels at the left, list of channel in actual selected FAV list at the right and edit functions in the middle of the screen – Add, Remove, Move, Rename. 4. Press color key to implement the 4. corresponding function – Group, Options, item. Find (described in previous chapter). 5. 5.
English 10.1.1 Edit 10 Menu “Installation” In "satellite" menu, press [GREEN] key to When you enter to “Installation” menu, there enter into "edit satellist" menu. In this menu. will display the screen like below: Press [RED] button to scan channels. Press [GREEN] button to rename for this satellite. Press [YELLOW] button to enter into "motor" Menu. Press [BLUE] button to auto Diseqc. 10.1.1.
English Note: When you choose LNB type “Universal”, you cannot modify 22K. 10.1.1.4 0/12V (Optional) You can use [/] key to switch “0V / 12V”. When this item switches to “12V”, receiver will receive TV and radio input signal from 12V port. If the item switches to “0V”, the 1. receiver will receive all signals from 0V port. In “Transponder” menu, you not only can use [/] key to select transponder but also 10.1.1.5 Power can use [Add] and [Delete] functions.
English and NIT Search on/off. After you set up, 10.2 FastScan Satellite press [ENTER] key to start scanning. 4. In the “TP Scan” item, press [EXIT] key to exit the scanning and save the current parameters. 10.1.3 Single Scan 1. Press [RED] key, it will show up a dialog to ask you scan mode (means you want to scan all channels or only scan free channels), In this menu, you can search the channels fast by set the following parameters: Provider: can select the provider according your situation.
English The supported language can be changed 11.1.1. Language without any notice. When you enter to “Language” menu, you will 6. see the screen like below: Teletext Language: Press [/] keys to select TXT language. As long as the services support it, the Teletext language is changeable by teletext menu on full screen. The supported language can be changed without any notice. 7. Subtitle display:Press [/] keys to select subtitle display model.if set "auto",it 1.
English 2. Parental Lock determining that when user wish to enter menu, whether have to input Password or not. If the setting of “Parental Lock” is “Yes” which means user have to key in password, set “No” means unlock. 3. Censorship Classification Lock determining that when user wish to lock channels, If the setting is “view all”, play 1. channels not need password. If it setting Auto update:this item is use setting date and time of STB.
English 4. Conversion :Press [/] to select LETTER_BOX, PAN_SCAN, COMBINED or IGNORE. 5. SPDIF is for setting the both SPDIF and PCM audio output mode, it has options PCM and Auto. You can press [Left/Right] Key to select each mode circularity. PCM Out means system will decode no PCM audio 1. track data to be PCM, digital audio decoder User can switch display resolution in view mode using [V.FORMAT] button. Also or HDMI TV will get PCM digital audio data.
English 3. Save As Factory default: when you want transparency, 25%, 75%, and 100% and “0” save current datebase as default datebase, (means no transparency function). press [ENTER] key on this item. 3. 4. Delete All Channel: This item to use mode is RC1,RC2 or RC1$2. delete all channels. 5. Remote mode: Enables to set remote 4. Press [EXIT] key to draw back main Press [EXIT] key to draw back from the “Miscellaneous Setting” menu. menu. 11.1.7.
English enter to the "contact rename" menu,press numeric keys input number, then press [red] button to confirm. 3. Website: This item to use note provider's website. Press [ENTER] key to enter to the "contact rename" menu,press [up/down] [left/right] key to move highlight and press [ENTER] key to input characters, then press [red] button to confirm. 4. 1. Press [EXIT] key to come back contact. Press [/] key to select menu items among HDD Format,USB Speed Testing,Record Setting,Timeshift Setting.
English 11.2.2. Usb speed testing When you enter to "Usb speed testing" menu. You will see the write speed and read speed of you disk, according this information you can know what operation your disk can support. like below: 1. Enable: Press [left/right] key to switch on or off. If it on, this function automatism run when in full screen or change channel.Or this function is fofbid. 2. TimeShift Path: Using change the path of timeshift file save. 3. 11.2.3.
English In this menu you can select the Upgrade type 11.4 Upgrade among app (no channel list), database, app + When you enter to “Upgrade ” Menu. 1. database. You can select the appropriate Press [/] key to select menu items upgrade file on "Upgrade type" item. After between backup system to hdd and upgrade you select the "Upgrade type" and "folder", from USB . 2. press [red] button, the receiver can upgrade Press [ENTER] key to enter the selected automatically. item.
English card, in "card info" menu all available information will be displayed. 12 Menu “Conditional Access” 1. 13 spark When you enter to “Conditional Access” In main menu,choose spark icon and press menu, you will see a screen like below: [ENTER] button to enter to online menu. Press [ENTER] button to enter child menu. Press [up/down] button to switch item. Receiver provide one CA slot for user to use. Receiver has build in smart card module with CONAX system.
English you will see a screen like below: Press [left/right] button to switch frame. Press [left/right] button to switch the type in Press [up/dowm] button to change item. software list and database list. Press [ENTER] or [play] button to download Press [up/down] button to choose item. and play video at has video item. Press [red] button to upgrade with choose item. 13.5 User manual Press [ENTER] button to display information When you enter to “User manual” menu, you of highlight item.
English this menu you can see the details information about the HDD. Press [ENTER] button to enter edit name, telephone, addresser, email, language. If you want to change the type of the file list Press [red] button to login and save. display. press [red] button. Press [green] button to setup sth. Press [green] key to sort for the file list. Press [yellow] button to clear online data and Press [yellow] key to delete the files that you reboot. want. In software file, press [blue] key to upgrade.
English Press [right] button to select download icon,and press [ENTER] button enter to "information" menu ,then do next and press [red] button to confirm. Press [info] button or press [right] button to select info icon,and press [ENTER] button to display the information of the file that you Press [right] button to select highlight connect icon,and press [ENTER] button to connect the server that you select. 15.
English "calculate" Item. 2.press [ENTER] key to input you need, or immediacy. 3.If you need clear input, press [EPG] key. 4.Press [EXIT] key to come back. 17 Menu "Net working" Press [right] button to select delete icon,and 17.1. youtube press [ENTER] button to delete the role that This menu is some internet applications. you select "youtube" Press [info] button or press [right] button to "www.youtube.com".
English duration. The site has Germany, worldwide, 4. Press [stop] or [EXIT] key to stop radio. Poland and so on. Duration has all time, this 5. Press [red] key to switch class. week, this month and so on. 6. Press [yellow] key to add highlight item to 7. Press [yellow] key to switch group. These favourite. are game, news, tech, move and so on. 7. Press [green] key to show favourite radio. 8. Press [blue] key to display the top video. 8.
English 17.4. Rss This menu is display rss web. When you enter to this menu, you will sea a screen like below: 1.Press [red] key to add rss web. 2.Press [green] key to delete the rss web of highlight. 3. Press [up/down] key to move the highlight. 4. Press [ENTER] key to display the summary of the new that highlight. 5. Press [EXIT] key to come back.
English 18 Trouble Shooting If you suspect there is a fault with your receiver, please check the following trouble shooting guide before calling authorized service agent. Warning! Under no circumstances attempt to repair the receiver yourself. Tampering with the receiver may result in fatal electric shock and will invalidate your warranty.
English 19 Specifications SYSTEM RESOURCES Main Processor Flash Memory DDR SDRAM Tuner/Front-end(Optional) Tuner Type Input Connector Loop Through Signal Level LNB Power & Polarization 22KHz Tone DiSEqC Control Demodulation Input Symbol Rate 450M Hz based CPU Nor flash:8MB X 1 ; Nand flash:512MB X 1 DDR2 128MB x 2 DVB-S / DVB-S2 F-type, Connector, Female F-type, Connector, Female -65 to -25 dBm Vertical: +13V/+14V Horizontal: +18V/+19V Current: Max.
English Size[W*H*D] Net Weight Operation Temperature Storage Temperature Storage Humidity 220mm*46mm*169mm 1.