
Instruction Manual


2
S&S® muers are a direct replacement for original equipment muers. They are designed to use existing, stock mounting hardware and brackets. If
S&S muers are used for other than stock replacement, stock mounting hardware, brackets and seals may need to be purchased separately.
Installation instructions are for all models except as noted.
1. Remove front and rear heat shields as required to access muer clamps.
2. Loosen muer clamp assembly at front of each muer and slide it forward onto exhaust pipe.
3. Unbolt both muers from mounting bracket.
4. For next step, select model.
Harley-Davidson® Dyna® 1995-up
a. Remove old muers by working them loose with a back and forth rocking motion, then slide them o of the exhaust pipe.
b. Slide S&S muers onto exhaust pipes. Slide clamps back into place. Tighten the clamps only until snug at this time.
FLH 1995-up
a. Remove old muers by working them loose with a back and forth rocking motion, then slide them o of the exhaust pipe.
b. Slide S&S muers onto exhaust pipes. Slide clamps back into place. Tighten the clamps only until snug at this time.
Softail® Shotgun 2000-2006
a. Remove old muers by working them loose with a back and forth rocking motion, then slide them o of the exhaust pipes.
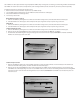
b. Remove and save the existing OEM interconnect seal from the crossover between the OEM slip-on muers.
c. Assemble both S&S muers together using the existing interconnect seal removed in step (b). See Picture 1. Slide both assembled
muers onto exhaust pipes at the same time.
Softail® Shorty 2000-2006
a. Remove old muers by pulling rear of each muer outwards clear of the mounting/exhaust crossover bracket, then work them loose
with a back and forth rocking motion, and then slide them o of the exhaust pipe.
b. Remove and save the existing OEM interconnect seals from between the muers and the mounting/exhaust crossover bracket. Slide
S&S muers onto exhaust pipes Align crossover on each muer with crossover connection of mounting bracket. Place the existing OEM
interconnect seals on each end of the mounting/exhaust crossover bracket. See Picture 2. Push muer crossover tube into place over
interconnect seal.
Picture 1
Picture 2
OEM Interconnect Seal
OEM Interconnect Seal
Mounting/exhaust crossover bracket