
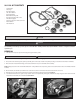
Owner manual


5
Picture 12
Picture 13
c- Retaining ring (use snap-ring pliers).
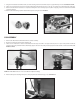
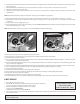
d- First gear and adjacent thrust washer, See Picture 12.
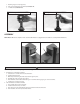
e- 1-2 shift collar, See Picture 13.
ASSEMBLY
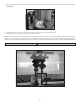
NOTE: Picture 14 shows a comparison of the old shift collar and the new, upgraded unit. The dierence is clearly marked with arrows.
Don't over expand the new snaprings when installing them on the counter shaft.
1- Assemble the countershaft as follows;
a- Slide the new 1-2 shift collar onto the shift sleeve.
b- Install the thrust washer.
c- With the pockets facing the shift collar, slide rst gear in place.
d- Carefully place the new snap-ring in place.
e- Now install the 3rd and 4th combination gear—remember the larger gear goes on the shaft rst.
f- Install the second new snap-ring.
2- The mainshaft is assembled as follows:
a- The 3-4 shift collar is slid in place rst.
b- Install the thrust washer, .075” thick.
c- Place 4th gear on the shaft with the pockets oriented towards the shift collar.
d- Now install the .250” thick spacer/thrust washer.
Picture 14
New Old
Picture 14
Countershaft 1st gear with thrust washer attached.
Removing 1-2 shift collar.
CAUTION