User guide


                   

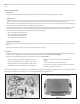
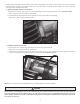
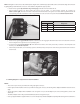
1. Cylinder Head Temperature Sensor Installation.
See Picture 5, below.
 
 
 
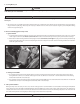
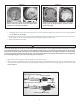
2. Installation of the Knock Sensor Kit

 
 
See Picture 6, below.
NOTE: Knock Sensor Kit includes an extra bolt and washer not used in Harley-Davidson® Evolution® installation.
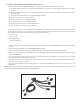
Carefully place fuel tank back into position to check Knock Sensor and mounting block clearance. Position the mounting block so that
the Knock Sensor or mounting block does not contact the fuel petcock or any other part of the motorcycle. If the outer body of the Knock
Sensor (black plastic portion) contacts the engine or any other part of the motorcycle, it could damage the Knock Sensor, or interfere
with its ability to detect knock. Special care for rubber mounted motors must be given. View Knock Sensor while motor runs to make
sure it has proper clearence.
Picture 5
Picture 6
CAUTION