
Owner's manual


3
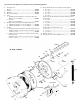
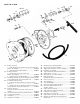
INSTALLATION KIT 17-0199 (See line drawing on page 6.)
1966-1984 shovelhead and for 1957-1985 Harley-Davidson®
Sportster® models
1. Remove existing air cleaner assembly and related hardware, if
applicable. Refer to authorized Harley-Davidson® Service Manual as
needed.
2. Prepare air cleaner backplate.
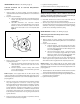
A. 1966-1979 shovelhead and 1957-1979 ironhead Sportster®
models – press plugs 50-8313 into holes “D" in backplate.
(See Figure 1)
B. 1980-1984 shovelhead and 1980-1985 ironhead
Sportster® models – apply PTFE plumber’s tape or thread
lubricant to threads of crankcase breather vent elbow
tting 50-8110 and install in hole “A" in backplate. (See
Figure 1)
3. Attach mounting bracket to engine. Do not tighten bracket
completely at this time.
A. 1966-1982 shovelhead normally utilize bracket 17-0092,
which attaches to bottom of front rocker box and air
cleaner backplate.
B. Ironhead Sportster® models normally utilize bracket
17-0093, which attaches to front intake lifter guide bolt
and air cleaner backplate.
NOTE: Backplate screws supplied with this kit have thread locking
compond on threads. If screw without thread locking compound is used, a
thread locking compound such as Loctite® 242 must be applied, and screws
properly tightened.
4. Align hole in other end of bracket with hole in backplate. Bracket
may require slight bend or shims for correct t. If gap exists
between backplate and mounting bracket, install shims or washers
(not supplied) to ll gap. Secure bracket to backplate with 1⁄4-
28 bolt, atwashers, and Nyloc locknut. Tighten to 10-12 ft-lbs. If
bracket attaches to manifold bolt, conrm that adequate thread
engagement exists between bolt and carburetor body. If longer
bolt is required, insure that bolt is not long enough to bottom out
against carburetor.
5. Apply a few drops of Loctite® 242 (blue) or equivalent to threads,
install nuts and lockwashers, and tighten.
6. Tighten all mounting hardware.
7. Install crankcase vent hose to tting installed in step 2.
Vent hose must not contact hot or moving surfaces that could
damage it and expose brakes or tires to crankcase oil/air mist. Oil
on these components could result in loss of control of motorcycle
with death or severe injury to operator and others.
8. Install lter element and air cleaner cover. Secure with three air
cleaner cover screws 50-0072 to complete installation.
9. Start motorcycle, inspect for leaks, and test ride. Engine should run
smoothly after proper warm-up. Surging or misre may indicate lean
carburetion. If necessary, consult professional mechanic regarding
possible need to install larger carburetor jetting.
INSTALLATION KIT 17-0108 (See line drawing on page 6.)
1984-1989 big twin and 1986-1987 Sportster® models
(Crankcase vented only.)
1. Remove existing air cleaner assembly and related hardware, if
applicable. Refer to authorized Harley-Davidson® Service Manual as
needed.
2. Prepare air cleaner backplate.
A. 1984-1989 big twin – press plug 50-8312 into hole “B" in
backplate. Apply PTFE tape or thread lubricant to threads
and screw crankcase breather vent elbow tting 50-8110
into hole “A." (See Figure 1)
B. 1986 and 1987 Sportster® models – press plug 50-8312
into hole “A" in backplate. Apply PTFE tape or thread
lubricant to threads and screw crankcase breather vent
elbow tting, 50-8110 into hole “B." (See Figure 1)
3. Mount air cleaner support bracket 17-0311 (two required) from air
cleaner support holes in cylinder heads with 5⁄16 -18 x 11⁄4" bolts
and lockwashers. Do not tighten bracket completely at this time.
NOTE: Backplate screws supplied with this kit have thread locking
compond on threads. If screw without thread locking compound is used, a
thread locking compound such as Loctite® 242 must be applied, and screws
properly tightened.
4. Attach backplate to carb and determine number of shims or washers
required to ll gap between backplate and mounting bracket.
5. Insert 5⁄16-18 bolts of appropriate length through backplate, shims,
mounting bracket, and lockwasher.
6. Tighten all mounting hardware.
A
D
E
B
C
E
Figure 1
WARNING