
Installation Manual
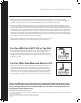

For Use With the S-5-PV Kit or Top Rail
When utilizing ProteaBracket™ to mount the S-5-PV Kit or top-mounted rail, the
slotted L-flange should be installed with the shorter slotted side (the side
without the square hole) rotated to the horizontal position. Tighten the hinge
bolt. Keep the slotted L-flange straight as you tighten the nut to 225 inch pounds
or 18.75 foot pounds.
For Use With Side-Mounted Rails for PV
When using a side-mounted rail for PV, flip the slotted L-flange upside down,
causing the shorter slotted side (the side without the square hole) to be flush
against the ProteaBracket base. In this position, the hinge bolt will lock into the
square hole on the slotted L-flange. Tighten the hinge bolt. The slotted L-flange
can now serve as a slotted L-foot for mounting the PV rail. Keep the slotted L-
flange straight as you tighten the nut to 225 inch pounds or 18.75 foot pounds.
*When used in conjunction with the S-5-PV Kit, an extra nut is necessary to secure
ProteaBracket’s slotted L-flange to the universal PV stud and mounting disk.
S-5!® Warning! Please use this product responsibly!
S-5!® Warning! Please use this product responsibly! Products are protected by multiple U.S. and foreign patents. For published data regarding holding strength, fastener torque, patents and trademarks
visit the S-5! website at www.S-5.com.
Copyright 2014, Metal Roof Innovations, Ltd. S-5! products are patent protected.
S-5! aggressively protects its patents, trademarks, and copyrights. Version
043014.
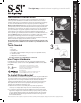
ProteaBracket™ Installation Instructions
4. Secure the ProteaBracket directly into the crown of the roof profile by screwing the provided self-tapping stainless
steel screws through the pre-punched holes of the ProteaBracket, alternating from one side of the bracket to the other,
and back again. Be sure to use all four pre-punched hole locations to achieve tested holding strength. Be careful not to
overtighten the screws; slight compression extrusion of rubber around the washer is a good visual check. If a fastener
has been stripped, it is important to remove the fastener and replace it with a waterproof bulb rivet or larger diameter
fastener. To avoid stripping, use screw gun with depth sensing nose piece or adjustable torque clutch. Lastly, hold the
slotted L-flange firmly in place and tighten the hinge bolt to 225 inch pounds or 18.75 foot pounds. The ProteaBracket is
now ready to install other ancillaries, such as the S-5-PV Kit.*
3. Next, align carefully, and apply in the proper orientation. While the ProteaBracket is reversible, when installing
multiple brackets, be sure that brackets on the same row have the same orientation, i.e. the longer side of the bases
should face the same direction. Do not remove the EPDM sealant as this is for weather-proofing.
Caution: ProteaBracket™ may not be ideal for use in conjunction with snow retention systems.
Take care when using to attach solar panels that are likely to be loaded with snow. All system
design and engineering is the responsibility of the user. S-5! makes no recommendation as to
specific layouts when using this part.
PBI-V1.0-0915