
Installation Guide

ProteaBracket
™
Install
888-825-3432 | www.S-5.com
Installation Instructions
S-5!® Warning! Please use these products responsibly! Visit our website or
contact your S-5! distributor for available load test results. The user and/or
installer of these parts is responsible for all necessary engineering and design
to ensure the ProteaBracket™ has been properly spaced and congured.
Notice to S-5! product users: Due to the many variables involved with
specic panel products, climates, environmental phenomena and job
particulars, the manufacturer cannot and does not express any opinions as to
the suitability of any S-5! assembly for any specic application and assumes
no liability with respect thereto. S-5! products are tested for ultimate holding
strength on various prole types and materials. This information is available
from the S-5! website: www.S-5.com. This document is an installation
guide only and the photographs and drawings herein are for the purpose of
illustrating installation tools and techniques, not system designs.
The ProteaBracket is designed to t most trapezoidal sheet shapes.
This product may not be suitable for snow retention.
Tools Needed
• Screw Gun
• 5/16” Drive Socket
• ½” Open End or Socket Wrench
• Rag
• String Line
• Tape Measure
To ensure brackets are installed in a straight line, install a single ProteaBracket
on each end of the roof at a measured, consistent distance from the bottom
edge of the roof. Use a string line between the two brackets. Mount the
remaining ProteaBrackets along the string line, directly into the sheeting of
the trapezoidal rib of the roof.
To Install ProteaBracket
™
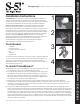
1. Determine the location of assembly. The only surface preparation necessary
is to simply wipe away excess oil and dirt from panel surface.
2. To create the appropriate t, and before removing the release paper, place
ProteaBracket onto the panel rib and tighten the hinge bolt to secure the
bracket’s proper position (you will use a tool to tighten the hinge bolt to
the specied torque at the end of step four). Note that the L-ange should
be oriented on the long side of the ProteaBracket base.
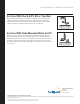
3. Next, peel the release paper from both bases, align carefully, and apply in the proper orientation. While the
ProteaBracket is reversible, when installing multiple brackets, be sure that brackets on the same row have the same
orientation, i.e. the longer side of the bases should face the same direction. Do not remove the sealant as this is for
water-tightness and weather-proong.
4. Secure the ProteaBracket directly into the crown of the roof prole by screwing the provided self-tapping stainless
steel screws through the pre-punched holes of the ProteaBracket, alternating from one side of the bracket to the other,
and back again. Be sure to use all four pre-punched hole locations to achieve tested holding strength. Be careful not to
overtighten the screws: slight compression extrusion of rubber around the washer is a good visual check. If a fastener
has been stripped, it is important to remove the fastener and replace it with a waterproof bulb rivet. To avoid stripping,
use screw gun with depth sensing nose piece or adjustable torque clutch. Lastly, hold the L-ange rmly in place and
tighten the hinge bolt to the specied torque (200 inch pounds or over). The ProteaBracket is now ready to install other
ancillaries, such as the S-5-PV Kit.
The right way to attach almost anything to metal roofs!
These instructions are for use by those experienced in the trade. Always follow appropriate safety precautions and use appropriate tools.
2
3
4
1