
Install Manual

ProteaBracket Installation Instructions
S-5!® Warning! Please use this product responsibly!
Products are protected by multiple U.S. and foreign patents. For published data regarding holding strength, fastener torque, patents, and trademarks, visit the S-5! website at www. S-5.com.
Copyright 2019, Metal Roof Innovations, Ltd. S-5! products are patent protected. S-5! aggressively protects its patents, trademarks, and copyrights.
AlPB-V1.2-0519
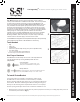
2. To create the appropriate t, place ProteaBracket onto the panel rib and tighten the hinge bolt to secure
the bracket’s proper position (Fig 2) (you will use a tool to tighten the hinge bolt to the specied torque at
the end of Step 3). Align carefully and apply in the proper direction, (i.e. the L-foot should be on the same
side of the bases and face the same way). NOTE: Peel release paper o the EPDM pad and adhere bracket
to the roof.
3. Secure the ProteaBracket directly onto the crown of the roof profile by screwing the provided self-tapping
screws through the pre-punched holes of the ProteaBracket, alternating from one side of the bracket to
the other, and back again. (Fig 3) Be sure to use all four pre-punched hole locations to achieve tested
holding strength. Be careful not to overtighten the screws; slight compression/extrusion of rubber around
the washer is a good visual check. If a fastener has been stripped, it is important to remove the fastener
and replace it with a waterproof bulb rivet or larger diameter fastener. To avoid stripping, use screw gun
with depth sensing nose piece or adjustable torque clutch. Lastly, hold the slotted L-flange firmly in place
and tighten the hinge bolt to 225 inch pounds or 18.75 foot pounds. The ProteaBracket is now ready to
install other ancillaries, such as rail or S-5-PVKIT
TM
2.0.* Do not attach additional L-foot on provided
L-foot.
*When used in conjunction with the S-5-PVKIT 2.0, an extra nut is necessary to
secure ProteaBracket’s slotted L-ange to the PV Stando and mounting disk.
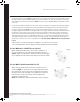
For Use With the S-5-PVKIT 2.0 or Top Rail
For Use With Side-Mounted Rails for PV
When utilizing ProteaBracket to mount the S-5-PVKIT 2.0 or
top-mounted rail, the L-foot should be installed as shown in
(Fig A). Tighten the hinge bolt. Keep the slotted L-foot straight
as you tighten the nut to 225 inch pounds or 18.75 foot pounds.
When using a side-mounted rail for PV, orient the L-foot as
shown in (Fig B). In this position, the hinge bolt will lock into
the square hole on the slotted L-foot. Tighten the hinge bolt.
Keep the slotted L-foot straight as you tighten the nut to 225
inch pounds or 18.75 foot pounds. (The rail will now be
attached to remaining slot.)
NOTE: ProteaBracket comes preassembled in this orientation.
Fig A
Fig B