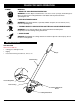
SS725r Straight Shaft Trimmer Add-On OPERATOR’S MANUAL FOR QUESTIONS, CALL 1-800-345-8746 in U.S. or 1-800-265-6778 in CANADA www.ryobi.
INTRODUCTION TABLE OF CONTENTS THANK YOU Thank you for buying this quality product. This modern outdoor power tool will provide many hours of useful service. You will find it to be a great labor-saving device. This operator’s manual provides you with easy-to-understand operating instructions. Read the whole manual and follow all the instructions to keep your new outdoor power tool in top operating condition.
RULES FOR SAFE OPERATION The purpose of safety symbols is to attract your attention to possible dangers. The safety symbols, and their explanations, deserve your careful attention and understanding. The safety warnings do not by themselves eliminate any danger. The instructions or warnings they give are not substitutes for proper accident prevention measures. SYMBOL MEANING SAFETY ALERT SYMBOL: Indicates danger, warning, or caution. Attention is required in order to avoid serious personal injury.
RULES FOR SAFE OPERATION • Turn off all controls before unplugging. • Keep hair, loose clothing, fingers, and all parts of body away from openings and moving parts. • Do not allow to be used as a toy. Close attention is necessary when used by or near children. WHILE OPERATING • Wear safety glasses or goggles that are marked as meeting ANSI Z87.1 standards, and ear/hearing protection when operating this unit. Wear a face or dust mask if the operation is dusty.
RULES FOR SAFE OPERATION SYMBOL MEANING • WEAR EYE AND HEARING PROTECTION WARNING: Thrown objects and loud noise can cause severe eye injury and hearing loss. Wear eye protection meeting ANSI Z87.1 standards and ear protection when operating this unit. • KEEP BYSTANDERS AWAY WARNING: Keep all bystanders, especially children and pets, at least 50 feet (15 m) from the operating area.
OPERATING INSTRUCTIONS OPERATING THE CLICK-LINK® SYSTEM The Click-Link® system enables the use of these optional add-ons. Blower/Vacuum . . . . . . . . . . . . . . . . . . . . . . . . . . BV720r Cultivator . . . . . . . . . . . . . . . . . . . . . . . . . . . . . . GC720r Hedge Trimmer (Gas units only) . . . . . . . . . . . . . HS720r Snow Thrower (Gas units only) . . . . . . . . . . . . . . ST720r Tree Pruner . . . . . . . . . . . . . . . . . . . . . . . . . . . . . TP720r Sweeper/Blower . . . . . . . . .
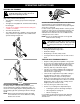
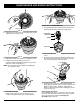
OPERATING INSTRUCTIONS HOLDING THE TRIMMER WARNING: Always wear eye, hearing, foot and body protection to reduce the risk of injury when operating this unit. Before operating the unit, stand in the operating position (Figs. 4 & 5). Check for the following: • The operator is wearing eye protection and proper clothing. • The right arm is slightly bent, and the hand is holding the shaft grip. • The left arm is straight, and the hand is holding the J-handle or D-handle. • The unit is at waist level.
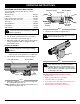
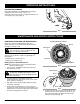
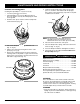
OPERATING INSTRUCTIONS DECORATIVE TRIMMING Decorative trimming is accomplished by removing all vegetation around trees, posts, fences, etc. Rotate the whole unit so that the cutting attachment is at a 30° angle to the ground (Fig. 7). Fig. 7 MAINTENANCE AND REPAIR INSTRUCTIONS LINE INSTALLATION FOR THE SPEEDSPOOL® Top View Of The SpeedSpool® Always use genuine Ryobi 0.080 inch (2.03 mm) replacement line. Line other than specified may make the engine overheat or fail.
MAINTENANCE AND REPAIR INSTRUCTIONS Fig. 13 Line Locking Hole Fig. 10 6. Pull the line from the outer spool until the line is tight against the inner reel (Fig. 11). INSTALLING A PREWOUND REEL 1. Turn the Bump Knob counterclockwise and remove the bump knob, spring, and foam seal (Fig. 14). Bump Knob Foam Seal Spring Inner Reel Fig. 14 Fig. 11 7. Repeat procedures 4-6 with the second piece of line. 8. Hold the outer spool.
MAINTENANCE AND REPAIR INSTRUCTIONS CLEANING THE SPEEDSPOOL® Cleaning the SpeedSpool® may be necessary, • To remove jammed or excess line, • If the SpeedSpool® becomes difficult to wind or does not operate correctly when bumping the head on the ground, 1. Hold the outer spool, and unscrew the bump knob counterclockwise (Fig. 16). 5. Clean the shaft and the inner surface of the outer spool. To clean the shaft underneath the plunger, press down on the plunger (Fig. 18).
TROUBLESHOOTING CUTTING HEAD WILL NOT ADVANCE LINE CAUSE ACTION Cutting head bound with grass Stop the unit and clean cutting attachment Cutting head out of line Refill with new line Inner reel bound up Replace the inner reel Cutting head dirty Clean inner reel and outer spool Line welded Disassemble, remove the welded section and rewind the line Line twisted when refilled Disassemble and rewind the line Not enough line is exposed Push the Bump Knob and pull out line until 4 inches (102 mm) o
TRIMMER ADD-ON PARTS LIST - MODEL SS725r 1 2 3 4 8 7 5 6 9 7 Item Part No.
NOTES 13
LIMITED TWO-YEAR WARRANTY RYOBI OUTDOOR PRODUCTS warrants each new RYOBI Product for two (2) years according to the following terms. This warranty extends to the original retail purchaser only and commences on the date of original retail purchase. Any part of the RYOBI Product manufactured or supplied by RYOBI and found in the reasonable judgement of RYOBI to be defective in material or workmanship will be repaired or replaced by an authorized RYOBI service dealer without charge for parts and labor.