
Use and Care Manual


7 — English
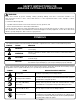
SYMBOLS
Some of the following symbols may be used on this product. Please study them and learn their meaning. Proper
interpretation of these symbols will allow you to operate the product better and safer.
SYMBOL NAME DESIGNATION/EXPLANATION
No Hands
Failure to keep your hands away from the wheel will result in
serious personal injury.
Class II Construction Double-insulated construction
V Volts Voltage
min Minutes Time
Direct Current Type or a characteristic of current
n Rated Speed Maximum rotational speed
n
o
No Load Speed Rotational speed, at no load
.../min Per Minute Revolutions, strokes, surface speed, orbits etc., per minute
FEATURES
PRODUCT SPECIFICATIONS
Wheel Diameter ............................................................5 in.
Wheel Arbor ............................................................... 7/8 in.
No Load Speed ...................................10,800 r/min. (RPM)
Cutting Depth at 0º
................................................. 1-5/8 in.
Cutting Depth at 45º ............................................ 1-1/16 in.
Wheel Type ..................... Continuous Rim Diamond Wheel
ASSEMBLY
UNPACKING
This product requires assembly.
Carefully remove the tool and any accessories from the
box. All items listed in the Includes section must be
included at the time of purchase.
WARNING:
Items in this Assembly section are not assembled to the
product by the manufacturer and require customer instal-
lation. Use of a product that may have been improperly
assembled could result in serious personal injury.
If any parts are damaged or missing, please call
1-800-525-2579 for assistance.
WARNING:
If any parts are damaged or missing do not operate this
product until the parts are replaced. Use of this product
with damaged or missing parts could result in serious
personal injury.
WARNING:
Do not attempt to modify this product or create acces-
sories not recommended for use with this product. Any
such alteration or modification is misuse and could result
in a hazardous condition leading to possible serious
personal injury.
ATTACHING GRAVITY FEED WATER BOTTLE
See Figure 1, page 13.
The gravity feed water bottle has a built in air vent that
equalizes pressure and allows water to flow more freely.
Remove the battery.
Turn the flow adjustment knob clockwise to the OFF
position.
Depress the release button to remove water bottle.
Unscrew the nozzle assembly.
Fill water bottle to desired level. Do not overfill.
Replace nozzle assembly.