OPERATOR'S MANUAL 7-1/4 in. (184 mm) Circular Saw Model CSB120, CSB130, or CSB130JS DOUBLE INSULATED SPECIFICATIONS: Blade Diameter Blade Arbor Cutting Depth at 0° Cutting Depth at 45° Cutting Depth at 51.5° Rating No Load Speed Net Weight 7-1/4 in. (184 mm) 5/8 in. (16 mm) 2-3/8 in. (60 mm) 1-13/16 in. (46 mm) 1-5/8 in. (41 mm) 120 volts, 60 Hz, AC 5,000 RPM 11.5 lbs. THANK YOU FOR BUYING A RYOBI CIRCULAR SAW.
TABLE OF CONTENTS ■ ■ ■ ■ ■ ■ ■ ■ ■ ■ Product Specifications ......................................................................................................... 1 Table Of Contents ............................................................................................................... 2 General Safety Rules ....................................................................................................... 2-3 Specific Safety Rules ...........................................................
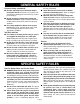
GENERAL SAFETY RULES Personal Safety (continued) ■ Remove adjusting keys or wrenches before turning the tool on. A wrench or a key that is left attached to a rotating part of the tool may result in personal injury. ■ Do not overreach. Keep proper footing and balance at all times. Proper footing and balance enables better control of the tool in unexpected situations. ■ Use safety equipment. Always wear eye protection.
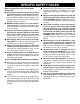
SPECIFIC SAFETY RULES Specific Safety Rules for Circular Saws (continued) ■ Always observe that the lower guard is covering the blade before placing saw down on bench or floor. An unprotected, coasting blade will cause the saw to walk backwards, cutting whatever is in its path. Be aware of the time it takes for the blade to stop after switch is released. ■ NEVER hold piece being cut in your hands or across your leg.
Additional Rules for Safe Operation ■ Know your power tool. Read operator's manual carefully. Learn its applications and limitations, as well as the specific potential hazards related to this tool. Following this rule will reduce the risk of electric shock, fire or serious injury. ■ Always wear safety glasses. Everyday eyeglasses have only impact-resistant lenses; they are NOT safety glasses. Following this rule will reduce the risk of serious personal injury. ■ Protect your lungs.
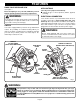
FEATURES KNOW YOUR CIRCULAR SAW APPLICATIONS See Figure 1. Before attempting to use your saw, familiarize yourself with all operating features and safety requirements. WARNING: ELECTRICAL CONNECTION Your circular saw has a precision-built electric motor. It should be connected to a power supply that is 120 volts, 60 Hz only. Do not operate this tool on direct current (DC). A substantial voltage drop will cause a loss of power and the motor will overheat.
ASSEMBLY ■ Carefully remove the saw and accessories from box. Make sure all items listed in the Packing List are included. ■ Do not discard the packing material until you have carefully inspected and satisfactorily operated saw. ■ Examine all parts and accessories to make sure that no breakage has occurred during shipping. Any damaged part should be replaced before attempting to use the tool.
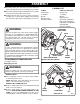
ASSEMBLY ■ Wipe a drop of oil onto inner blade washer and outer blade washer ("D" washer) where they contact blade. SPINDLE LOCK BUTTON WARNING: If inner blade washer has been removed, replace it before placing blade on spindle. Failure to do so could cause an accident since blade will not tighten properly. ■ Fit saw blade inside blade guard and onto spindle. NOTE: The saw teeth point upward at the front of the saw as shown in Figure 2. ■ Replace "D" washer and spring washer.
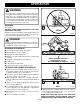
OPERATION WARNING: Do not attempt to operate this tool until you have read thoroughly and understand completely all instructions, safety rules, etc., contained in this manual. Failure to comply can result in accidents involving fire, electric shock, or serious personal injury. Save operator's manual, and review frequently for continuing safe operation and for instructing others who may use this tool. KICKBACK See Figure 5. THE BEST GUARD AGAINST KICKBACK IS TO AVOID DANGEROUS PRACTICES.
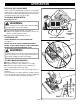
OPERATION DEPTH OF CUT ADJUSTMENT Always keep correct blade depth setting. The correct blade depth setting for all cuts should not exceed 1/4 in. below the material to be cut. More blade depth will increase the chance of kickback and cause the cut to be rough. TO ADJUST BLADE DEPTH ■ Unplug your saw. WARNING: Failure to unplug your saw could result in accidental starting causing possible serious personal injury. ■ Loosen depth adjustment knob. See Figure 9.
OPERATION NEVER PLACE YOUR SAW ON THAT PART OF THE WORK THAT WILL FALL OFF WHEN THE CUT IS MADE. See Figure 12. Keep the cord away from cutting area. ALWAYS place the cord to prevent it from hanging up on the work while making a cut. Utilize the cord clip to help prevent cord problems. See Figure 13. DANGER: If the cord hangs up on the work during a cut, release the switch trigger immediately. Unplug your saw and reposition the cord to prevent it from hanging up again. DANGER: WRONG Fig.
OPERATION TO CROSS CUT OR RIP CUT TOP VIEW OF SAW See Figure 15. VIEWING WINDOW When making a cross cut or rip cut, align your line of cut with the outer blade guide notch on the saw base (as shown in Figure 15) and view the blade through the viewing window. Since blade thicknesses vary, always make a trial cut in scrap material along a guideline to determine how much, if any, the guideline must be offset to produce an accurate cut.
OPERATION TO BEVEL CUT See Figure 18 and 19. The angle of cut of your saw may be adjusted to any desired setting between zero and 51.5 degrees. There is a window in the saw base to help you line up the blade with the line of cut. See Figure 18. Align your line of cut with the inner blade guide notch on the saw base and view through the window when making full 45 degree bevel cuts.
OPERATION POSITIVE 0° BEVEL STOP POSITIVE 0˚ BEVEL STOP See Figure 20. Your saw has a positive 0° bevel stop that has been factory adjusted to assure 0° angle of your saw blade, when making 90° cuts. However, misalignment can occur during shipping. TO CHECK: ■ Unplug your saw. ADJUSTMENT SCREW 30 45 51.5 15 HEX NUT Failure to unplug your saw could result in accidental starting causing possible serious personal injury. ■ Place your saw in an upside down position on workbench. See Figure 20.
OPERATION DUST NOZZLE (MODEL CSB 130JS) See Figure 22. A dust nozzle is included with saw Model CSB130JS. As shown in figure 22, the dust nozzle fits over the dust chute which is located on the rear of the upper blade guard. Attach dust nozzle with a twisting motion. The easy rotation of the dust nozzle allows the operator to direct the flow of dust and chips. The dust and chip opening should always be turned away from the operator. TO POCKET CUT See Figure 23.
MAINTENANCE WARNING: When servicing use only identical Ryobi replacement parts. Use of any other parts may create a hazard or cause product damage. GENERAL Avoid using solvents when cleaning plastic parts. Most plastics are susceptible to damage from various types of commercial solvents and may be damaged by their use. Use clean cloths to remove dirt, carbon dust, etc. WARNING: Do not at any time let brake fluids, gasoline, petroleumbased products, penetrating oils, etc.
NOTES Page 17
RYOBI CIRCULAR SAW – MODEL NUMBER CSB120 35 10 37 10 36 38 3 10 2 10 39 40 36 41 37 35 4 5 1 8 6 7 42 9 10 10 11 31 33 32 25 12 14 24 30 27 13 10 26 12 21 15 16 17 26 27 34 18 28 22 29 Page 18 23 19 20
RYOBI CIRCULAR SAW – MODEL NUMBER CSB120 The model number will be found on a plate attached to the motor housing. Always mention the model number in all correspondence regarding your CIRCULAR SAW or when ordering repair parts. PARTS LIST Key No.
RYOBI CIRCULAR SAW – MODEL NUMBERS CSB130 / CSB130JS 43 15 15 45 44 46 3 15 2 15 44 47 48 49 45 43 4 5 6 7 1 8 9 13 10 11 12 50 14 41 38 40 39 15 16 17 31 15 18 19 29 37 33 15 32 17 34 26 20 21 22 30 32 33 42 23 35 27 36 Page 20 28 24 25
RYOBI CIRCULAR SAW – MODEL NUMBERS CSB130 AND CSB130JS The model number will be found on a plate attached to the motor housing. Always mention the model number in all correspondence regarding your CIRCULAR SAW or when ordering repair parts. PARTS LIST Key No.
OPERATOR'S MANUAL 7-1/4 in. (184 mm) Circular Saw Model CSB120, CSB130, or CSB130JS DOUBLE INSULATED EXTENSION CORD CAUTION When using a power tool at a considerable distance from a power source, be sure to use an extension cord that has the capacity to handle the current the tool will draw. An undersized cord will cause a drop in line voltage, resulting in overheating and loss of power. Use the chart to determine the minimum wire size required in an extension cord. Only round jacketed cords should be used.