
Instruction manual


8
altered it may be re-saved to the same scene store or to another scene store by selecting Scene from
the main menu followed by Store. As an aid to this, the last recalled scene will be indicated by a
brightly lit light above the scanner selection keys when you are prompted for the scene to store to. It
should be noted that a scene can also be copied to another scene store by recalling the scene and then
re-saving it to a different scene store.
PROGRAMMING CHASES
A chase consists of a sequence of scenes. The Navigator can store up to 128 different chases
consisting of up to 32 steps each. There must already be scenes programmed before a chase can be
programmed.
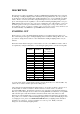
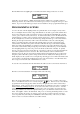
From the main menu select Chase to access the chase menu as shown below:
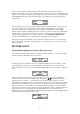
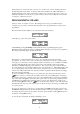
Select Opt to go to the chase options menu:
Select PGM by pressing and holding its button until the chase programming display appears.
Holding the button will clear the chase programming buffer, allowing a new chase to be programmed.
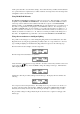
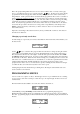
The chase programming display should look like this:
The asterisk ( * ) indicates that there are no chase steps currently stored in the chase being
programmed. To select a scene to add to the chase, press the button next to P1-S to step through the
scene pages (1-8) and select a scene by using the scanner selection keys 1-16. Available scenes will be
shown by dimly lit lights above the scanner selection keys. The currently selected scene will be
indicated by a brightly lit light above the fixture keys. The selected scene page is indicated after the
‘P’ on the display, the scene number within the page is shown after the ‘S’. The lighting fixtures will
move to take up their positions for the selected scene. To add the scene to the chase select Add; the
selected scene will be added at the end of the chase and the step number will be adjusted accordingly.
Repeat the selecting and adding
process for the number of desired steps. To see which scenes have been used in the chase, use the
keys to increase or decrease the step number and view the scene making up the selected step.
If you wish to delete a step, select the step to remove and select Del. When you are happy with all the
steps of the chase select Quit to return to the chase options menu. To preview the programmed chase
select Run, the programmed chase will start running. You may now alter the hold setting for the
chase by selecting Hold and using the keys to alter the value from 0% to 99%. The hold value
determines the time each step of the chase is active for before moving to the next step, its default value
on power up is 20%.
If you need to delete a step or add steps to your chase then select PGM from the chase options menu
but without holding the button down, this will allow alteration of the steps forming the chase. After
any changes have been made you may return to the chase options menu by selecting Quit and preview
the chase by selecting Run as before.
To save the chase select Store, the display will change to show: