
Instruction manual


2
DESCRIPTION
The Navigator is a fully programmable controller for DMX intelligent lighting that can be used with
the full range of intelligent lighting fixtures manufactured by Ryger Electronics. It is also possible to
use the Navigator with other manufacturers intelligent lighting by use of a programmable personality
feature. The use of a menu system makes using the Navigator as easy to use as the average mobile
phone. The Navigator has the capability to control 16 different intelligent lighting fixtures of up to 8
DMX channels each and can store up to 128 scenes containing the state of all 16 fixtures. Scenes can
be linked together to form up to 128 different chases consisting of up to 32 steps each. Chases can
also be linked to form up to 16 shows consisting of up to 32 steps each. Scenes, chases and shows can
be recalled manually or by MIDI if the optional MIDI interface has been fitted.
STARTING OUT
The first step is to set up your intelligent lighting fixtures for use with the Navigator. Please note:
The switch settings below apply to intelligent lighting fixtures available from Ryger Electronics. The
procedure for setting the base address for other manufacturers intelligent lighting fixtures may be
different.
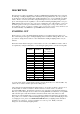
Each of the fixtures that the Navigator controls must be set to the correct DMX base address. This is
accomplished by setting the DIP switches on the intelligent lighting fixtures as in the following table:
FIXTURE
NUMBER
DMX BASE
ADDRESS
SWITCH
SETTINGS
1 2 3 4 5 6 7
1 1 1 0 0 0 0 0 0
2 9 1 0 0 1 0 0 0
3 17 1 0 0 0 1 0 0
4 25 1 0 0 1 1 0 0
5 33 1 0 0 0 0 1 0
6 41 1 0 0 1 0 1 0
7 49 1 0 0 0 1 1 0
8 57 1 0 0 1 1 1 0
9 65 1 0 0 0 0 0 1
10 73 1 0 0 1 0 0 1
11 81 1 0 0 0 1 0 1
12 89 1 0 0 1 1 0 1
13 97 1 0 0 0 0 1 1
14 105 1 0 0 1 0 1 1
15 113 1 0 0 0 1 1 1
16 121 1 0 0 1 1 1 1
A 1 in the switch settings column indicates that the switch should be ON, a zero indicates OFF. Any
switches above switch 7 should be placed in the OFF position.
After setting up the individual intelligent lighting fixtures to be used they should be connected one to
another (fixture 1 to fixture 2, fixture 2 to fixture 3, fixture 3 to fixture 4 and so on) with the
appropriate DMX cabling. For TinyScan systems use stereo jack plug to jack plug leads; Defender or
Discovery systems will require the use of cables wired using XLR male to female leads. A long DMX
cable run will require a 100 ohm termination after the last fixture in the chain. Please note that
TinyScans are self terminating and you won’t require the termination if a TinyScan is the last fixture.
It is possible to use a mixture of different intelligent lighting fixtures if cables with XLR plugs/sockets
to jack plugs are used, please see CONNECTION DETAILS and your lighting fixtures manual for
information on connections. Connect each fixture to a source of power. Finally connect the
Navigator to the first intelligent lighting fixture.