NAVIGATOR DMX Controller Version 1.
DESCRIPTION The Navigator is a fully programmable controller for DMX intelligent lighting that can be used with the full range of intelligent lighting fixtures manufactured by Ryger Electronics. It is also possible to use the Navigator with other manufacturers intelligent lighting by use of a programmable personality feature. The use of a menu system makes using the Navigator as easy to use as the average mobile phone.
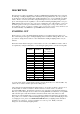
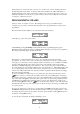
Connect a 12-25v DC power supply capable of delivering 300mA to the DC input jack of the Navigator then switch on the power to the lighting fixtures. Switch on the power to the Navigator. On switch on of the Navigator you will be greeted by the opening screen followed by a message indicating that the MIDI interface is present if it has been fitted. You will then be given the main menu that looks like this: The Navigator has two modes of operation.
At this point select Ok to save the fixture settings. After a brief moment you will be informed that the save operation has been completed and you will be returned to the Setup menu. From the Setup menu select Quit to return to the main menu. Using DP40/SP40 MS units The DP40MS and SP40MS allow DMX base addresses up to 61 only. This means that you can only use fixtures 1-8 for DP40MS and SP40MS units.
1 2 3 4 5 6 7 8 Level - Power - Colour - Pan - Tilt - Gobo - Rotate DMX channel 1 2 3 4 5 6 7 8 Step size 1 12 1 1 12 1 (Unused) 1 (Unused) 1 (Unused) (Joystick X) (Joystick Y) (Unused) (Unused) (Unused) Fade or Switch Switch Switch Fade Fade Switch Fade Fade Fade Selecting Lvl steps through the levels 1 to 8. Selecting DMX will step through DMX channels 1-8 that is being controlled by the selected level.
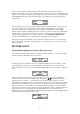
From the Edit menu select Quit again. You will be asked if the changes made are to be saved: Select Ok to save the changes or Quit to abandon the changes. Either way you will be returned to fixture type selection. If you have saved a new fixture type you may now assign this new type to other fixtures. Up to 22 custom fixture types may be stored in addition to the pre-programmed fixture types. PROGRAMMING SCENES A scene is the state of all the lighting fixtures at a particular time.
Important: Overwriting a scene that is used in any chase or show will alter all occurrences of the scene in all of the chases or shows that use it. Deleting the scene will not give a blank scene in chases or shows that use it - only when the scene is re-programmed will the change take effect. Other functions while programming scenes Pressing the ‘ALL’ key will select all fixtures making the level buttons affect all of the connected fixtures simultaneously.
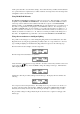
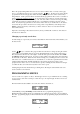
altered it may be re-saved to the same scene store or to another scene store by selecting Scene from the main menu followed by Store. As an aid to this, the last recalled scene will be indicated by a brightly lit light above the scanner selection keys when you are prompted for the scene to store to. It should be noted that a scene can also be copied to another scene store by recalling the scene and then re-saving it to a different scene store. PROGRAMMING CHASES A chase consists of a sequence of scenes.
This is the prompt asking which chase store is to be used to hold the chase. You may select a page from 1 - 8 in which the chase is to be stored by using the keys. If there are any chases already programmed in the selected page they will be shown by the lights above the scanner selection keys being dimly lit. At this point it should be noted that already programmed chases can be overwritten or deleted without any warning being given.
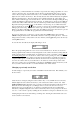
The asterisk ( * ) indicates that there are currently no steps in the show being programmed. To select a chase to add to the show, press the button next to P1-C to step through the chase pages (1-8) and select a chase by using the scanner selection keys 1-16. Available chases will be shown by dimly lit lights above the scanner selection keys. The currently selected chase will be indicated by a brightly lit light above the fixture keys.
ACTIVATING PLAYBACK ONLY MODE Once the Navigator has been programmed with all the scenes, chases and shows to be used it will be necessary to activate the Playback Only mode of the unit. This will prevent alteration of stored information and allow the MIDI interface to function if fitted. It is still possible to enter the programming mode if any changes need to be made to stored scenes, chases or shows but you will need to enter a passcode to do this. Please read the following carefully.
page. The scene or chase page can be selected by the keys. For shows there is only one page, the keys will have no effect in the show selecting mode. Auto / Sound - This option will toggle between automatic and sound mode for recalled chases and shows. In Auto mode a chase will play back with it’s stored hold setting making the time between chase steps equal. In Sound mode the chase will advance a step when a bass beat is detected by the internal microphone.
RESTORING DEFAULT SETTINGS From the Setup menu there is an option, init, which allows certain aspects of the Navigator to be reset to their default settings. This option should be used with extreme care as it’s effects are irreversable. A description of the options will be given below. From the main menu select Setup to enter the Setup menu and then Select Init.
CONNECTION DETAILS Connection diagrams for rear panel connectors Possible types of DMX cables required Connection Navigator to Discovery / Defender Navigator to TinyScan / TinyScan Plus TinyScan / TinyScan plus to Defender or Discovery Defender / Discovery to TinyScan / TinyScan Plus Cable required 3 pin XLR male to 3 pin XLR female 3 pin XLR male to 2.5mm Stereo Jack plug 2.5mm Stereo Jack plug to 3 pin XLR female 3 pin XLR male to 2.