
Installation Manual

3
2. Connect the chassis harness to the camera harness plug. BE CAREFUL AS IT IS KEYED AND CAN
ONLY GO TOGETHER ONE WAY! DO NOT FORCE IT TOGETHER!
3. Run the chassis harness to the drivers floorboard area securing it with the included zip ties along
the frame rail and away from any moving parts. Be careful that the cable didn’t come
disconnected from the camera while you were pulling it through the chassis.
4. Almost every truck has a large grommet through the driver’s floor near the front left corner of
the driver’s seat for the parking brake cable. We recommend using this grommet to route your
camera cables through. If for some reason you don’t have this cable, you will have to find
another suitable location. Be careful not to damage any other vehicle wires if you are going
through an existing wiring harness!
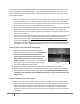
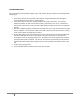
5. For those who have the cable access
mentioned above, remove the driver’s side sill
plate and peel the carpet back far enough to
see the top of the grommet (see IMAGE 2).
Being careful not to slice the cable, use your
razor knife or poking tool to make a new hole
somewhere in the grommet and expand it
large enough for the head of your RCA cable
to penetrate. BE CAREFUL NOT TO DAMAGE
THE HEAD OF YOUR RCA CABLE WHEN
PUSHING IT THROUGH THE GROMMET. In
image 2 you can see that the camera wires are now sharing the grommet with an existing cable.
This grommet will have to be resealed using your RTV or butyl tape but wait until the cables are
in place (next step) to ensure you have the proper amount of slack at both ends.
6. Push the cable(s) through the grommet location in the floor mentioned in the previous step, and
route the RCA cable under the carpet toward the video interface unit or navigation receiver.
Route the power/ground wires to the Left I/P Junction Block (it’s under the large square black
plastic cover to the left of the foot brake).
7. As a final check make sure that the cable is now secure from all moving parts under the vehicle,
through the holes created in the box and tailgate. Coil up any excess cable behind the dash or
console and secure it with a zip tie. Once secure, use the RTV or butyl tape to seal the grommet
that you poked a hole in previously or you will end up with we carpet! Try to seal it from the top
and bottom just to be sure. Now you can put your carpet and sill plates back together.
Section 4: Connect your navigation or other monitor to the camera
1. If you are using an aftermarket receiver or mirror monitor, plug the RCA video cable into the
input on your receiver or mirror harness. Secure the excess cable so it will not interfere with
anything under the dash.
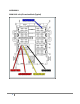
2. (Lockpick users skip to step 5) Connect the red power wire to the reverse power source in the
Left I/P Junction Block (diagram in appendix) port X10, pin 8 – should be a dark blue wire. This
will provide power to the camera only when in reverse.
3. Connect the black ground wire to Port X14, pin 1 or any clean metal surface.
IMAGE 2