
Installation Manual

2
Unpack the contents of the package and gather the required tools listed above so you can be sure you
have everything you need before you begin. In the package you should have the bezel with camera,
chassis harness, and a ziplock bag containing 2 snap busings, 2 red tap splices, 1 U-terminal, lock plug,
and a handful of zip ties.
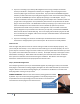
1. Remove any plastic interior components to allow access to the necessary wires of your Lockpick
or video interface device. This may include the side panel of the center console if applicable.
You will need to remove your factory navigation unit if you plan to connect this camera directly
to the VSS harness or if you are installing a lockpick as part of this kit.
2. Remove your old tailgate bezel - Use the 13mm socket wrench to remove the bottom bolt of the
tailgate latch. Pull the tailgate handle up out of the way with one hand and firmly grab the
plastic bezel with the other and give it a good tug. Be careful because it has a tendency to bust
a knuckle on the way out.
3. Every truck we’ve ever seen has drain holes in the bottom of the tailgate and most newer trucks
(usually 09‐up) have a hole in the back of the bed as well. If you already have holes in the
tailgate and back of the bed, you do not have to remove the tailgate to run the camera cable,
and can skip to Section 3. If you do not have the existing hole in the bed, remove the tailgate
from the truck as per the factory manual. We will be drilling a hole in the bottom of the tailgate
(OPTIONAL IF YOU USE THE DRAIN HOLE METHOD) and the rear of the bed for wire passage.
Section 2: Drill the access holes (if not already there)
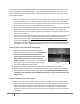
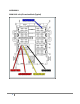
1. Using a ¼” drill bit, drill a hole in the center of the
pickup box end as shown in IMAGE 1. It is important to
center it so that the hole can be expanded to 1”
without going through the floor of the bed, but also
high enough so you can’t see the wires when the
tailgate is closed. Once you get the ¼” hole drilled, you
can use your 1” bit to make it large enough to install
one of the included plastic snap bushing.
2. Making sure that the holes will line up, do the same to the bottom of your tailgate.
3. Install the plastic snap bushings. These bushings provide an inside diameter large enough for
the loomed camera harness to slide through easily. Tip: install a slight amount of RTV to the
exposed metal on both holes before installing the grommets to avoid rusting and help secure
the grommets.
Section 3: Connect the power to the camera
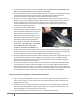
1. Using a “fish” tool, drop the camera cable out the center tailgate drain hole (or freshly drilled
hole) and through the existing (or freshly drilled hole) in the bed. The split loom will protect the
camera cable from sharp metal or other obstructions. You should leave enough slack so the
cable can pull itself through the snap bushings easily when opening and closing the tailgate.
Secure the connector in an easily accessible location so you can access it if you want to remove
the tailgate.
IMAGE 1