
Product Manual


Installing your RV Wi-Fi+
In most cases, your manufacturer will install your RV Wi-
Fi for you. But if you are looking at installing yourself,
please follow the steps below.
There are two methods available:
• With an external antenna fitted to the outside of the RV.
• No external antenna.
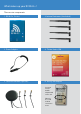
Set up for use with external antenna
1
Choose a position for RV WI-FI+ Router adjacent to a single
12v power point, remembering to leave access for the SIM
insertion;
2
Pre wire external antenna and mount on roof using
bracket provided;
3
Screw into place on router: 4G/LTE antenna cable into ‘4G/
External’ point:
4
Screw into place on router: 3G antenna cable into ‘3G/
External’ point;
5
Screw into place on router: Wi-Fi antenna cable into
‘Wi-Fi/External’ point;
6
Attach single antenna to router into ‘Wi-Fi’ point - the
remaining black antenna are now spares;
7
Remove the middle Noosey Sim adapter from the pack.
Insert an activated and credit loaded Nano SIM into the
adapter and place in the SIM card slot. Failure to use
this adapter will result in connection issues.
8
Plug the power adaper into the power jack of the RV
Wi-Fi+ Router;
9
Place the power cord into the 12v power point and turn
on. Sim must be inserted prior to turning on or a reboot
will be required;
10
Ensure the ‘Power’ light is on.
Installing your RV Wi-Fi+ using the
external antenna