
Installation Guide

R H
•••••••••••••••••••••••••••••••••••••••••
INSTALLATION INSTRUCTIONS
INSTALLING GUIDE
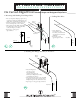
3. Door Guide Part 1
4. Door Guide Part 2
• Use your level to plumb* your Door.
• With the Door in the closed
position, place the Door Guide half
way into the Door mortise (the
groove that runs along the bottom
of a wood Door).
• Double check that your Door is
plumb.*
• Hold the Door Guide firmly in
position. Using a drill with a Phillips
bit, install a 1” Grabber Screw to
secure your Door Guide to the floor.
_____________________
*Plumb - perfectly vertical.
• Slide the Door into the
open position exposing
the other edge of the
Door Guide.
• Using a drill with a Phillips
bit, install a second 1”
Grabber Screw.
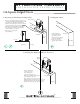
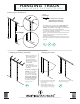
2. Installing Your Door
• Lift your Door up to your
Track at a slight angle.
• Carefully rest both Wheel
grooves onto the top of the
track.
• Guide the Door to the
resting position.
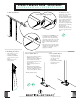
• e hardware for the middle holes will
be installed in this order: Adjustable
Spacer, Flat Track, 1” Washer, and Lag
Screw. Using a ratchet with a 9/16” socket,
tighten the Lag Screw most of the way.
• Repeat on all remaining middle Track
holes.
• After all Lag Screws are in, fully tighten
all using your ratchet with socket, being
careful not to over-tighten to avoid
stripping the wall studs.
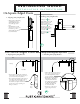
• e outside holes will be
installed with a either a Track
Stop or a Lag Soft Stop.
• In this order: Adjustable Spacer,
Flat Track, [Track or Lag Soft]
Stop, 1” Washer, and Lag Screw.
Using a ratchet with a 9/16”
socket, tighten the Lag Screw
most of the way, enough to hold
the Track in place, but allowing
the Track to move.
• Swing the Track up to be
horizontal, and repeat the same
step on the opposite end of the
Track.
9/16”
Track Stop or Lag Soft Stop
1. Hole Installation