
Installation Guide

R H
•••••••••••••••••••••••••••••••••••••••••
INSTALLATION INSTRUCTIONS
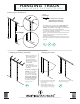
HANGING TRACK
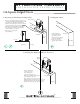
3. Hanging Your Track
• Loosely attach one end of the Track
using a Track Stop or a Lag Stop
(see next page).
• Swing the Track up and loosely
attach the other end, using a Track
Stop or a Lag Stop (see next page).
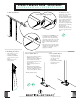
2. Marking and Drilling Track Holes
• Hold up your Track so that
the marked line from the
previous step is visible
through the Track holes.
• Mark an intersecting line in
the center point of each of
the Track holes.
• Set the Track down.
• Using a drill with 1/4” drill
bit, drill out your marked
Track holes.*
*Be sure you are drilling into
wall studs. If your track holes
are not lining up with your
studs, you will need to install
your Track onto a header. The
header needs be attached to
your wall through the studs.
This will provide the stability
your wall needs to hold the
weight of your Door.
1/4”
• e center holes can now be loosely
attached (see next page).
9/16”
}
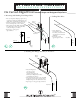
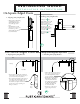
• To determine where to install your Track, add together 1-5/8”
(space above door) plus 1/2” (oor gap) to the height of
your Door. This measurement is how high up on your wall (from
your finished floor up) you should install the Track.
• This is where you will mark a horizontal line on your wall parallel
to the floor, the same length of your Track.
• Check to see if your floor is level. If your floor rises more than 1/2”
along the length of the Track, you risk your Door rubbing or
sticking at this high point.
• If your floor is not level, measure up from the highest point of your
floor to find your Track hole center position to attach the Track to
your wall.
1. Measuring for Track Position
}
Door Height
1/2”
1-5/8”
1-5/8”
Door Height
1/2”
# of inches up from nished
oor where you will pencil a
horizontal line for your track
+
+
=