
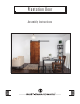
Installation Guide


R H
•••••••••••••••••••••••••••••••••••••••••
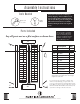
INSTALLATION INSTRUCTIONS
HANGER HOLES
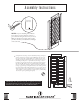
Assembly Instructions
7
/16”
Attach a Door
Pull and your
Door is ready
to hang.
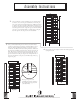
Next you will identify the A1 part or top rail as we call it. is part is the
capping piece on top and goes in similar to the bottom rail. Place a bead
of glue in the groove of the BR part, should be about 5” left to glue. en
put glue in the groove of the A1 part including the alignment hole for the
dowel. is part will be slid into
place from the top working towards
the bottom.
5.
6.
e nal item is to place the BL part into place. Place a bead of glue in either
the groove on that part or along the edge of the bottom and top rails and along
the edge of the T&G. Align
all parts to be ush on the
top and bottom. A little
persuasion with your mallet
might be needed. Insert the
remaining lag bolts, tightening
as tight as you can to ensure
proper adhesion of the glue.
If any glue that has leaked out
anywhere, you can use a water
dampened cloth to remove the
glue before it dries.
Congratulations on the assembly of your
amazing Plantation Door. We are always
here to help. If you have questions, please
call us for assistance.
A1
BL