
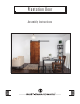
Installation Guide


R H
•••••••••••••••••••••••••••••••••••••••••
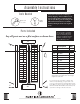
INSTALLATION INSTRUCTIONS
HANGER HOLES
Assembly Instructions
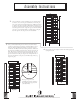
Next you will repeat the setting in of the C1, C2, and C3 parts for the
second panel. See #2.
4.
3.
Next you will identify the BC part. You will notice that the A2 rail (the
part that your already lagged together) has a small hole drill in the groove
of the part. is is for placing the included wood dowel pin into place.
On the ends of the BC you will notice matching holes. Use a small dab of
glue in the holes of the BC part and the A2 part, insert the dowel into the
holes. is part is also universal and can be used on either end. Next run
a bead of glue along the edge of the already inserted T&G. Put a drop of
glue on the dowel on one end, place that part into the alignment hole on
the bottom rail and then set into place over the T&G, using a mallet, tap
this part into place.
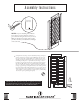
2.
Next you will need to turn the assembled parts onto their sides where
the holes are. Locate one C1 part, sixteen C3 Parts, and one C2 part.
Next, apply a bead of glue running lengthwise up the BR part until you
are about 5” from the top. Quickly, starting from the bottom place in
the C2 parts with the groove facing the top of the door, then stack in all
sixteen C3 parts in succession, tongue into grooves. en take the nal
part (C1) to cap o the T&G. Using a soft mallet gently tap all parts
down into part A2, and each part to the side into Stile BR.
Place a spot of glue into each
predrilled hole and insert dowell into
the predrilled holes. Tap gently with
your rubber mallett.
A1
A2
BR
C1
C2
C3
A2
C1
C2
C3
BC
A2
A2
BC