
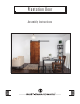
Installation Guide


R H
•••••••••••••••••••••••••••••••••••••••••
INSTALLATION INSTRUCTIONS
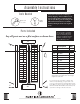
HANGER HOLES
Assembly Instructions
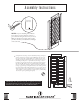
Door bottom
with mortise
NOTE: If you are installing a Floor Mount
Door Guide, your door will have a mortise (a
groove that runs along the bottom of your door).
Make sure this mortise is facing down towards
your oor and that you install the Door Hangers
on the other end.
PLEASE NOTE: ese instructions are specic to a particular door size and
type. Adjustments may be needed on your part for changes in specications
and measurements, as well as door types that are dierent from these.
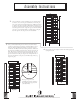
1.
Starting from the bottom up (bottom is identied by having a thin groove
(mortise) along the bottom edge) lay A2 and BR facing each other so the
large groove on the side of the stile (BR) is on the inside, and the 3 holes
are facing out. Using the included glue, apply a bead of glue in the groove
of the BR part starting about 1” up from the bottom and up to about 7”
from the bottom. You will then take the 9” high rail (A2) and place in the
right side stile (BR) where the glue was applied, making sure the thinner
groove is on the bottom of the door. (the two parts need to be lined up in a
90 degree opposite L-shape, being ush on the bottom). Gently tap all into
place with a rubber mallett. Using the included ¼” x 6” lag bolts, take 2 of
them and place in the 2 bottom holes that are pre-drilled, using the 7/16”
socket attached to a ratchet tighten those 2 lags as tight as possible making
sure that the 2 parts are pulled together tightly.
A2
BR
F
E