
Installation Guide


3-1/8”
R H
•••••••••••••••••••••••••••••••••••••••••
INSTALLATION INSTRUCTIONS
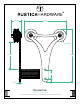
HANGER HOLES
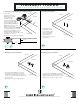
• Lay your Door
facing UP on saw horses.
• Pencil a line 3-1/8” parallel
from the Door edge
(this marks the proper
location for the Hanger edge,
near the bottom of the Hanger).
• Using your Hanger as a guide,
line up the lower portion of your
Hanger (down near the two holes)
with the line you just made.
• Holding your Hanger in place, measure
a 2-3/8
”
gap between the top of the Door
and the bottom of the Wheel (see below).
• Mark the center of both Hanger holes
(these indicate where you should drill to attach
your Hanger to your Door).
• Repeat Step 1 on the opposite edge of the Door.
1. Measuring and Marking Your Hanger Holes
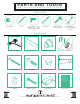
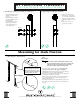
• Using a drill with a 1/8”
bit, drill a pilot hole all
the way through the Door
where you have marked.
(one pilot hole for each
hole in the Hanger).
• Repeat Step 2 on the opposite
edge of the Door.
Door Front
Door Top
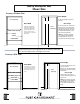
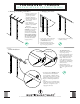
• Lay the Door facing DOWN on the saw horses.
• Using a drill with a 1” spade bit or Forstner bit
(a Forstner bit is preferred), drill a 7/16” deep hole,
centering your 1” spade or Forstner bit directly over
the 1/8” pilot hole.
• Repeat Step 3 on the opposite edge of the Door.
2. Drilling Pilot Holes
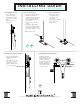
3. Drilling Countersink Holes 4. Drilling Lag Screw Holes
• Lay the Door facing UPWARDS on the saw horses.
• Using a drill with a 3/8” drill bit, drill all the way
through the Door, through your pilot holes (Step 2).
• Repeat Step 4 on the opposite edge of the Door.
1/8”
1”
3/8”
Door Edge
Door Front
Door Top
Door Edge
Door Back
Door Top
Door Front
Door Top
Door Top
Door Edge
Door Edge
2-3/8”